Composting itself is actually pretty easy, and there are several methods and solutions. Whether you own a full-on farm or live in a tiny apartment, there is no reason you can’t compost.
In a world obsessed with “greening,” it’s scary to think about how much food we throw away. A friend of mine started a small-scale composting business last year by collecting food scraps from local restaurants and was able to save 111.3 tons of food waste from ending up in the dump and turned it into glorious, nitrogen-rich compost.
If that’s not the motivation to start composting, I don’t know what is!
Composting, at any level, reduces the amount of organic waste in landfills, contributing to waste reduction and decreasing landfill-related environmental issues.
Here are a few of the composting options available, with pros and cons for each, to help you start on the method that will work best for you!
1. Compost Heap
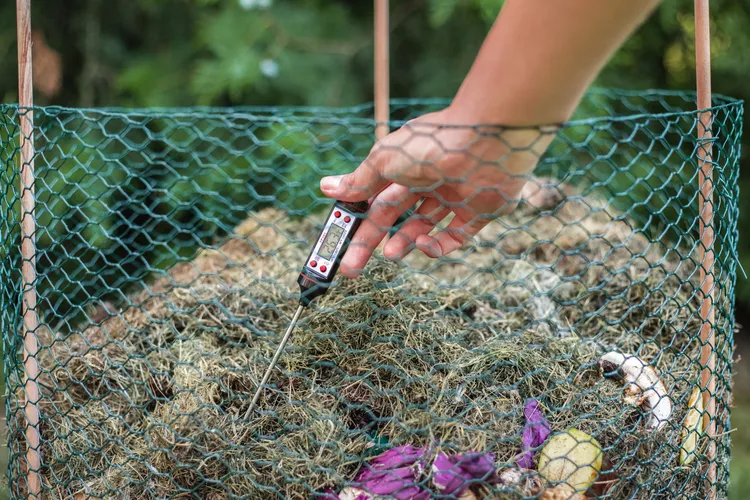
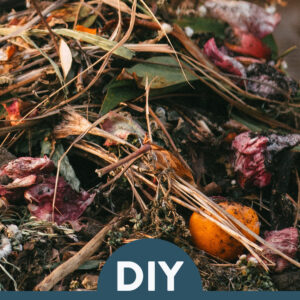
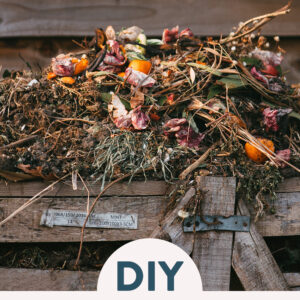
The most straightforward way of composting involves dedicating an area, usually 25 sq. ft or so to being a compost heap, any larger and it makes it pretty difficult to aerate.
You start by adding layers of organic material, usually browns (old leaves, bark, etc) followed by greens (grass cuttings and vegetable scraps) topped by soil.
Continue building the layers until it’s around 4 to 5 ft high, and then turn it every 2-3 days with a fork for the first month, keeping it moist but not wet.
After the first month, taper off until you’re turning once or twice a month. In 3-4 months, you’ll have a soil-ready compost, less if you decide to add a commercially available compost activator.
Pros of Compost Heap Composting
Low Cost
Compost heap composting is inexpensive to set up and maintain. You typically don’t need any special equipment or containers.
Large Capacity
A compost heap can be as large as necessary, suitable for processing significant quantities of organic waste, such as yard trimmings, kitchen scraps, and more.
Simple Setup
Creating a compost heap is easy. All you need is a designated area in your yard, garden, or outdoor space.
Nutrient-Rich Compost
Over time, a well-managed compost heap produces nutrient-rich compost that can improve soil quality, enhance water retention, and promote healthy plant growth.
Natural Decomposition
Compost heap composting relies on the natural process of decomposition by microorganisms and other organisms in the soil. It’s an environmentally friendly way to recycle organic waste.
Minimal Odor (when managed properly)
With proper layering and maintenance, compost heaps usually produce minimal odors. Offensive odors are often a sign of improper composting practices.
Cons of Compost Heap Composting
Longer Processing Time
Compost heaps typically take longer to produce finished compost than other methods, such as hot composting or vermicomposting. It can take several months to a year or more for the compost to mature.
Space Requirement
You need a suitable outdoor space for a compost heap. This may not be practical for individuals with limited yard space or those living in urban environments.
Aesthetics
Some people find compost heaps less visually appealing, as they can appear as a pile of organic waste in the yard or garden.
Not Ideal for All Materials
Compost heaps may not efficiently break down certain materials, such as meat, dairy, and large woody items. These should be excluded from the heap.
Pest Attraction
Without proper management, compost heaps can attract pests like rodents and flies. Proper layering, covering, and turning can help prevent this.
Manual Labor
Compost heap composting requires physical effort to turn and maintain the pile. This may not be suitable for individuals with limited mobility or those who prefer a hands-off approach.
2. Bin Composting
Also known as the “no turn” method. It’s similar to the layered method above, but the idea is you have three bins, you keep adding to the first until it’s full, then move to the next bin. While it’s the most effortless method, it’s also the longest and it can take as long as 3 years to decompose!
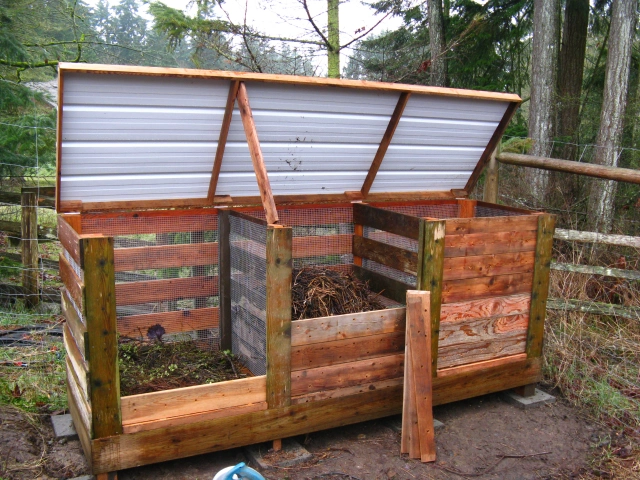
Pros of Bin Composting
Controlled Environment
Bins provide a controlled environment for composting. You can better manage factors like moisture, aeration, and temperature, which can lead to more efficient decomposition.
Neat and Tidy
Compost bins help keep your compost pile contained and organized, making it visually appealing and less likely to attract pests.
Space-Efficient
Compost bins are suitable for smaller spaces, including balconies, patios, and small yards. They can be an excellent option for urban or suburban environments.
Faster Decomposition
In a closed bin, the composting process often proceeds more quickly than in an open heap due to the higher temperatures generated inside the bin.
Year-Round Composting
Bins offer the ability to compost year-round, even in colder climates. Insulated or enclosed bins can maintain warmer temperatures during the winter.
Reduced Odors
Properly managed compost bins tend to produce fewer odors compared to open heaps. They help contain and trap odors inside the bin.
Easy to Turn
Some bin designs have mechanisms or features that make it easier to turn the compost, promoting aeration and decomposition.
Cons of Bin Composting
Cost
Purchasing a compost bin can be more expensive than simply using an open pile or heap, although there are a variety of price points available.
Capacity Limitation
Bins have limited capacity, which may not be sufficient for large quantities of organic waste, especially for those with extensive gardens or a lot of kitchen waste.
Initial Setup
Setting up a compost bin may require assembly, and it can be more time-consuming than simply designating a spot for an open compost pile.
Potential Overheating
In some cases, compost bins can get too hot, which can kill off beneficial microorganisms. This can be a concern in very sunny and hot climates.
Maintenance Requirements
While bins offer more control, they also require regular maintenance, including turning, monitoring moisture levels, and ensuring the right carbon-nitrogen balance.
Not Ideal for All Materials
Just like open compost piles, compost bins may not efficiently break down certain materials like meat, dairy, and large woody items. These should be excluded.
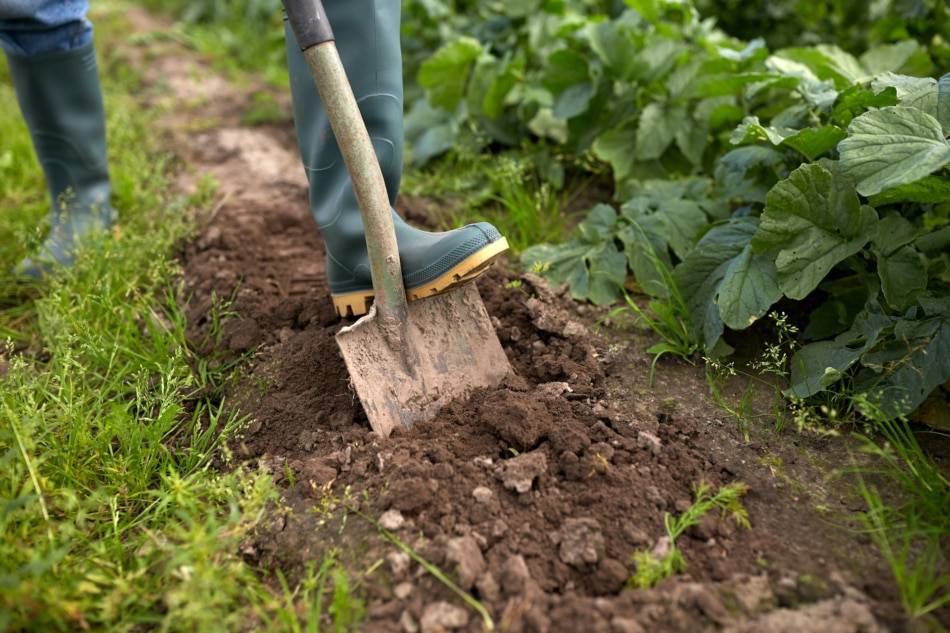
3. Trench Composting
Trench composting, also known as “buried composting” and as discussed in our DIY garden beds post, is a way of composting by digging a trench roughly 3-feet deep and filling it with compostable scraps, covering them with alternate layers of soil.
Once completed, leave them for 2-3 months to break down, and then plant your vegetables directly into the bed.
Pros of Trench Composting
In-Ground Composting
Trench composting is an in-ground method, which means it doesn’t require special bins or containers. It blends well with the natural environment and is particularly suitable for those who prefer a low-profile composting approach.
Improved Soil Structure
The organic matter buried in the trench decomposes and enriches the soil, enhancing its structure, moisture retention, and nutrient content. This can lead to healthier plant growth in the area.
Odor Control
Trench composting tends to produce fewer odors compared to other methods, as the waste is buried underground, helping to contain and reduce smells.
Minimal Maintenance
Once the trench is set up, there is minimal ongoing maintenance compared to turning and monitoring required for some other composting methods.
Less Space Required
Trench composting can be done in small garden spaces or in rows, making it a space-efficient method.
Good for Garden Beds
Trench composting can be integrated directly into garden beds to enrich the soil where plants are growing.
Cons of Trench Composting
Slow Decomposition
Trench composting can be slower than other methods, particularly in the beginning, as it relies on natural decomposition processes in the soil.
Requires Digging
Setting up a trench requires digging, which can be labor-intensive and may not be suitable for individuals with limited mobility or those who prefer a no-dig approach to composting.
Limited Capacity
The size of the trench limits the amount of organic waste you can bury at one time. For large volumes of waste, multiple trenches may be necessary.
Inflexible Location
Once you’ve dug a trench, you’re committed to composting in that location. This may not be ideal if you want to change your composting spot in the future.
Not Suitable for All Materials
Trench composting may not efficiently break down certain materials like meat, dairy, and large woody items. These should be excluded.
Deteriorating Aesthetics
The trench may not be visually appealing as it involves a dug-up area in your garden, which some individuals may not find attractive.
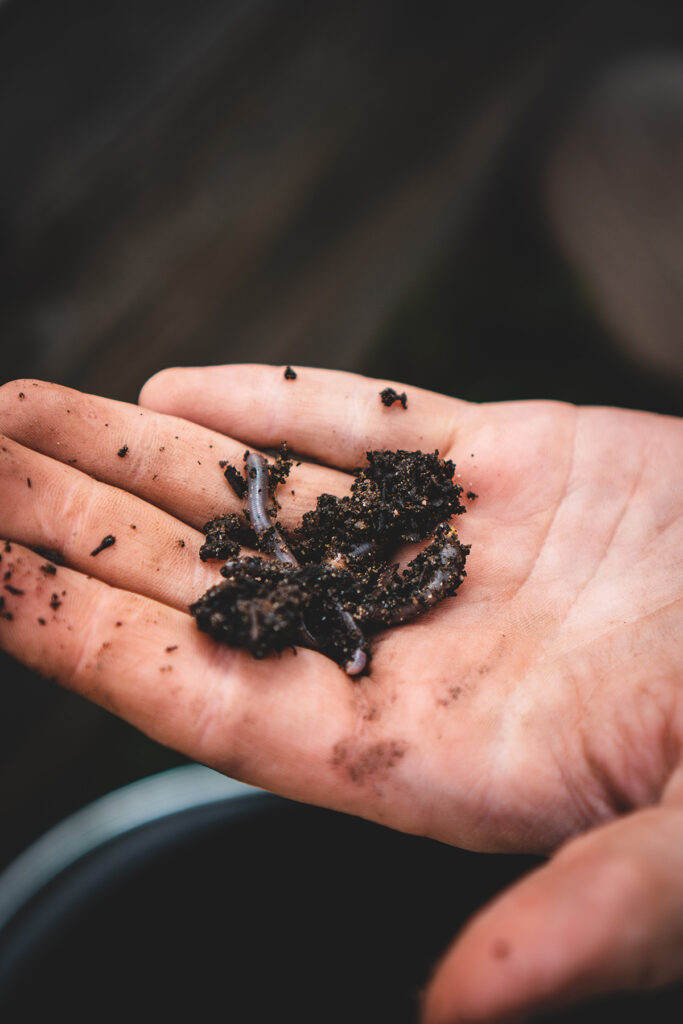
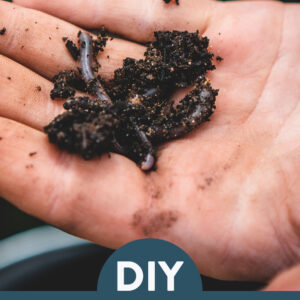
4. Worm Composting
Worm Composting and vermicomposting yield nutrient-rich castings and are probably the most fertile soil methods. The downside is that they’re not as scalable as the above methods, but they’re perfect for small gardens and apartment dwellers.
Red wriggler earthworms break down kitchen scraps into castings and nutrient-rich worm tea, which can be used as organic fertilizer.
The downside is that the worms don’t have a large appetite so you can’t feed them a lot of food at once, you should also avoid all types of citrus, meat, or onions when feeding them.
The plus side is that it’s also one of the least odorous methods of composting, which is why it’s become popular with many apartment dwellers who use it to clear off kitchen scraps.
Pros of Worm Composting
Efficient Decomposition
Worms are highly efficient at quickly breaking down organic matter into nutrient-rich, fine-textured compost.
Small-Scale and Indoor Option
Worm composting can be done on a small scale, making it suitable for apartment dwellers or people with limited outdoor space. It’s often done in bins and can be kept indoors.
Nutrient-Rich Compost
The compost produced through vermicomposting is known as “black gold” for gardeners. It’s rich in essential nutrients and microorganisms, making it an excellent soil conditioner and natural fertilizer.
Low Odor
When managed correctly, worm composting typically produces minimal odors, which can be beneficial for indoor composting.
Enhances Soil Health
Worm compost for your garden or potted plants improves soil structure, water retention, and nutrient availability, promoting healthier plant growth.
Cons of Worm Composting
Maintenance Requirements
Worm composting requires ongoing care and attention. You must monitor the moisture level, temperature, and the health of the worm population.
Initial Setup Costs
Setting up a vermicomposting system can have some initial costs, including buying a bin, bedding materials, and, of course, the worms themselves.
Limited Capacity
Worm bins have a limited capacity, and they may not be suitable for processing large quantities of organic waste. You may need multiple bins for larger households.
Slow Processing of Waste
Vermicomposting may not be as fast as traditional composting methods, especially for large volumes of waste.
Temperature Sensitivity
Worms are sensitive to temperature extremes. They thrive in a range of 55-77°F (13-25°C). In extremely cold or hot conditions, they may not compost effectively.
Potential for Pest Attraction
Fruit flies and other small pests can be attracted to the worm bin if not managed properly. Proper bedding and covering can help prevent this issue.
Not Suitable for All Materials
Worms cannot process all types of organic waste, such as meat, dairy, and large woody materials. These should be excluded from the bin.
5. Quick Composting (aka. Hot Composting or Rapid Composting)
Fast composting, also known as hot composting or rapid composting, is a method of quickly converting organic materials into finished compost.
This process involves providing ideal conditions for microorganisms to break down organic matter at an accelerated rate, resulting in compost in a matter of weeks or a few months, as opposed to traditional composting, which can take several months to a year or more.
Pros of Hot Composting
Quick Results
Hot composting can produce finished compost in a matter of weeks to a few months, significantly faster than many other composting methods.
Pathogen and Weed Seed Reduction
The high temperatures generated in a hot compost pile can kill pathogens and weed seeds, resulting in sterilized and weed-free compost.
High-Quality Compost
The rapid decomposition and high temperatures result in nutrient-rich, well-structured compost that can significantly improve soil fertility and structure.
Optimal Conditions for Microorganisms
The controlled environment, high temperatures, and balanced carbon-nitrogen ratio create ideal conditions for beneficial microorganisms, promoting rapid decomposition.
Flexible Sizing
Hot composting can be done in various sizes, from small bins to larger outdoor piles, making it adaptable to different spaces and waste quantities.
Temperature Monitoring
The heat generated in a hot compost pile allows for temperature monitoring, which can help you ensure that the composting process is proceeding optimally.
Cons of Hot Composting
Labor and Attention-Intensive
Hot composting requires regular turning or aerating the compost pile to maintain high temperatures and even decomposition. This can be labor-intensive.
Higher Initial Effort
Setting up a hot compost pile may require more initial effort in terms of creating a proper mix of green and brown materials, ensuring moisture levels, and monitoring temperatures.
Not Ideal for Small Spaces
Hot composting may not be practical for those with limited space, such as apartment dwellers or individuals with small balconies.
Potential for Odors
If the pile is not managed properly or becomes anaerobic, it can produce foul odors. This is less likely with good management but remains a risk.
Not Suitable for All Materials
Just like other composting methods, hot composting may not efficiently break down certain materials like meat, dairy, and large woody items. These should be excluded.
Sensitivity to Weather
Weather conditions, especially extreme heat or cold, can impact hot composting. In very hot weather, the pile may overheat, while extremely cold conditions may slow decomposition.
Skill and Knowledge Required
Successful hot composting requires knowledge of the carbon-nitrogen ratio, moisture control, and temperature management. It may take some time to develop these skills.
Regardless of the method you choose, remember that successful composting depends on maintaining the right balance of green and brown materials, proper aeration, and moisture levels. With patience and care, you can create nutrient-rich compost that will benefit your garden and reduce waste.
More Outdoor Ideas from Curbly
- Weekend Project: Make These Large-Scale Modern Concrete Planters
- 62 DIY Projects To Transform Your Backyard
- Make a DIY Fire Pit this Weekend With One of These 61 Fire Pit Ideas
- 59 DIY Landscaping Ideas and Tips to Improve Your Outdoor Space
- 15 Tips For Landscaping On A Budget
- 10 Unbelievable Outdoor Kitchens
- 15+ Inspiring Chicken Coop Plans for Your Backyard Flock
- Kitchen Scraps to Garden Gold: A Guide to Bokashi Composting
- Composting Made Easy: A Beginner’s Guide
I was wondering if you can compost in a large garbage can. If so are the steps the same as the step in above article. that you for you time.
If i add my “clay” dirt, will that work? Won’t it eventually decompose to clay again?
I compost I’m just always looking for new ideas
Hi Tamara, yes, you can composts in a bin, but you’ll need to have holes in it so that it can areate, I’d stick to using kitchen scraps, not meat, just vegetable scraps, grass cuttings etc.
Dima, clay is not good because it will eventually get wet again and then compact.
Do you know how to prevent raccoons and other critters from getting into and messing up the trenches and dragging food around?
Thanks for the tips,
I am starting a vegetable garden,
And i was very curious on how doing
My own compost.
WORM COMPOSTING. Ive done this for years on my alottment and now at my house garden using 4 large wheelie bins,drainage holes in the bottom plus damp compost and everything that can decompose goes in,after 3 -4 months bin full of lovely compost, I then move top foot of compost plus most of thev worms into an empty bin and start over…
Throw some seaweed in for some great compost, Also helps keep the soil moist.
How about Bokashi composting?? Can take almost everything from your kitchen-can do it inside & it’s quick! I’m using a 5 gallon thermos (2 actually) and they work perfectly. No smell… Great solution..
Grama was old and little. Her composting was a 5 gallon bucket with holes poked in. When it neededd turnng over , she just put the lid on securely and us kids rolled it around on the lawn for a bit.
I bought a “worm Feast” from Western Australia which are 3 plastic tubes ( for want of a better word ) with tight twist lids ( to keep out vermin ) . You bury the tubes in the ground and only the lid is seen. Rotate putting scraps in the “holes” and the worms come and go as they please ( there’s no bottom ) and dispose of the scraps. Works well for me.
Another super quick method is to take your green materials and put them into a black plastic bag tie the top loosely. Put it in the sun. Flip it over the next day. Then again the third. Basically the heat causes rapid putrification, and it will be ready to mix with soil Ina few days.
Most the time I just dig random holes in the garden and bury it.
Great info. Thanks. My questions are: 1. Are the commercially-available composters (rotating drum-like set-ups) effective? and 2. I have a small back yard and have limited soil to add to the composter. How important is this extra soil? Thanks again. Mark H.
Can any of these methods be used in the winter months? I know it’s cold but since it takes a long time anyway can it work?
I want to use thermocole box for vermicomposting. How should I go about ?