Are you looking for a unique and stylish way to stay warm and cozy this winter? Look no further than arm knitting a chunky blanket! This project is an easy and fun way to make a homemade blanket in no time at all.
In this guide, we will show you how to arm knit a blanket from start to finish. We will provide step-by-step instructions on how to crochet a chunky blanket so that you can create a beautiful and unique piece of home decor that you can cherish for years to come.

Table of contents
What Is An Arm Knitted Blanket
Create a cozy and stylish arm knitted chunky blanket by using your own arms as knitting needles.
This technique has become popular due to its simplicity and the time it saves when compared to traditional knitting.
With arm knitting, you can make a beautiful blanket without following complicated stitches or patterns, making it an ideal project for beginners or those who want a quick and satisfying DIY project.
The resulting arm knitted blanket is not only warm and comfortable but also adds an elegant and cozy touch to any space.
You can use it as a throw blanket on a sofa or bed, or even as a stylish wall hanging.
There are endless possibilities when it comes to styling and using an arm knitted blanket in your home decor. Get started today by grabbing some chunky yarn and your arms and create a unique and beautiful arm knitted blanket.
Materials Needed
- 4 skeins of yarn
What is the best yarn for arm knitting a blanket?
When it comes to choosing the best yarn for arm knitting a blanket, there are a few factors to consider. The most important one is the thickness and texture of the yarn. For a chunky and cozy blanket, you’ll want to opt for a thick yarn that is plush.
Look for yarns labeled as “super bulky” or “chunky” for the best results. Like a chunky wool.
These types of yarn will create those large and luxurious loops that give arm knitted blankets their unique and cozy look.
Another factor to consider is the composition of the yarn. Acrylic yarn is a popular choice for arm knitting as it is affordable, easy to work with, and comes in a wide range of colors. It is also machine washable, which makes it convenient for cleaning.
However, if you prefer a more natural option, you can also choose yarns made from wool or a wool blend. These yarns provide extra warmth and have a lovely texture.
Ultimately, the best yarn for arm knitting a blanket is one that suits your personal preference and style. Experiment with different yarns to find the perfect combination of thickness, texture, and color that will result in a beautiful and cozy arm knitted blanket.
Casting On
To start creating your arm knitted blanket, you first need to cast on.
Casting on is the initial step, where you create the foundation first row of stitches (loops) that will become the stitches of your blanket.
It may sound a bit intimidating if you’re new to knitting, but fear not! Arm knitting is a beginner-friendly technique, and casting on is actually quite simple.
To cast on, begin by leaving a long tail of yarn, around 6 to 8 times the width of the blanket you want to make. Hold the tail of the yarn with your non-dominant hand and make a slipknot.
Insert your non-dominant hand through the loop, pulling it snugly onto your arm.
Next, using your dominant hand, grab the working yarn (the end connected to the yarn ball) and bring it through the slipknot.
Place the new loop on your non-dominant arm, making sure it’s snug but not too tight. Repeat this process until you have cast on the desired number of stitches.
Casting on is the foundation of your arm knitted blanket, so take your time and make sure your loops are even and not too tight. Once you have completed the casting on process, you’re ready to move on to the next step – the arm knitting technique!
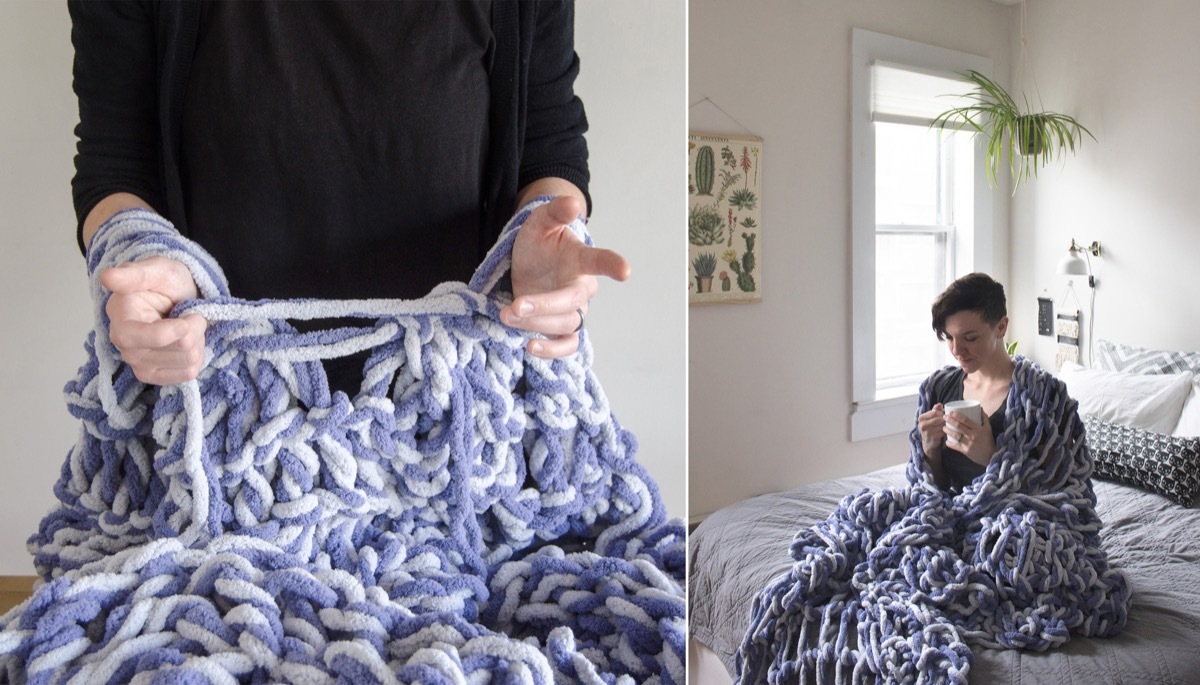
Arm Knitting Technique
Now that you’ve got your casting on done, it’s time to move on to the exciting part – the arm knitting technique!
This is where you’ll use your arms to create those cozy loops of yarn that will transform into a beautiful blanket.
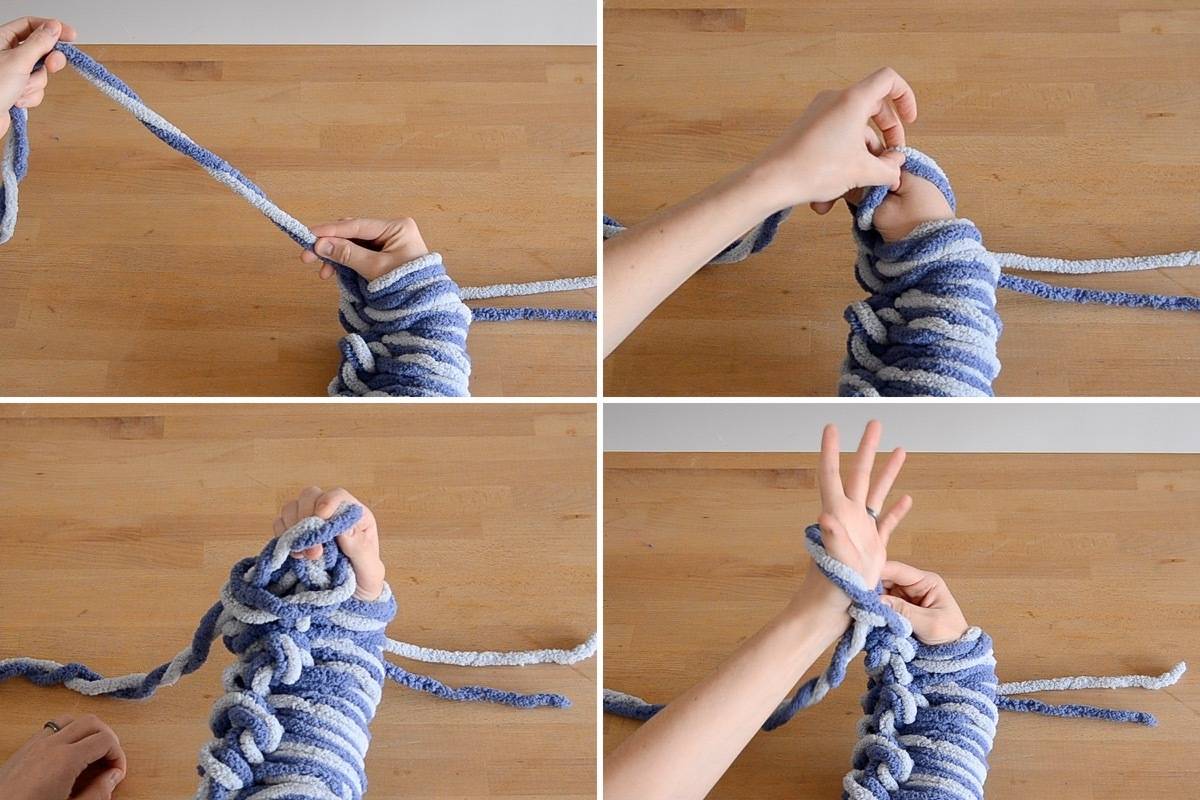
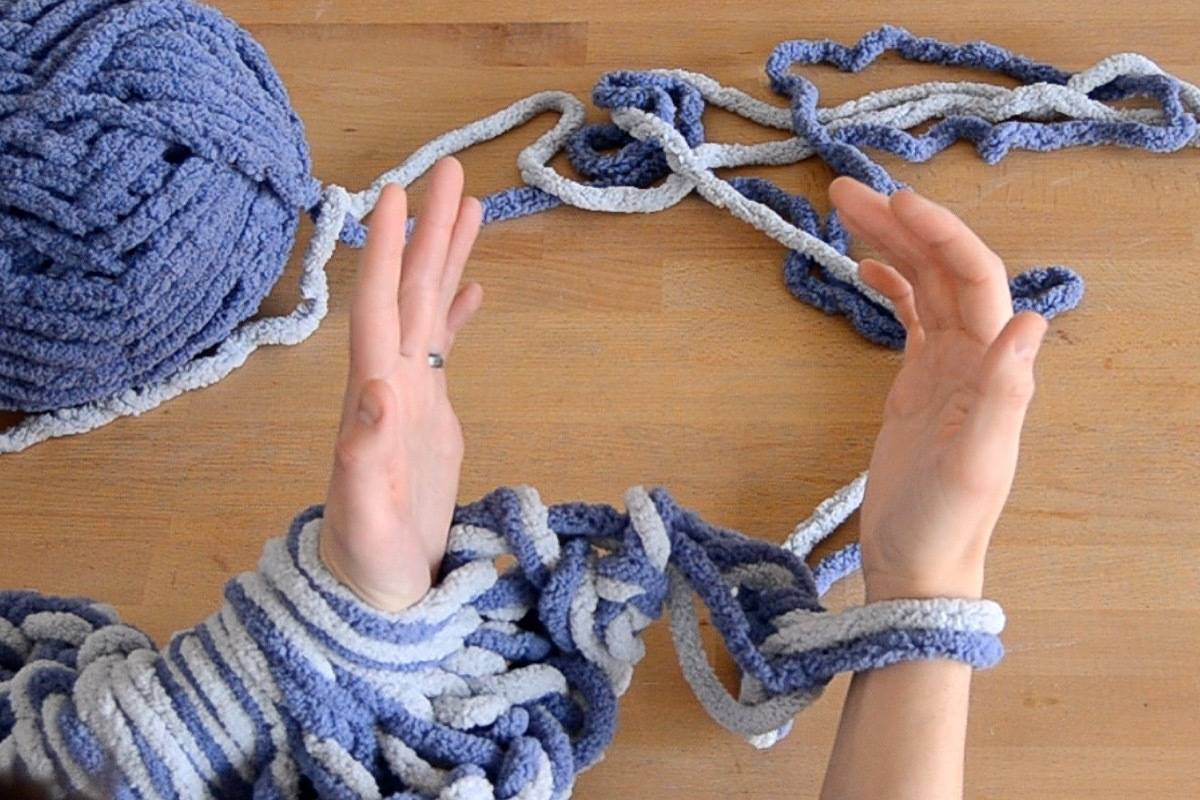
To start, slide one arm through the first loop of the first stitch on your other arm. Now you have two loops on one arm. Take the working yarn (the end connected to the yarn ball) and bring it through the loop, creating a new second loop. Slide this new loop onto your arm, and now you have two loops on that arm. Repeat this process for each stitch on your arm until you’ve worked through all of them.
As you go, be sure to pull the yarn snugly, but not too tight, to create even loops. This will give your blanket that chunky and cozy look. Keep going until you’ve reached the desired length for your blanket.
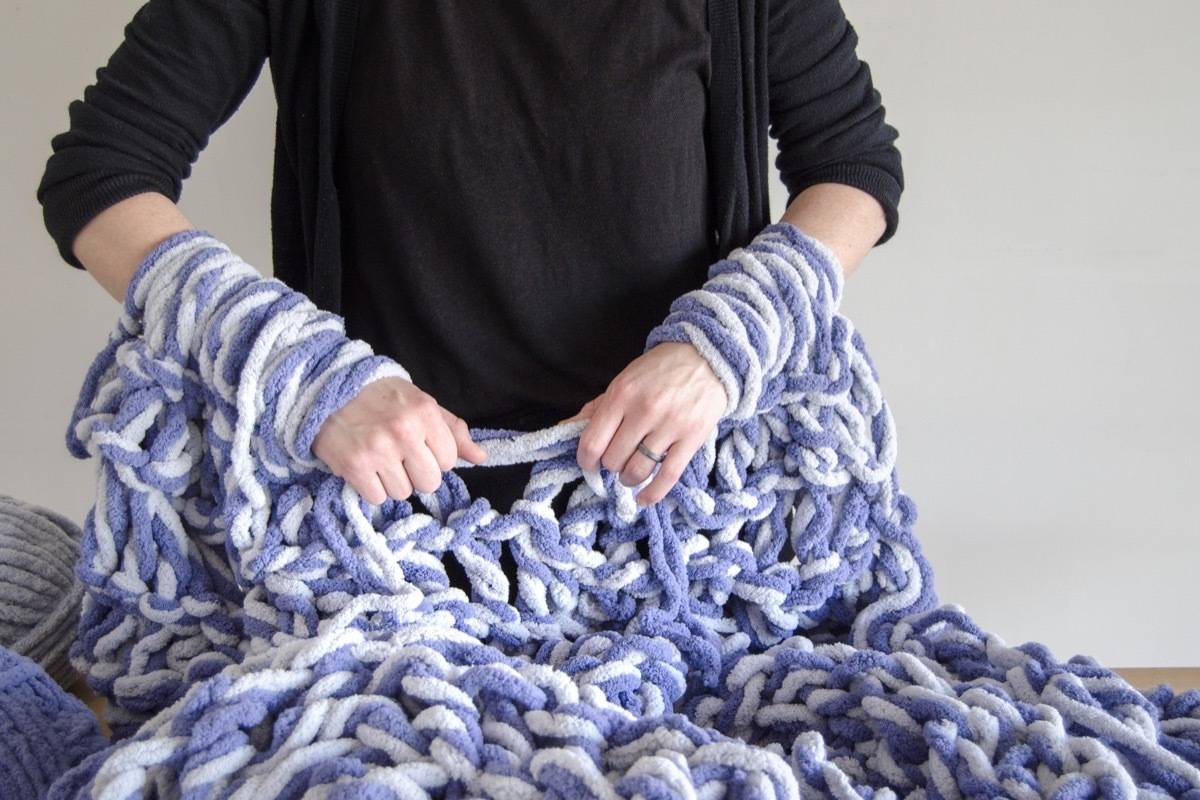
Once you’ve completed all your rows, it’s time to bind off and add those finishing touches to your arm knitted blanket.
Binding Off and Finishing Touches
Once you’ve completed all the rows of your arm knitted blanket, it’s time to move on to the final step – binding off and adding those finishing touches. This is where you’ll secure your stitches and give your blanket a polished look.
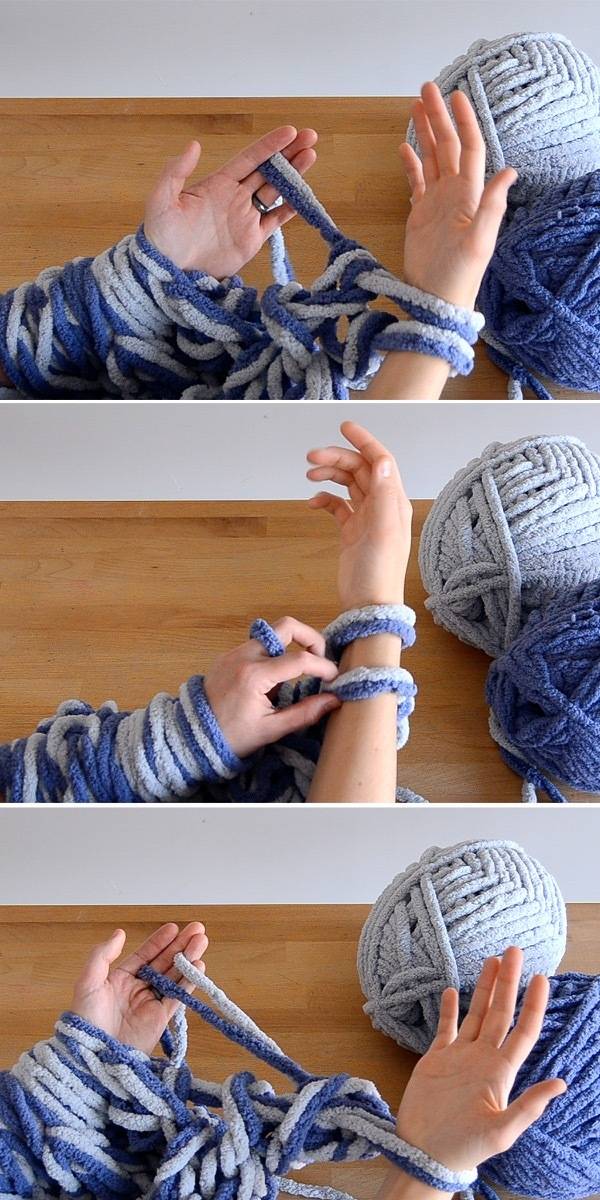
To bind off, start by knitting two stitches onto one arm. Then, lift the first stitch over the second stitch and off your arm. Continue this process, knitting one stitch onto the other arm, and then lifting the first stitch over the second stitch.
Repeat until you have only one stitch left on your arm. Cut the yarn, leaving a long tail, and thread it through the final loop, pulling tight to secure it.
Now that your stitches are bound off, it’s time to add those finishing touches. You can trim any excess yarn tails and weave them into the stitches to hide them.
This will give your blanket a clean and seamless look.
Additionally, you can fluff up your blanket by gently pulling and adjusting the loops to make it look even and cozy.
Step-By-Step Instructions
How To Arm Knit a Blanket

Materials
- Four skeins of chunky yarn
Instructions
- Prepare your yarn. Pull out 20 feet of both strands of yarn. The amount of slack yarn you give yourself at the beginning is dependent on the size of the blanket you want to make, and the weight of your yarn. For two strands of this chunky yarn at 34 stitches in width, I used 20 feet of slack yarn.
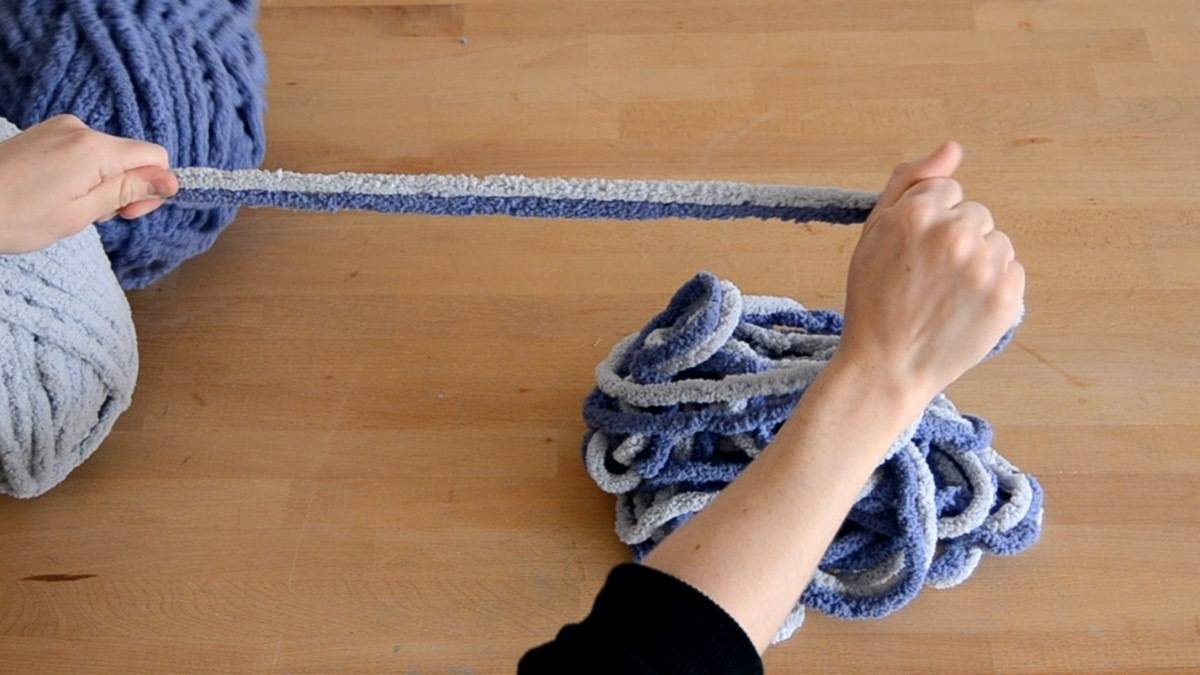
- Tie a slip knot. Tie a slip knot at the 20-foot mark. If you are unfamiliar with the slip knot, don’t worry – it’s really easy. I recommend watching this short 50-second video to learn how. From here on out, I’ll refer to the extra 20 feet of yarn as the “slack yarn,” and the balls of yarn as the “working yarn.”
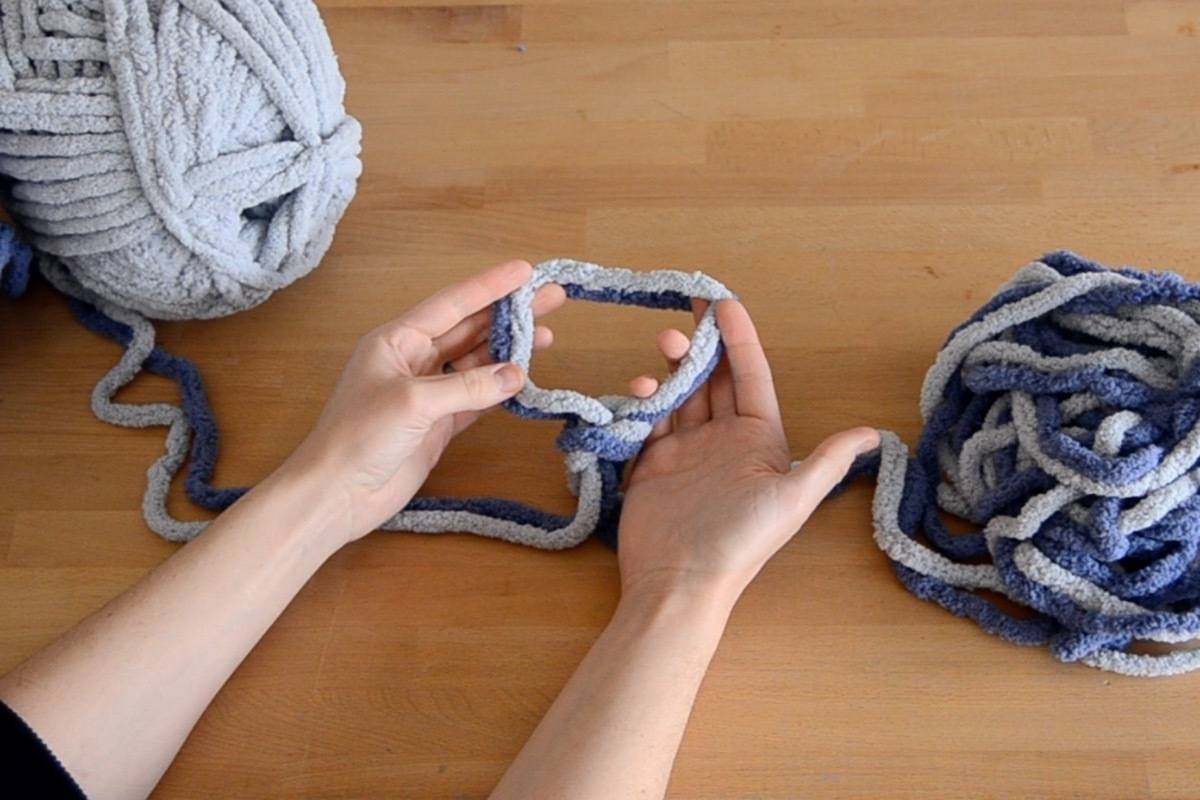
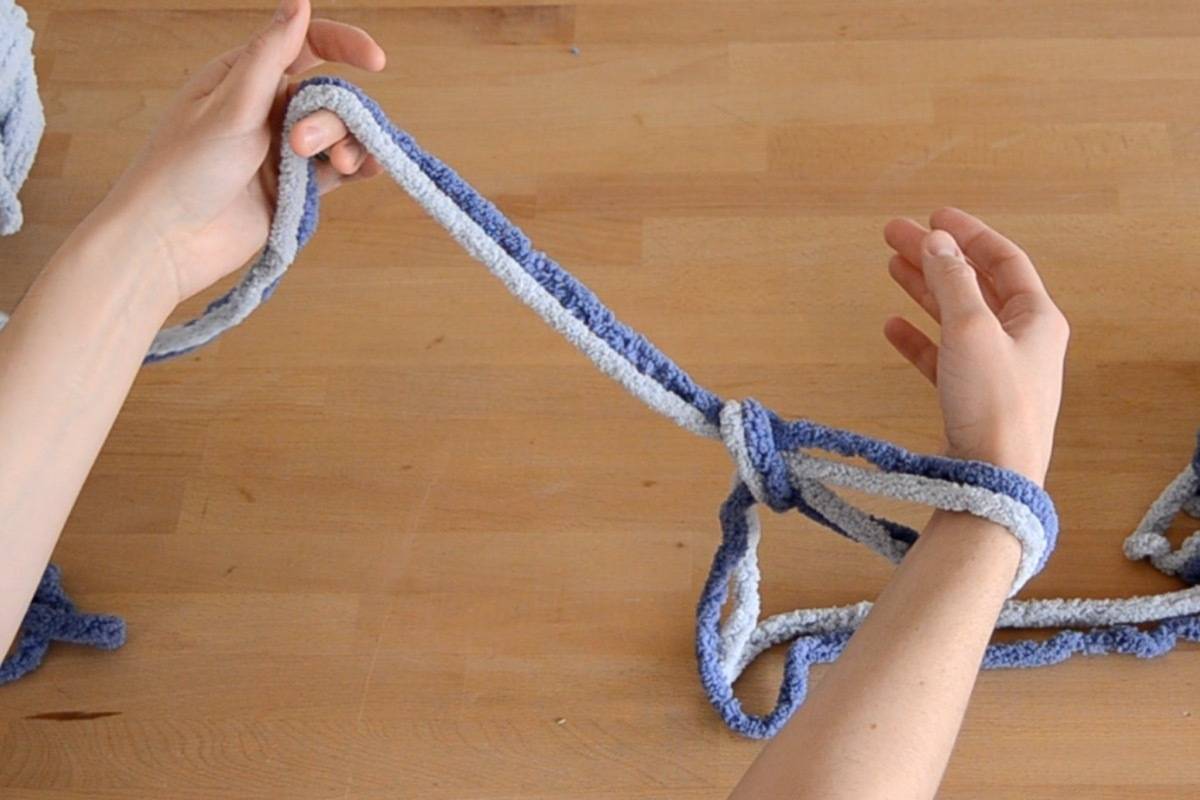
- Feed your right arm through the slip knot. Feed your right arm through the slip knot. You want it to be tight, but not too tight since the slip knot will have to be large enough to fit around your elbow and upper arm.
- Prepare for casting on. Now set up your left hand to cast on. Loop the working yarn around the left thumb, grab the tail of the working yarn, and hold with the ring and pinky fingers of the left hand. Grab the slack yarn, and pinch it between your pointer and middle finger on your left hand.
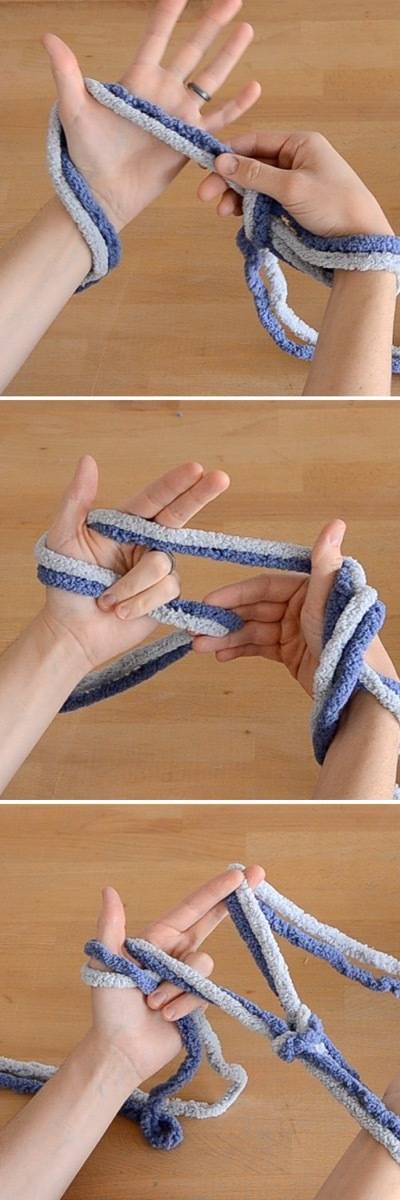
- Casting on. Now to cast on. Work right hand under loop beneath left thumb.
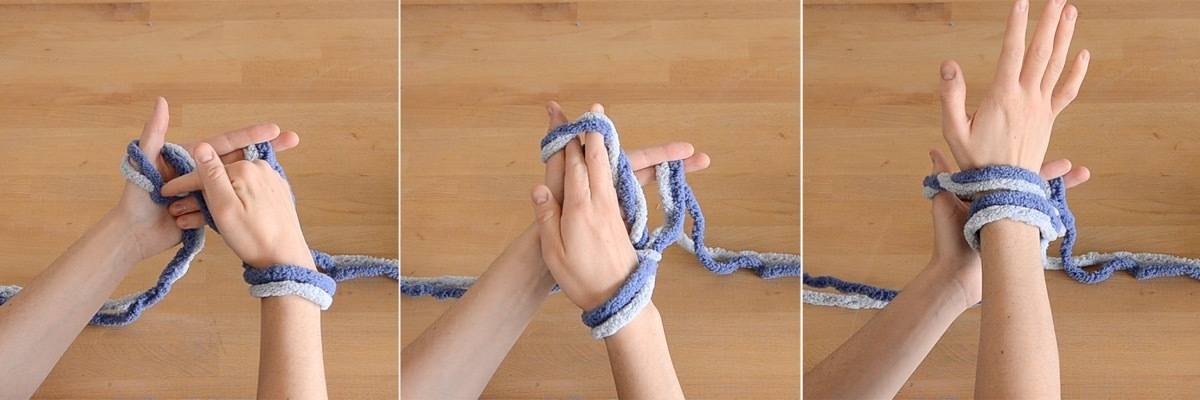 Work right hand under yarn being pinched by left pointer and middle finger.
 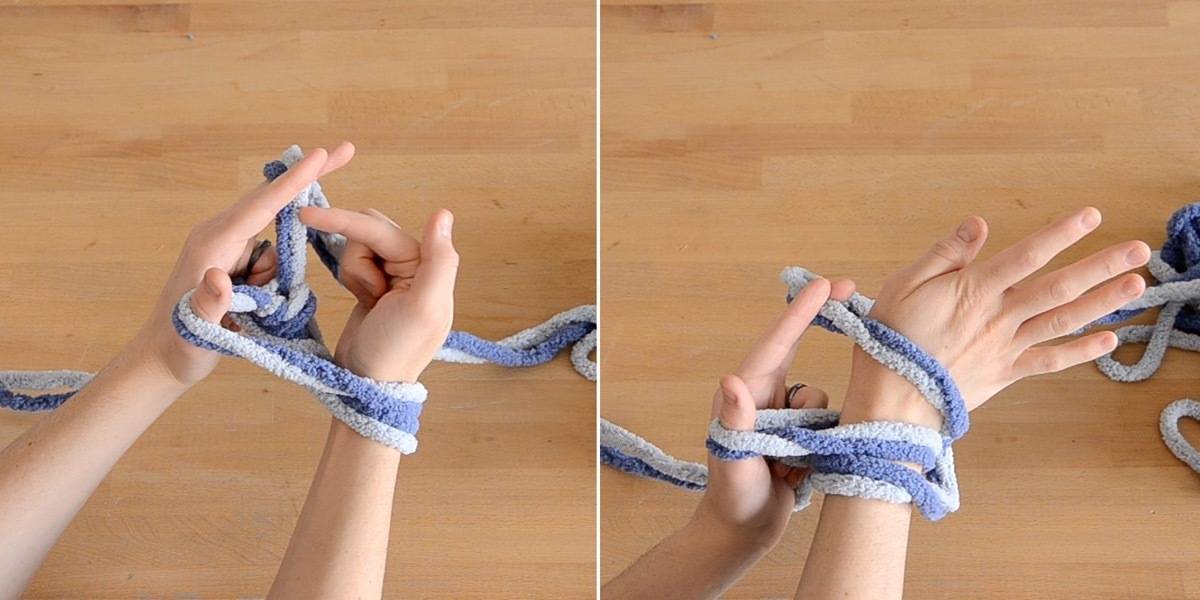 Rotate your right arm towards yourself. Feed your right hand down through the loop on your left thumb. Tighten the working yarn, but not too much! Now you’ve cast on your first stitch!
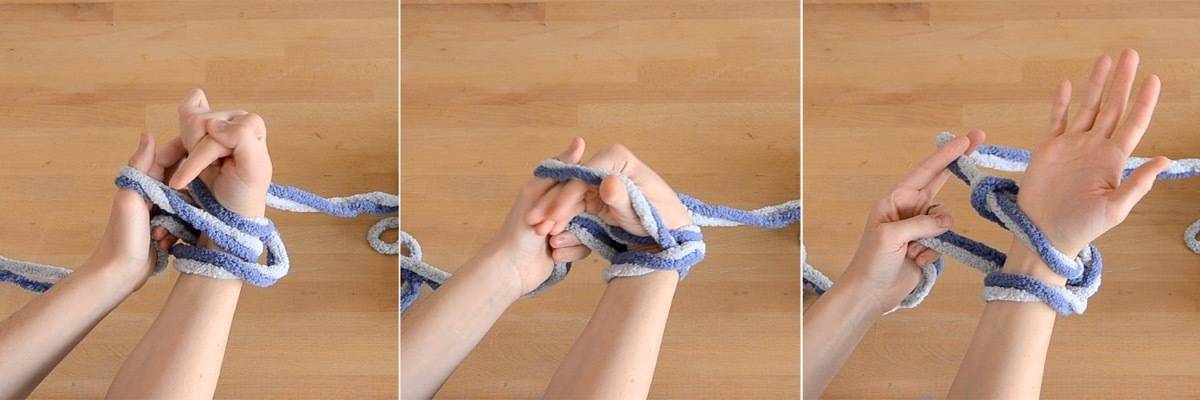
- Cast on 34 stitches. Cast on 34 stitches. Move the yarn up your arm as you work, making sure your stitches aren’t too tight or too loose.
- Make your first stitch. Grab the working yarn in your right hand. With your left hand, pull the first loop on your right arm over your right hand. Turn the loop in your right hand towards yourself, and feed your left hand through. You’ve just completed the first stitch of your arm knit blanket!
- Continue stitches. Make 34 stitches until you’ve used every loop on your right arm.
- Repeat. To move on to the next row, repeat steps 7-8, using opposite hands. I.e., grab the working yarn in your left hand, and complete the action with your right hand.
- Continue knitting. Continue steps 7-9 until you’ve completed a total of 34 rows. The whole process should take about an hour.
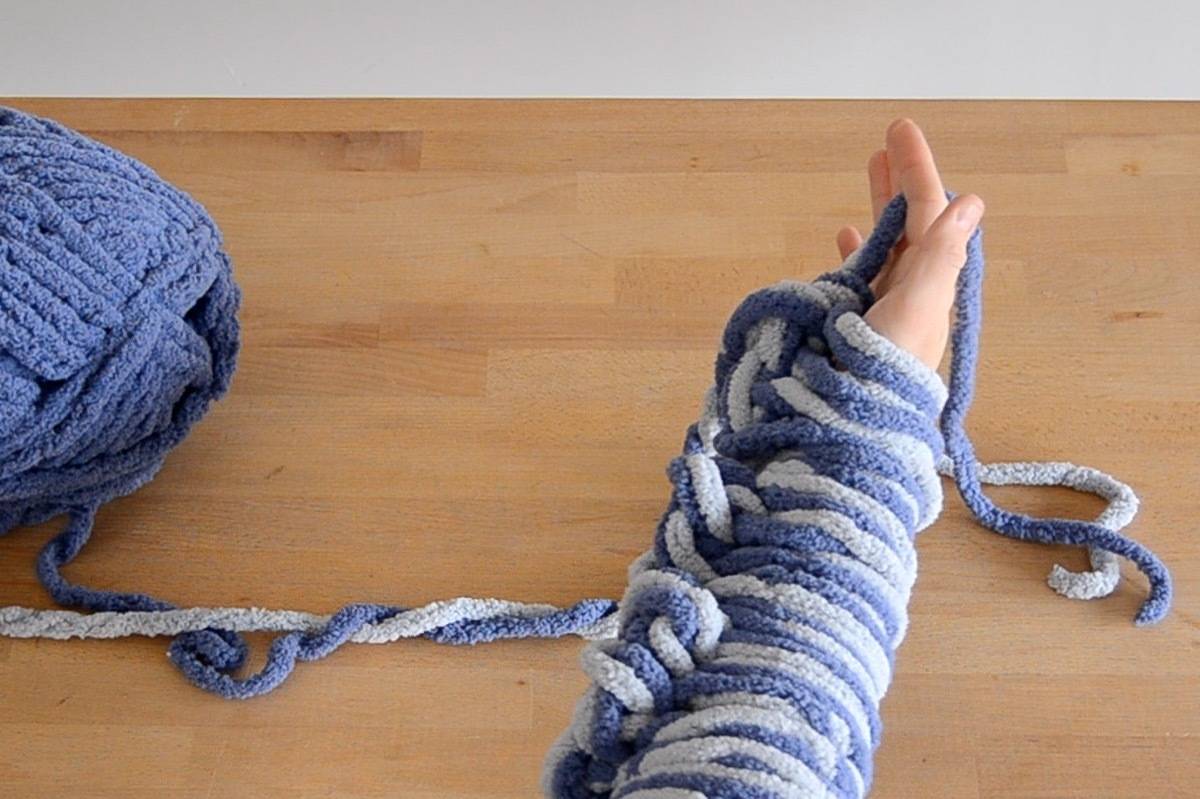
- Casting off. When you’re ready to cast off, start with two normal stitches. Pull the first stitch on your right arm over your right hand. Do a normal stitch, and pull the first loop over your right hand again. Repeat for the entire row.
 When you get to the end, trim your yarn, leaving a few extra inches. Pull the last loop all the way through, which will create a knot at the end.
- Enjoy your handiwork! Weave in any loose yarns with a crochet hook, or by hand. Cuddle up in your DIY giant knit blanket and admire your handiwork!
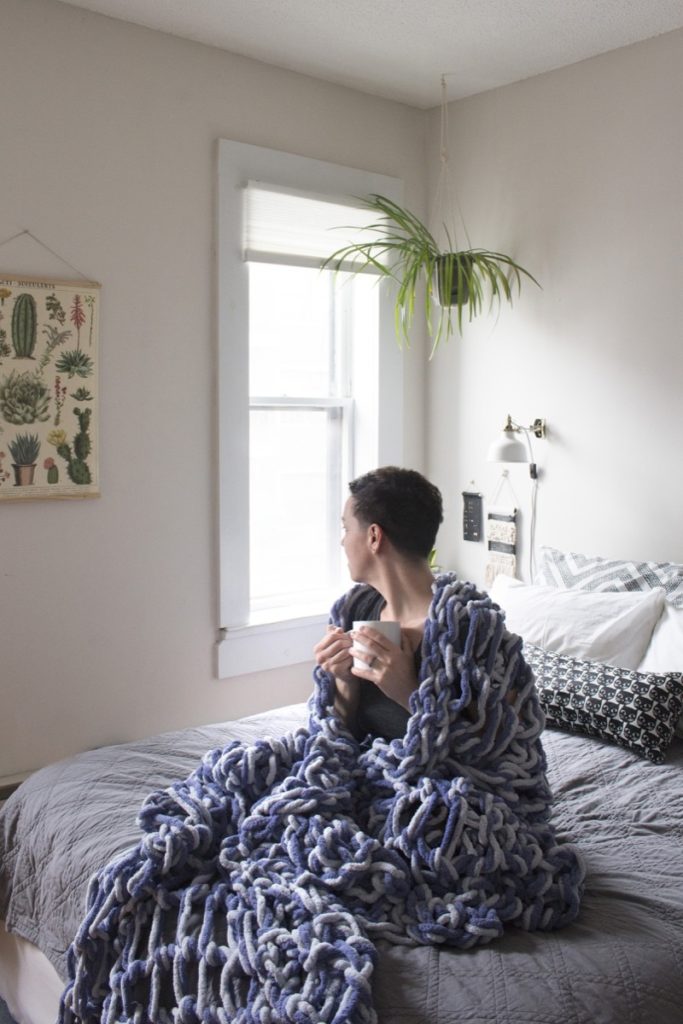
Styling Your Blanket
After completing your arm knitted blanket, it’s time to style and perfect it. The versatility of arm knitted blankets allows you to use them in various ways throughout your home. You can unleash your creativity and experiment with different ways to showcase your beautiful creation.
One of the most popular ways to style an arm knitted blanket is to use it as a throw blanket on your sofa or bed. You can drape it over the arm of your couch or layer it on top of your bedding to add a cozy and inviting touch to your living space. The chunky texture of the blanket will make your home feel warm and welcoming.
If you’re feeling adventurous, you can also use your arm knitted blanket as a stylish wall hanging. Find a spot in your home that needs a little something extra and hang your blanket on the wall using decorative hooks or a rod. This unique and eye-catching display will impress your guests and become a focal point in any room.
For chilly winter nights, consider turning your arm knitted blanket into a poncho or wrap. Simply fold the blanket in half and cut a small slit in the center for your head to fit through. This cozy and fashionable accessory will not only keep you warm but also make a fashion statement.
If you’re in need of a quick and easy home decor update, use your arm knitted blanket as a table runner. Place it down the center of your dining table or coffee table to instantly add texture and visual interest. This simple trick can transform the look of your entire space.
Remember, styling your arm knitted blanket is all about creativity and personal preference. Play around with different ideas and see what works best for your home. The possibilities are endless, and the result will be a beautiful and unique piece of decor that you can enjoy for years to come.
How long does it typically take to complete an arm knitted blanket?
Making an arm knitted blanket is a fulfilling and fast DIY project. The time required to finish it depends on various factors, such as the size of the blanket, how quickly you knit, and your experience level.
Typically, a small to medium-sized arm knitted blanket can be completed within a few hours, while a bigger one could take a day or two.
Remember that arm knitting is a calming and pleasurable activity, so take your time and enjoy the process of crafting your warm and comfortable masterpiece.
What is the recommended length and width for an arm knitted blanket?
Deciding on the size of an arm-knitted blanket is entirely up to personal preference and intended use.
A popular option for a snugly throw blanket would be around 40 inches by 60 inches.
However, if you’re looking for a bigger blanket to snuggle up with loved ones, you can go as big as 50 inches by 70 inches or even larger.
The key is to create a blanket that suits your needs and brings you comfort.
How do I wash and care for my arm knitted blanket?
If you’ve invested time and effort into creating an arm-knitted blanket, it’s important to take good care of it to ensure it lasts for years.
When washing and caring for your blanket, keep in mind that due to its chunky nature, it’s best to spot clean or hand wash it in cool water with a mild detergent.
Avoid using bleach or harsh chemicals that could damage the yarn. After washing, gently squeeze out excess water and reshape the blanket while it’s still damp, then lay it flat to dry.
By following these easy care instructions, your arm-knitted blanket will remain cozy and beautiful for a long time.
So, think you’ll try your hand — I mean arm — at making an arm knit blanket? With the holidays right around the corner, it’s a fast, easy, and affordable way to give a handmade gift to show someone you care. Happy arm knitting!
If arm knitting isn’t your style, but you still want to stay warm this fall, check out this tutorial for making a cuddly flannel throw blanket.

Your arm knit blanket is lovely. The yarn looks yummy and soft. What are the finished dimensions? Thank you.
@Tracy Thank you! This blanket is very large, and how loose or tightly you knit will change the shape of it. Mine finished at about 10 feet by 6 feet.