Are you looking for a unique costume for Halloween, a costume party, or any other fun event? Why not make a DIY bird costume? Making DIY cardboard wings and a headdress is easier than you think, and with the help of some simple materials, you can be sure to stand out in the crowd. Your DIY bird costume will be a show stopper!

Reasons To Make Your Own Costume
Are you tired of showing up to costume parties and seeing everyone wearing the same store-bought costumes?
Do you want to stand out and make a statement with your Halloween costume this year?
Well, look no further than making your own DIY bird costume! There are several reasons why making your own costume is a fantastic idea.
Explore your creative side
First and foremost, making your own bird costume allows you to tap into your creativity and unleash your imagination. You have the freedom to design a unique and personalized costume that perfectly captures the bird species you want to emulate.
The possibilities are endless, whether you want to be a majestic peacock, a graceful flamingo, or a mischievous parrot. You can choose the colors, the size of the wings, and the overall look of your costume. With a DIY bird costume, you have complete control over the outcome, and that’s a truly empowering feeling.
It’s cost effective
Another reason to make your own bird costume is the cost-effectiveness.
Store-bought costumes can be quite expensive, especially if you’re looking for something out of the ordinary.
By making your own costume, you can save a significant amount of money. All you need are some basic materials like cardboard, paint, feathers, and glue.
These materials are relatively inexpensive and can be easily found at your local craft store or maybe even around your house.
Plus, you can reuse the materials for future projects, making it a sustainable choice as well.
Exclusivity
Moreover, making your own bird costume allows you to add your personal touch and create a one-of-a-kind piece.
You can incorporate elements that reflect your own style and personality. Maybe you want to add some glitter or sequins to make your costume sparkle.
Or perhaps you want to use recycled materials to give your costume an eco-friendly twist.
The possibilities for customization are endless when you make a DIY bird costume.
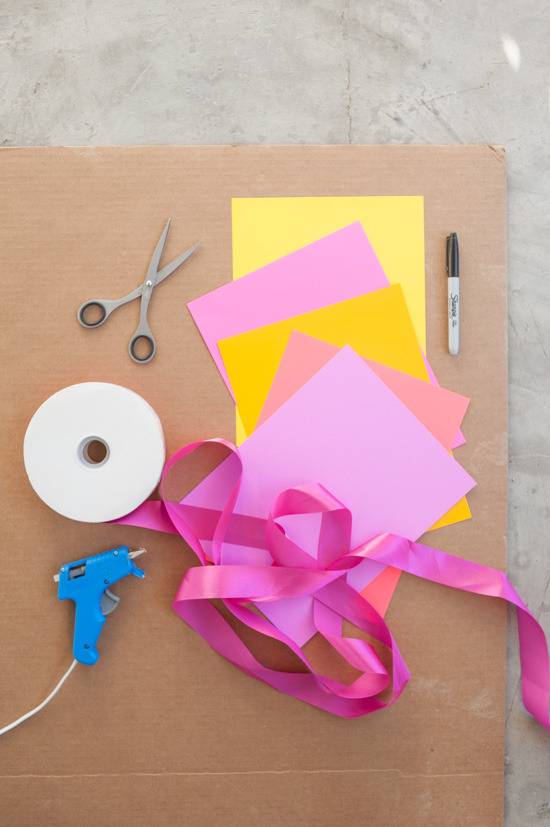
Materials Needed
When it comes to creating your own DIY bird costume, you’ll need a few key materials to bring your vision to life. Here’s a list of what you’ll need to get started:
- Cardboard. This will be the foundation of your wings and headdress. Look for sturdy cardboard that is large enough to cut out your wings’ desired shape and size. You can even repurpose cardboard boxes for this!
- Colorful paper. Choose vibrant and eye-catching colors that reflect the bird species you want to emulate. You can use construction paper, tissue paper, or even patterned scrapbooking paper to add a pop of color to your costume.
- Scissors. Make sure you have a pair of sharp scissors on hand for cutting out the cardboard and paper. A good pair of scissors will make the process much easier and ensure clean edges.
- Hot glue. Hot glue is a must-have for assembling your costume. It provides a strong bond and dries quickly, making it ideal for attaching feathers, paper, and other materials to the cardboard.
- Ribbon. To secure the wings to your body, you’ll need some ribbon. Choose a color matching your costume, or choose a contrasting color to make a statement. The ribbon can also be used to tie your headdress in place.
- Boxcutter. A boxcutter will come in handy for cutting out intricate shapes and details from the cardboard. Make sure to use caution and take your time to avoid any accidents.
- Marker. A marker will be useful for sketching out your design on the cardboard before cutting. It will also help with adding any necessary details or outlines.
- Paint and paintbrush (for mask). If you’re planning on creating a bird mask to complete your costume, you’ll need some paint and a paintbrush. Choose colors that match your overall costume design, and have fun adding details and texture to the mask.
With these materials at your disposal, you’ll be well-equipped to bring your DIY bird costume to life. Let your imagination soar, and get ready to impress everyone with your unique creation!
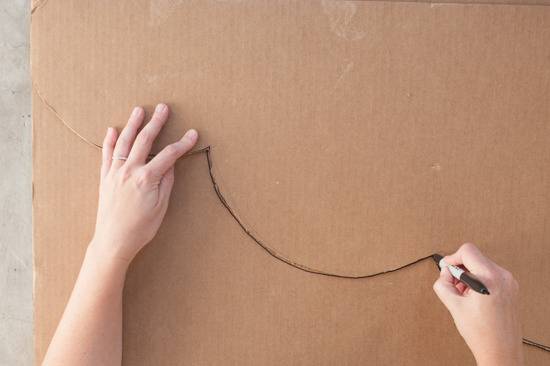
Sketching out the Design
Now that you have gathered all your materials, it’s time to let your creativity take flight and start sketching out the design for your DIY bird costume!
You can opt to bring your vision to life on paper before transferring it onto the cardboard.
If you are sketching on paper first, you may find it easier to use a pencil.
Take inspiration from photos or illustrations of the bird species you want to emulate, and try to capture the unique shapes and proportions of their wings.
Don’t be afraid to experiment and play around with different designs.
Once you are certain of your design, grab your marker and start sketching the outline of your wings and headdress.
Once you have the basic shape outlined, you can start adding more details. Think about the feather patterns, the placement of different colors, and any additional embellishments you want to incorporate.
You can even sketch out the beak or eyes if you’re planning on creating a bird mask.
Remember, this is your chance to make your costume truly one-of-a-kind.
Feel free to let your imagination run wild and add your personal touch to the design. Whether it’s intricate patterns, bold colors, or whimsical accents, make sure your costume reflects your style and personality.
Once you are happy with your sketch, it’s time to move on to the next step of bringing your DIY bird costume to life – cutting out the cardboard shapes.

Cutting Out the Cardboard Shapes
Now that you have your design sketched out, it’s time to bring your DIY bird costume to life by cutting out the cardboard shapes.
This step is where you will see your costume start to take shape and transform from a mere idea into a tangible creation.
To begin, gather your sturdy cardboard and your box cutter. Make sure you have a large, clean workspace where you can comfortably work on cutting out the shapes.
Place your sketch on top of the cardboard and secure it with tape or pins to prevent it from shifting while you work.
Using your box cutter, carefully follow the lines of your sketch and begin cutting out the cardboard shapes. Take your time and make precise cuts, ensuring clean edges and smooth curves.
Remember, safety first! Use caution while handling the box cutter to avoid any accidents.
Once you have cut out all the necessary shapes for your wings and headdress, set aside any remaining scraps of cardboard for later use. You never know when they might come in handy for adding extra details or embellishments to your costume.
Now that the cardboard shapes are cut out, you are one step closer to completing your DIY bird costume. Next, we will move on to assembling the costume and bringing all the pieces together.
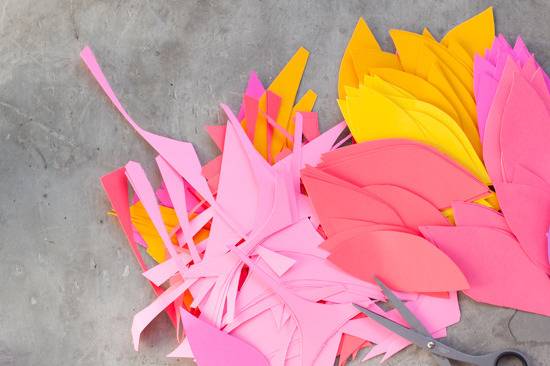
Cutting Out Feathers
Now that you have your cardboard shapes cut out, it’s time to add some feathered flair to your DIY bird costume!
Feathers are crucial in bringing your costume to life and giving it that authentic bird-like appearance. The easiest way to create feathers for your costume is to cut them out of colored construction paper.
You can choose different colors to mimic the natural feathers of the bird species you want to emulate.
Use your sketches as a guide and cut out feather shapes that vary in size and length.
Alternatively, if you want a more realistic look, you can also find feathers at a local craft store and glue them onto the cardboard. Whether you opt for construction paper or real feathers, adding these details will take your costume to the next level and ensure you truly stand out in the crowd. Get ready to ruffle some feathers and impress everyone with your DIY bird costume!
Assembling the Costume
Now that you have all the necessary materials and your cardboard shapes cut out, it’s time to bring your DIY bird costume to life by assembling it. This is where the magic happens, and your costume starts to take shape!
To start, take your cardboard wings and headdress and lay them flat on your work surface. It’s time to bring out the hot glue gun and attach the feathers.
Pro Tip: I personally prefer to wear plastic gloves whenever I use a hot glue gun. This makes it less likely that you accidentally burn your fingers while using the hot glue.
Take each feather and apply a small dab of hot glue to the bottom end. Carefully place the feather onto the cardboard and gently press down to secure it.
Repeat this process, layering the feathers until your wings are covered in a beautiful, feathery pattern.
Next, it’s time to make arm holes for your wings. Take two long pieces of ribbon and measure them to the length you desire.
Then, position them on the underside of your wings, making sure they’re evenly spaced and centered. Use the hot glue gun to secure the ribbons to the cardboard. You could even choose to use a stapler to attached them as added security to the cardboard as well.
These ribbons will act as straps, allowing you to easily slip your arms through and hold the wings up while you wear them.
Once you have finished attaching the feathers and creating the arm holes, let the glue dry completely.
It’s important to ensure that everything is securely in place before moving on to the next steps.
Ways To Personalize The Costume
Now that you have the basic structure of your DIY bird costume, it’s time to take it to the next level by adding your personal touch and making it truly unique.
There are endless ways to personalize your costume and make it stand out from the crowd.
Glitter or Sequins
One option is to add some sparkle and shine by incorporating glitter or sequins. You can glue them onto the cardboard wings or headdress to give your costume a glamorous touch.
Add Design with Paint or Markers
Another idea is to use fabric paint or markers to create intricate patterns or designs on the feathers. This will add a beautiful and eye-catching detail to your costume.
Fabric
You can even experiment with different textures and materials if you’re feeling adventurous. Consider attaching fabric or faux fur to your wings to give them a soft and fluffy look. You can also use ribbons or fabric strips to create a flowing and dynamic effect.
Accessories
Don’t forget about accessories! Adding accessories such as jewelry, beads, or even a small toy bird can enhance the overall look and make your costume more interesting.
Infuse your personality
Lastly, consider incorporating elements that reflect your own personality. Maybe you want to add a touch of your favorite color or include a meaningful symbol or pattern. This is your chance to let your imagination run wild and create a costume that truly represents you.
Remember, the goal is to make your DIY bird costume a reflection of your creativity and individuality. So have fun with it, be bold, and get ready to turn heads at your next event!
Outfit Ideas To Wear With The Mask And Wings
Looking for some outfit ideas to complete your DIY bird costume? We’ve got you covered!
Once you have your wings and headdress ready, it’s time to think about what to wear with them.
One option is to go for a simple monochromatic outfit that complements the colors of your costume.
For example, if you’re dressed as a vibrant peacock, a solid-colored dress or jumpsuit in a shade of blue or green would be a perfect choice. If you want to add a bit more flair, you can also accessorize with statement jewelry, like a necklace or earrings with feathers or bird-themed designs.
Another idea is to wear flowing, bohemian-inspired clothing for a more ethereal look. Think long, flowing dresses or skirts in soft, pastel colors. This will create a whimsical and enchanting vibe that matches the grace and beauty of your bird costume.
Finally, don’t forget about the shoes!
Depending on the event and your personal style, you can opt for simple flats, strappy sandals, or even lace-up boots to complete your bird-inspired ensemble.
Go ahead and experiment with different outfit combinations to find the perfect look that showcases your DIY bird costume in all its glory.
With the right outfit, you’ll be ready to spread your wings and take flight at any event!
Putting on the Finished Product
Now that your DIY bird costume is complete, it’s time to put on the finished product and show off your creativity!
Start by carefully slipping your arms through the ribbon arm holes and securing the wings in place. Adjust the ribbons so that the wings sit comfortably on your back and feel secure.
Then, place the headdress on your head and secure it with some additional ribbon if necessary.
Take a moment to admire your masterpiece in the mirror and revel in the transformation. As you put on the finished product, you’ll feel the excitement build as you become the majestic bird you’ve always admired.
Whether it’s a Halloween party, a costume event, or just a fun day of dress-up, you’re sure to turn heads and capture everyone’s attention.
So, spread your wings, embrace your unique bird persona, and get ready for a truly unforgettable experience in your DIY bird costume.
Have a blast, and let your inner bird soar!
How To Make a DIY Bird Costume
Materials
- cardboard
- colorful paper
- scissors
- hot glue
- ribbon
- boxcutter
- marker
- paint and paint brush (for mask)
Instructions
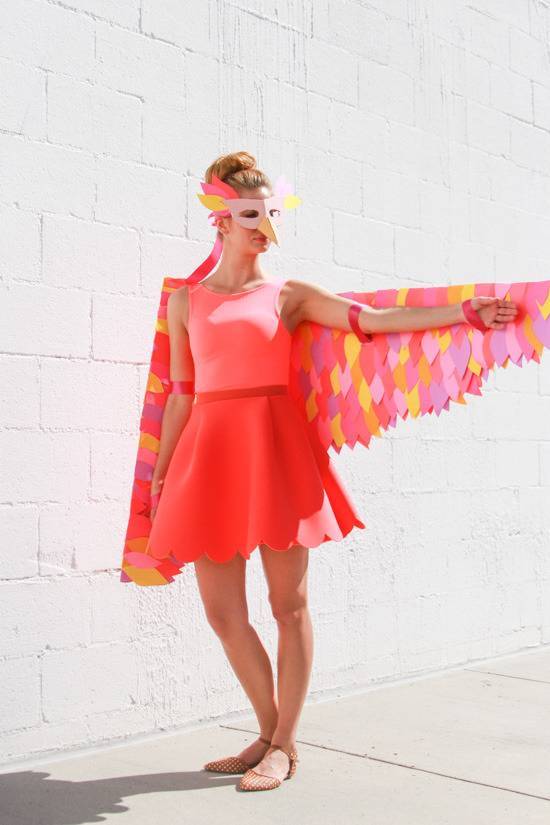
- To create the wings, first draw out a scalloped shape wing onto cardboard. I used the straight edge of the cardboard for the top of the wing and then drew a descending scallop shape for the bottom of the wing. Measurements for the wings will vary based on the height of the person, but my measurements for someone who is 5’6 were as follows: 32 inches wide at the top and 15 inches tall (at its tallest part).
- Next, cut out the wing shape with a boxcutter. Then trace the wing that has been cut out onto cardboard and cut out the second wing.
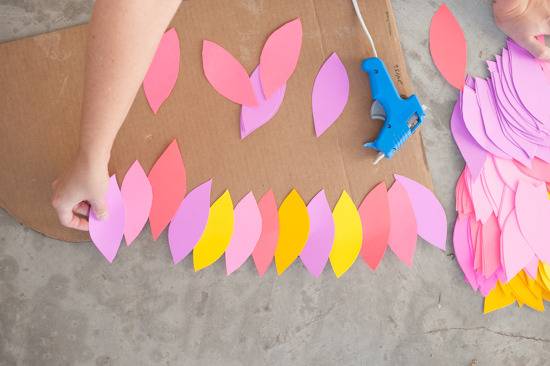
- Next, draw and cut a feather template to use for the wing feathers. I created a basic leaf shape in two sizes to make it look like the feathers were slightly more natural.
- Then, cut out feathers in various colors from paper. You’ll be covering the front and back of each wing, so you’ll need a lot of paper feathers for this part.
- Glue the paper feathers onto the back part of each wing, starting at the bottom of each wing and working your way up. Once you get to the top, fold the feathers over and glue the tops down on the other side.
- Once dry, flip the wings over and repeat this process on the other side. Once you get to the top, cut off the excess paper flaps for this side.
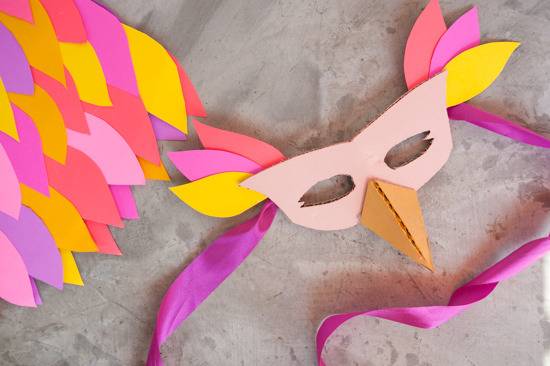
- Add ribbon loops for the arms to go through, but cutting a length of ribbon and glueing to the inside of each wing, as shown. Cover ends with more paper feathers if necessary. I also attached a ribbon strip to the back to connect the feathers to one another. This isn’t required, but it does help to keep the wings from slipping off.
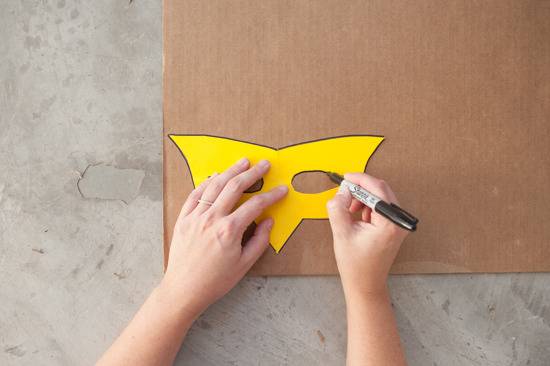
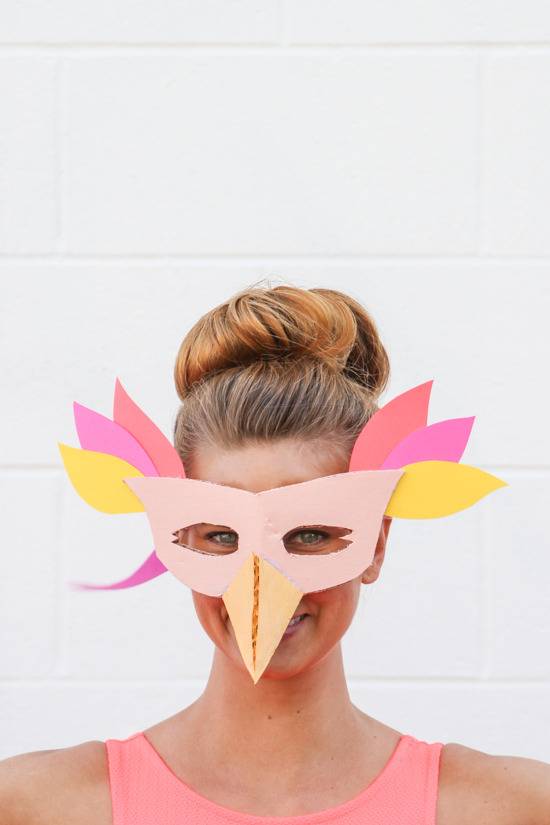
- Set the wings aside. To create a bird mask, draw a template onto paper to work out the proper shape. Then, trace that onto cardboard and cut out. I cut a separate triangle for the beak and scored it down the middle so that it would be more three dimensional.
- Paint the mask and beak. Wait for the paint to dry. Then add a ribbon strip to the back of the mask. And add extra paper feathers if desired.
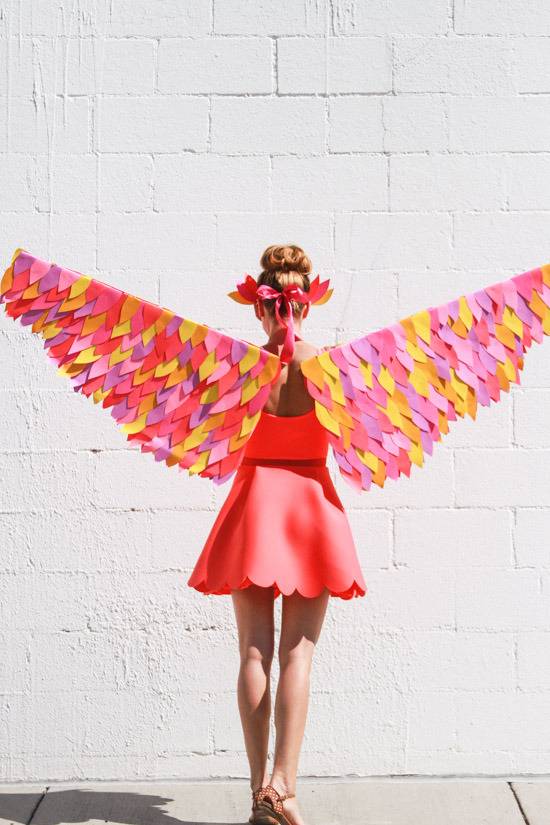
- Add a colorful outfit and you’re all set.
Now that you have made your costume, check out our suggestions for making you halloween playlist!
This is stunning, Brittni!!!
Thanks Alicia. 🙂