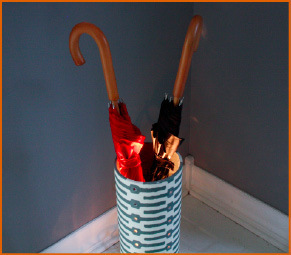
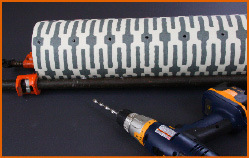
There’s no end to the home furnishings that can be constructed and crafted from sections of PVC piping. Found in the plumbing aisle at the hardware store, this material lends itself to drilling, cutting, and painting, and accepts fabric beautifully. There’s no guesswork here. A two foot section of 6”-diameter PVC pipe is the perfect base for a fabric covered umbrella stand, but why stop there? Let’s light it up!
Note: this project comes from our Make It: Hardware Store Decor ebook, which you can buy for just $9.99 here (it includes 12 similarly awesome tutorials).
Materials:
- A length of PVC pipe, 6” x 24”
- Spray paint for the inside of the pipe
- Spray primer
- Fabric, 3⁄4 yard
- A jar of matte ModPodge
- Clear Plexiglas material, 8”x10” x 1⁄4”
- Two pieces of Masonite, 8”x10” x 1⁄4”
- One tube of clear silicone adhesive
- Galvanized steel corrugated furnace round end cap, 6” diameter X 2 1⁄2”
- LED light rope or battery-operated led lights, 6’ length
Tools:
- Scissors
- Drill and 1⁄4” drill bit
- Utility knife
- Jigsaw
- Metal snips
- #18 fine jigsaw blades
- Three small clamps
- One large set of pipe clamps (or something to stabilize the pipe while drilling holes)
- Plastic container to soak fabric in ModPodge
- Clean rags
- Foam brush
- Fine-grit sandpaper
Step 1
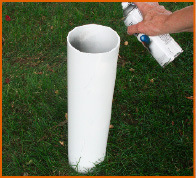 Clean off the PVC pipe with soap and water. Cover any printing on the outside of the pipe with spray paint primer. Spray paint the inside of the pipe with a color that coordinates with the fabric. Let the paint and primer dry.
Step 2
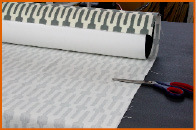
Measure the circumference of the pipe and cut a piece of fabric that will wrap around the pipe with an overlap of 2”. The length of the fabric will be 27”, so there’s a little extra at the top and bottom for adjustments.
Step 3
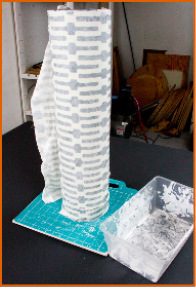 Soak the fabric in a container of ModPodge. Gently squeeze out the excess glue. Wrap the fabric around the pipe, smoothing out any wrinkles and bubbles. Make sure the fabric weave stays straight and doesn’t stretch on the diagonal. Align the design all the way around the pipe.
One cut side of the fabric will adhere to the pipe. Fold the other cut edge over one inch, forming a fold in the fabric. Wrap that folded edge on top of the cut edge that has already been adhered to the pipe. The folded edge covers the cut edge and forms the seam at the very back of the umbrella stand. Let the wrapped fabric dry completely around the pipe.
Step 4
Determine where the holes will be drilled and re-apply a coat of ModPodge to those areas. Let it dry. Stabilize the round pipe by attaching pipe clamps or attaching it to the workbench with C-clamps so it doesn’t roll during the drilling. Use the 1⁄4” or larger drill bit to drill symmetrical holes all around the pipe.
Step 5
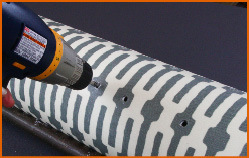
Use the blunt end of a round handle or another tool to push the drilled-through fabric back inside each hole, twisting it a little bit to get it to stay. If the fabric around the hole is frayed or shredded, add some ModPodge keep it in place.
Step 6
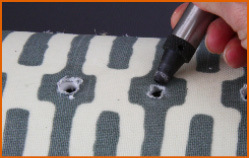
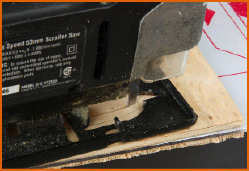
Use a utility knife to cut off the excess fabric at the top and bottom of the pipe. The fabric should cover the edge of the pipe without folding over inside it. Draw a 1” square on the back side of the pipe bottom. Cut the square out with a jigsaw and a #18 blade.

Step 7
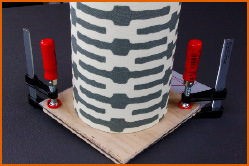
Trace one end of the pipe onto one piece of the Masonite. Measure in 3⁄8” from that line to make a pattern. Sandwich the Plexiglas between two pieces of Masonite and attach three small clamps. Cut out the circle with the jigsaw. The Masonite stabilizes the Plexiglas so it won’t crack. File down the edges of the circle with a sander or sandpaper so that it will just fit inside the bottom of the pipe.
Step 8
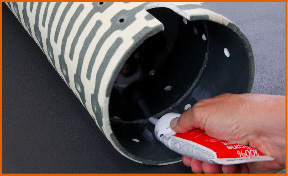
To ensure the LED lights will remain dry, the Plexiglas will be attached inside the bottom of the pipe with silicone adhesive. Measure and mark 3” from the bottom of the pipe. Run a small bead of silicone adhesive all the way around the inside at that 3” mark. Gently place the Plexiglas up against the silicone and let it dry. Run another bead of silicone up against the bottom of the Plexiglas and let that dry.
Caution: Follow all warnings on the string lights’ packaging. Do not leave the lights on for extended periods.
Step 9
Cut two lines into the the corrugated edge of the furnace cap, stopping 1⁄2” before the bottom lip. Use the needle nose pliers to roll the cut end over towards the outside. This opening will align with the groove in the pipe bottom to accommodate the electrical cord.

Step 10
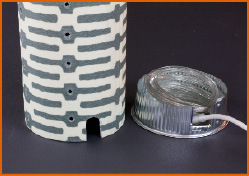
Place the coiled LED light rope into the steel end-cap and gently bend the corrugated rim so it will fit inside the bottom of the pipe. It doesn’t have to fit all the way down into the pipe.
Gently tap the cap into the end of the pipe as far as it will go.
Greet your guests on a rainy evening and show them where they can put their umbrellas.