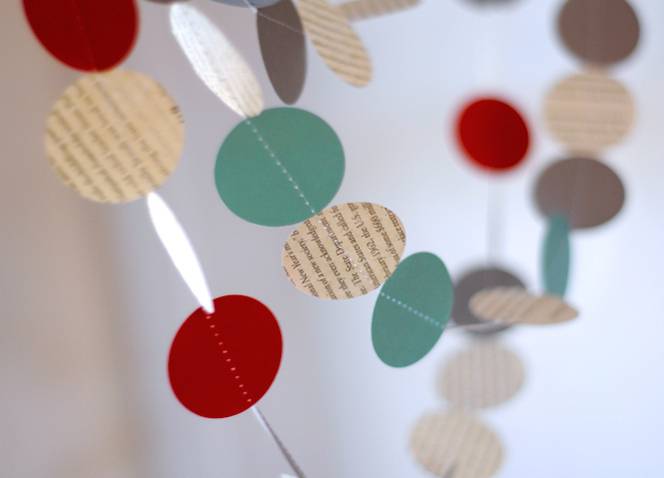
When I first saw David Stark’s holiday line for West Elm this year, it immediately put me into the holiday spirit. It’s got a papercraft-y look that jives with my absolute love of Christmas and all things handmade. I even made the trip across town to the awful outdoor yuppie shopping center to check it out in person, resulting in my first visit to an actual West Elm retail store. (It’s actually pretty cool; glad to know about it). I was especially jazzed by the circle garlands, which is made to look like it was created by cutting rounds from old books and stringing them up. But at $18.00 for a ten foot length, and a lack of color that just won’t work in my white-walled home, I decided that instead of purchasing a modern paper garland that was made to look like it was created from recycled books and handsewn, I should just hand sew a modern paper garland made from actual recycled books.
Total cost was under $5.00 for at least sixty feet of garland, and I whipped everything up in under an hour. I also created a series of mod paper ornaments to match; have a peek at that how-to here.
Materials and tools
- Secondhand books with relatively thick pages (I went to the half-priced bookstore and raided the $1.00 section)
- Cardstock in colors of your choice
- Circle punch, 1-2″ diameter
- Sewing machine, or needle and thread
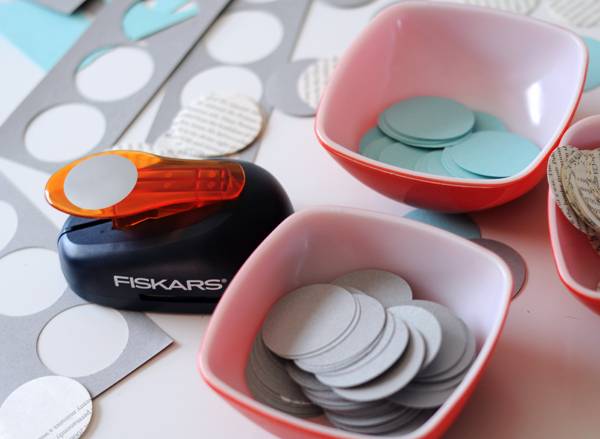
1. Use the circle punch to create a whole bunch of paper circles. I used a 2″ punch, which actually creates a circle of 1 3/4″. Weird…
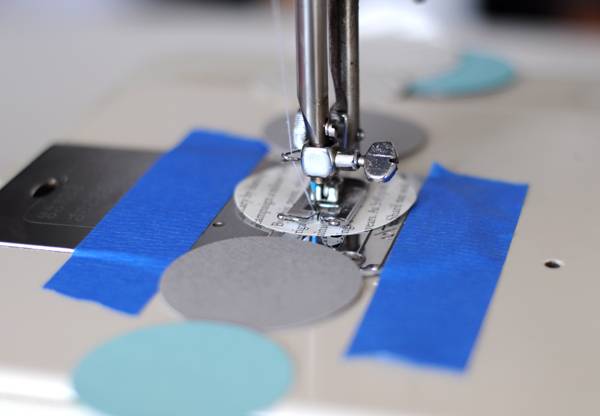
2. Fire up your sewing machine, choose a straight stitch with the longest length possible, and make sure your feed dogs are up. (I realized later that you don’t actually need the bobbin thread here, but it aids in durability, I think). I used some painter’s tape to make guides to line up the circles so the stitch is in the center. Leave a bit of thread at the head of the garland, and sew into the first circle. Backstitch, then slowly continue to feed the circles into the needle. After a few seconds, you’ll totally get the hang of it.
This is also totally possible with a needle and thread: just use nice long running stitch, and be sure to use thimbles. The only drawback here is that you might crease the paper as you press the needle through.
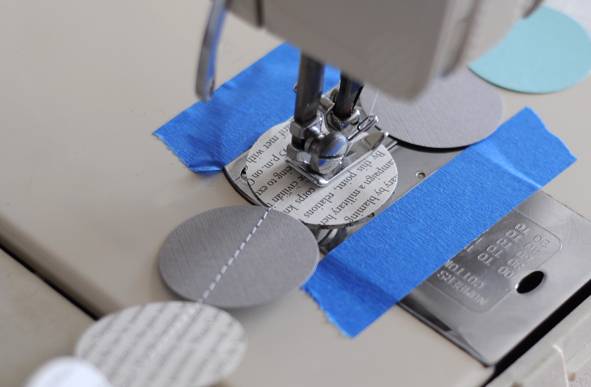
3. Keep on sewing until you’ve reached the desired length, and backstitch into the last circle. Leave a long tail of thread at the end to help with hanging.
Now, crank them out by the dozens! I found that using a single color, gray, and the book pages looked the best. Too many colors (I tried the blue, red, and chocolate brown all together) made it look a bit too…much. But choose whatever colors work for your space, and create yards of the stuff in one sitting.