
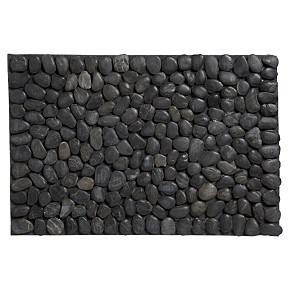
Just finished this mat to go with my Bathroom Redo. It has a peculiar providence, I was mooching around the CB2 website, doing a little window shopping and I spotted a cool pebble mat like this fellow for $54.
Me: ‘Hey, I had that idea too!’ I just didn’t get around to doing it!”
My Sweetie: “So you’re saying they stole your idea from inside your head?”
Me, kinda indignant: “YEAH”
Him: “Would you like me to make you a tinfoil hat?”
Crazy aside, here’s how I made the mat.

You will need:
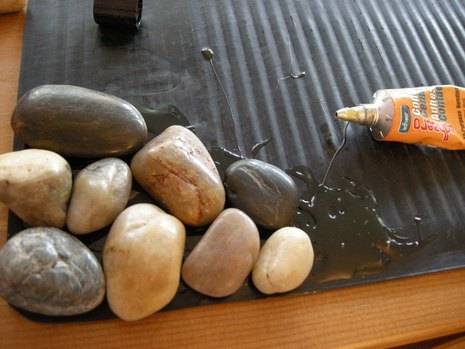
I smooshed down the glue then arranged the rocks. Not hard at all. In retrospect I think it would have been better to start in the center and work my way out. It’s also probably best to let the glue set for a good 24 hours before walking on it.
The only difficult part for me was to not try and arrange the rocks too much, I didn’t want straight lines or uniform colour, but it’s hard to let go of the whole symmetry thing. I think it turned out pretty organic looking though. It feels really lovely on bare feet and the rocks get shiny when they are wet. 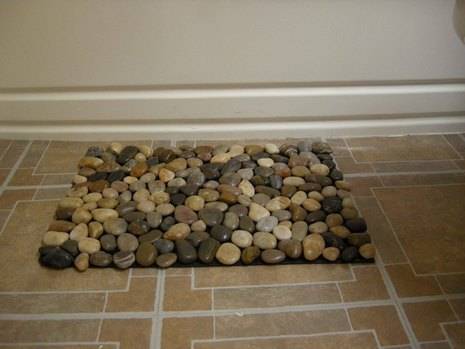
I haven’t had any problems with slipperiness… yet.
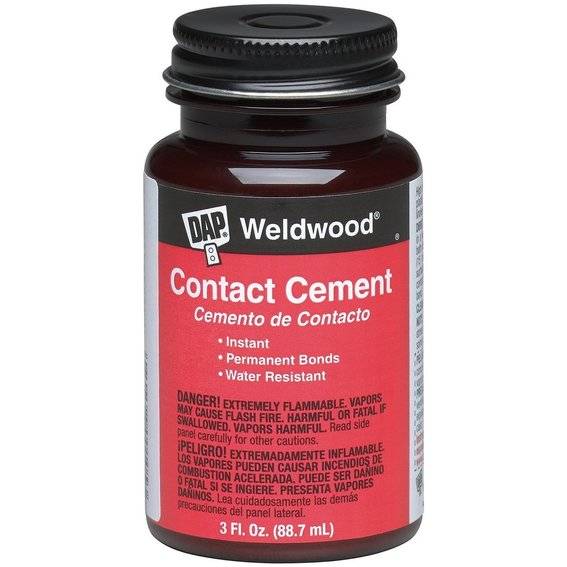
what kind of glue did you use? sorry , but I didnt see it in the directions. Thanks, its really nice!
Look’s good but would this not be a bit hard on your feet getting out of the shower/bath.
You can also glue the rocks onto a mesh backing and then put into ceramic mortor base you put into the boot tray. The following day grout the rock like you would ceramic tile. Seal the grout and rock after the grout drys a couple of days with a gloss sealer and you don’t have to worry about mildew. Makes a beautiful mat!!
Wouldn’t this be a collector of mildew and such, under the rocks. Unless you were to regularly clean it, like with borax or similar…
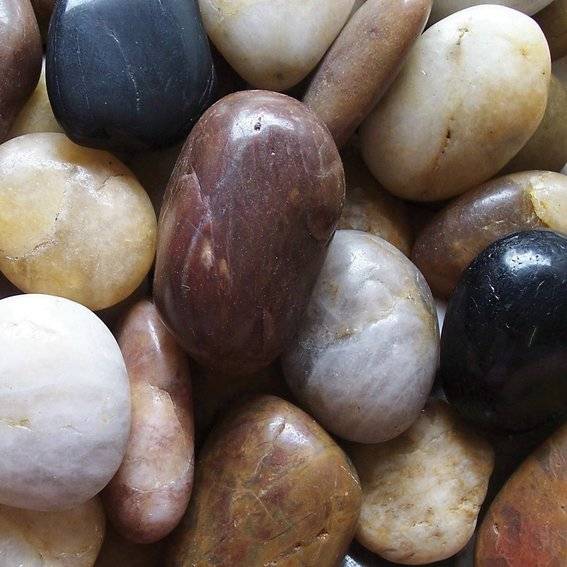
Where can I get river rocks
Where can I get river rocks
They sell river rocks at Dollar Tree. They are really nice!
I have done alotof crafting and rock collecting and this is just my “cuppa tea! “
I hate sounding so dumb but what is a “boot tray”? Just not familiar with the expression.
@Eloise….A boot tray is just a mat by the front door to put your wet/muddy boots on. Most have raised edges to keep the muck from spilling onto the floor.
Provenance…not providence.
I like your webpage architectural style graphics. And your clever take on the smiley face icon.
I have a walk in shower with river rock on the floor. It is heaven on the feet and not slippery which is a lot better than a standard tile bottom. I would set this with grout, maybe in a boot tray. Good idea to use up the leftovers for the other bath remodel. It I’d not hard on the feet because the flat Sid of the rocks face up.
Interesting post. Never thought about this. Gonna try this at home when I got time.
can u use regular rocks
Great idea! my daughters have been begging me to paint on rocks, now i know what to do with them after ????
i like yours better than the $40 version! I may try this too. 🙂 thanks for the idea.
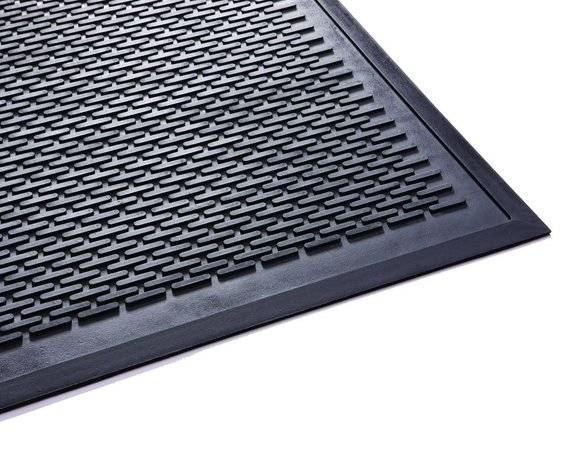
I just made this using river rocks from the dollar store and silicone glue. I glued the rocks on a rubber door mat since I wanted to use it as a boot mat. Not only is it extremely heavy, but everytime I pick it up a rock pops off. According to my husband what is needed is flexibility and you won’t get that with rocks. I have no idea how you got yours to stay unless you leave it where it sits and never move it. This project looks cool and I wanted to give it as a christmas gift, but how do you keep the rocks from falling off if you move it?
How do u clean it? Does it get slippery and slimy after a while or is there something to spray over it to make it easier to maintain? Lol havent made one yet but such a great idea, turns out I have everything I need ..fun 🙂
I have mine in a tray like a large cookie tray (industrial size), rocks are smaller and grouted. It stays in place, can be hosed off. And I don’t have to contend with the rocks coming off. And the shower floor is wonderful. This is cleaned just like tile. No mossy build up and you should be fine.
What about E6000 glue? Do you think that would work?
I have made these but smaller rocks, making placemats and coasters , for garden, and tea party.
I have made these using smaller pebbles , to make place mats, and coasters , for garden , and tea party’s .. very cute
Love the rock idea. Can you glue it straight onto the bottom of the shower stall? I dont have enough money to remodel but i can afford this.
It has to be set in mortar and grouted for a shower application.
Right!
Won’t the water just drip and pool on the floor, though? It’s beautiful, I’m just hesitant!
Amanda, are you asking about the floor mat or the shower floor? I wouldn’t use this as a mat without some precautions but it is great for outside. I have the shower floor pebbled and LOVE it. Best change I ever made.
might be lovely to look at until you break your neck slipping on it. rocks and water dont mix. dangerous for the elderly for sure!
If you have a grouted shower floor, it is no different than having a nonslip tiled floor. No slip hazard. Not any more than a standard shower floor, actually less than a fiberglass unit. Everything needs to be cleaned, regardless of what material is used.
You can make something similar for outside to set into a garden design, which gives the stones a more level surface – make a frame/tray with scrap ply and wood, held with a couple of nails, and put a thin layer of sand in the bottom. set the pebbles tightly, right side down over the whole surface then cover with cement. when completely set, pull the frame off, turn over and brush off the sand. It is probably better in small squares rather than a large size though, which might crack.
So want to try this! I’ve got a creak out on my land, and have rocks for constant use (: after gluing, couldn’t modge podge be used and a spray sealant over the top of rocks to hold down better?
You can also glue rocks like this on old kleenex boxes with silicon cauck than finish with a spray shelac very heavy but super cute and homey.
I also did a table top with sides and once the rocks were in place I added liquid apoxy to it very cute as well.
did you flip the mat over and use the bottom rubber side ?
How long do they tend to last?
Having trouble finding a rubber mat at dollar store. They have one that has a type of rubber on one side and a felt like on the other. Suggestions please?
Having trouble finding rubber mat at dollar stores
You could use polyurenthane to get a better sealant and or apoxy, just poor a flood coat over it, just don’t poor to make a flat surface. Great idea for outside of shower. A simple cheap glue will not work, also if a sturdier/ heavier duty sealant or flood coat is applied just to where you can still feel the rocks, you will be able to clean easily as so no mildew will grow. Just wipe clean after each use. It may still warp and crack or whatever but just move only to clean under.
Simply amazing idea! I have to try this as soon as possible. Thank for sharing…
I made one of these mats years ago but I use it at the front door for boots and shoes.
But if you have to buy the rcks for $10 + S&H $10, wouldn’t that cost twice as much as buying one? I love it, but can’t afford that.
I have laminate flooring in a half bath; the toilet needs to be replaced and I had an idea of installing a small perimiter of these types of rocks around the new toilet. Has anyone ever done anything like that? Any suggestions and especially pictures would be much appreciated.
I am working on a bath mat now and just came across this pin. Using clear silicone as the adhesive and smaller rocks.
At Dollar General I purchased the mat, rocks, and glue, all for $10 total. My only anticipated challenge is the weight, once completed, and the awkwardness of moving it!
How do you clean you mat?