Are you tired of constantly buying new cat toys that only last a few days? Or maybe you just want to add a personal touch to your feline friend’s playthings? Look no further than this DIY cat wand toy with a wooden twist!

This simple and fun project combines the durability of wood with the enticing texture of leather to create a modern and stylish toy that your cat will love.
Plus, with just a few materials and some basic crafting skills, you can easily make this toy yourself and save money in the long run.
So grab your tools and get ready to create a DIY cat toy that is sure to provide endless hours of entertainment for your furry companion.
Keep reading for a step-by-step guide on how to make your own DIY cat wand toy with a wooden twist.
Gathering Your Materials for the DIY Cat Wand Toy
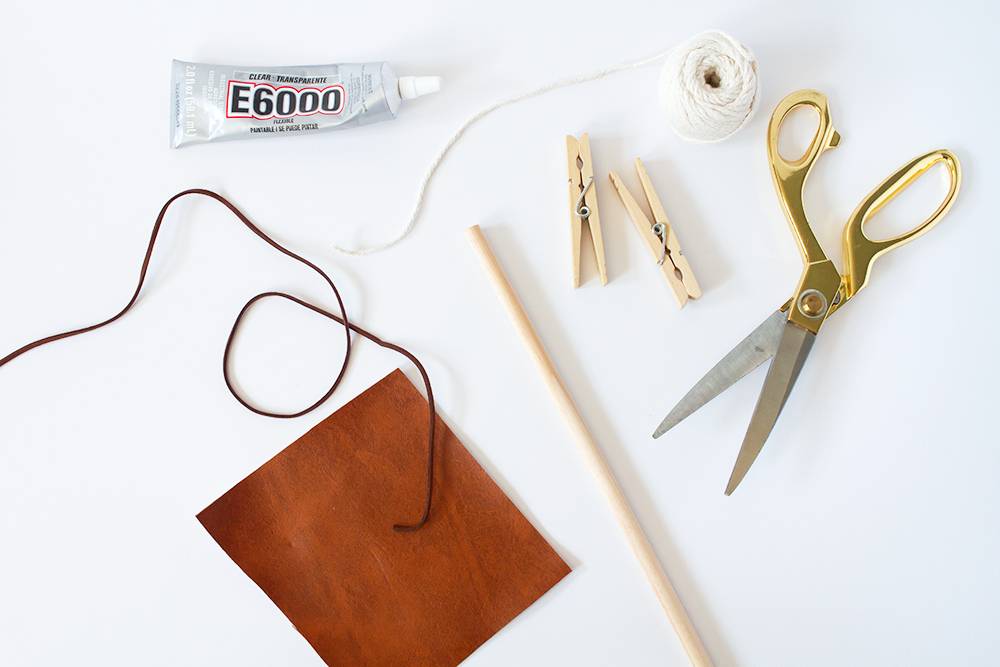
Before you dive into creating your very own DIY cat wand toy, the first step is to gather all the necessary materials.
This preparation ensures a smooth crafting process, allowing you to focus on the fun of assembly without any interruptions.
Here’s what you’ll need to get started:
- Wooden Dowel. This will serve as the sturdy base for your cat wand toy. A dowel about 12 to 18 inches in length and ¼ to ½ inch in diameter works best, providing an ideal balance between ease of handling and durability.
- Leather Lace. Leather lace will be used to add a decorative and functional element to the wand. It offers a great texture that cats love and adds to the aesthetic appeal of the toy. You’ll need a length of about 24 inches.
- Faux or Real Leather Fabric. Choose a small piece of faux or real leather fabric for the tassel at the end of the wand. This material is perfect for catching your cat’s eye and encouraging playful attacks. A piece measuring approximately 5×5 inches should suffice.
- Cotton Twine. The cotton twine will be used to secure the leather fabric to the dowel, creating a playful tassel. About 24 inches of twine will be enough for this project.
- Scissors. A sharp pair of scissors is essential for cutting the leather and twine to the desired lengths.
- E6000 or Other Clear Strong Glue. This glue is crucial for attaching various elements of the toy securely. Ensure it’s clear and strong to maintain the aesthetic look of your DIY cat wand toy while ensuring durability.
With these materials at hand, you’re well-equipped to start crafting a modern and stylish cat wand toy that combines the natural appeal of wood with the enticing texture of leather.
Wrapping the Wooden Dowel With Faux Leather
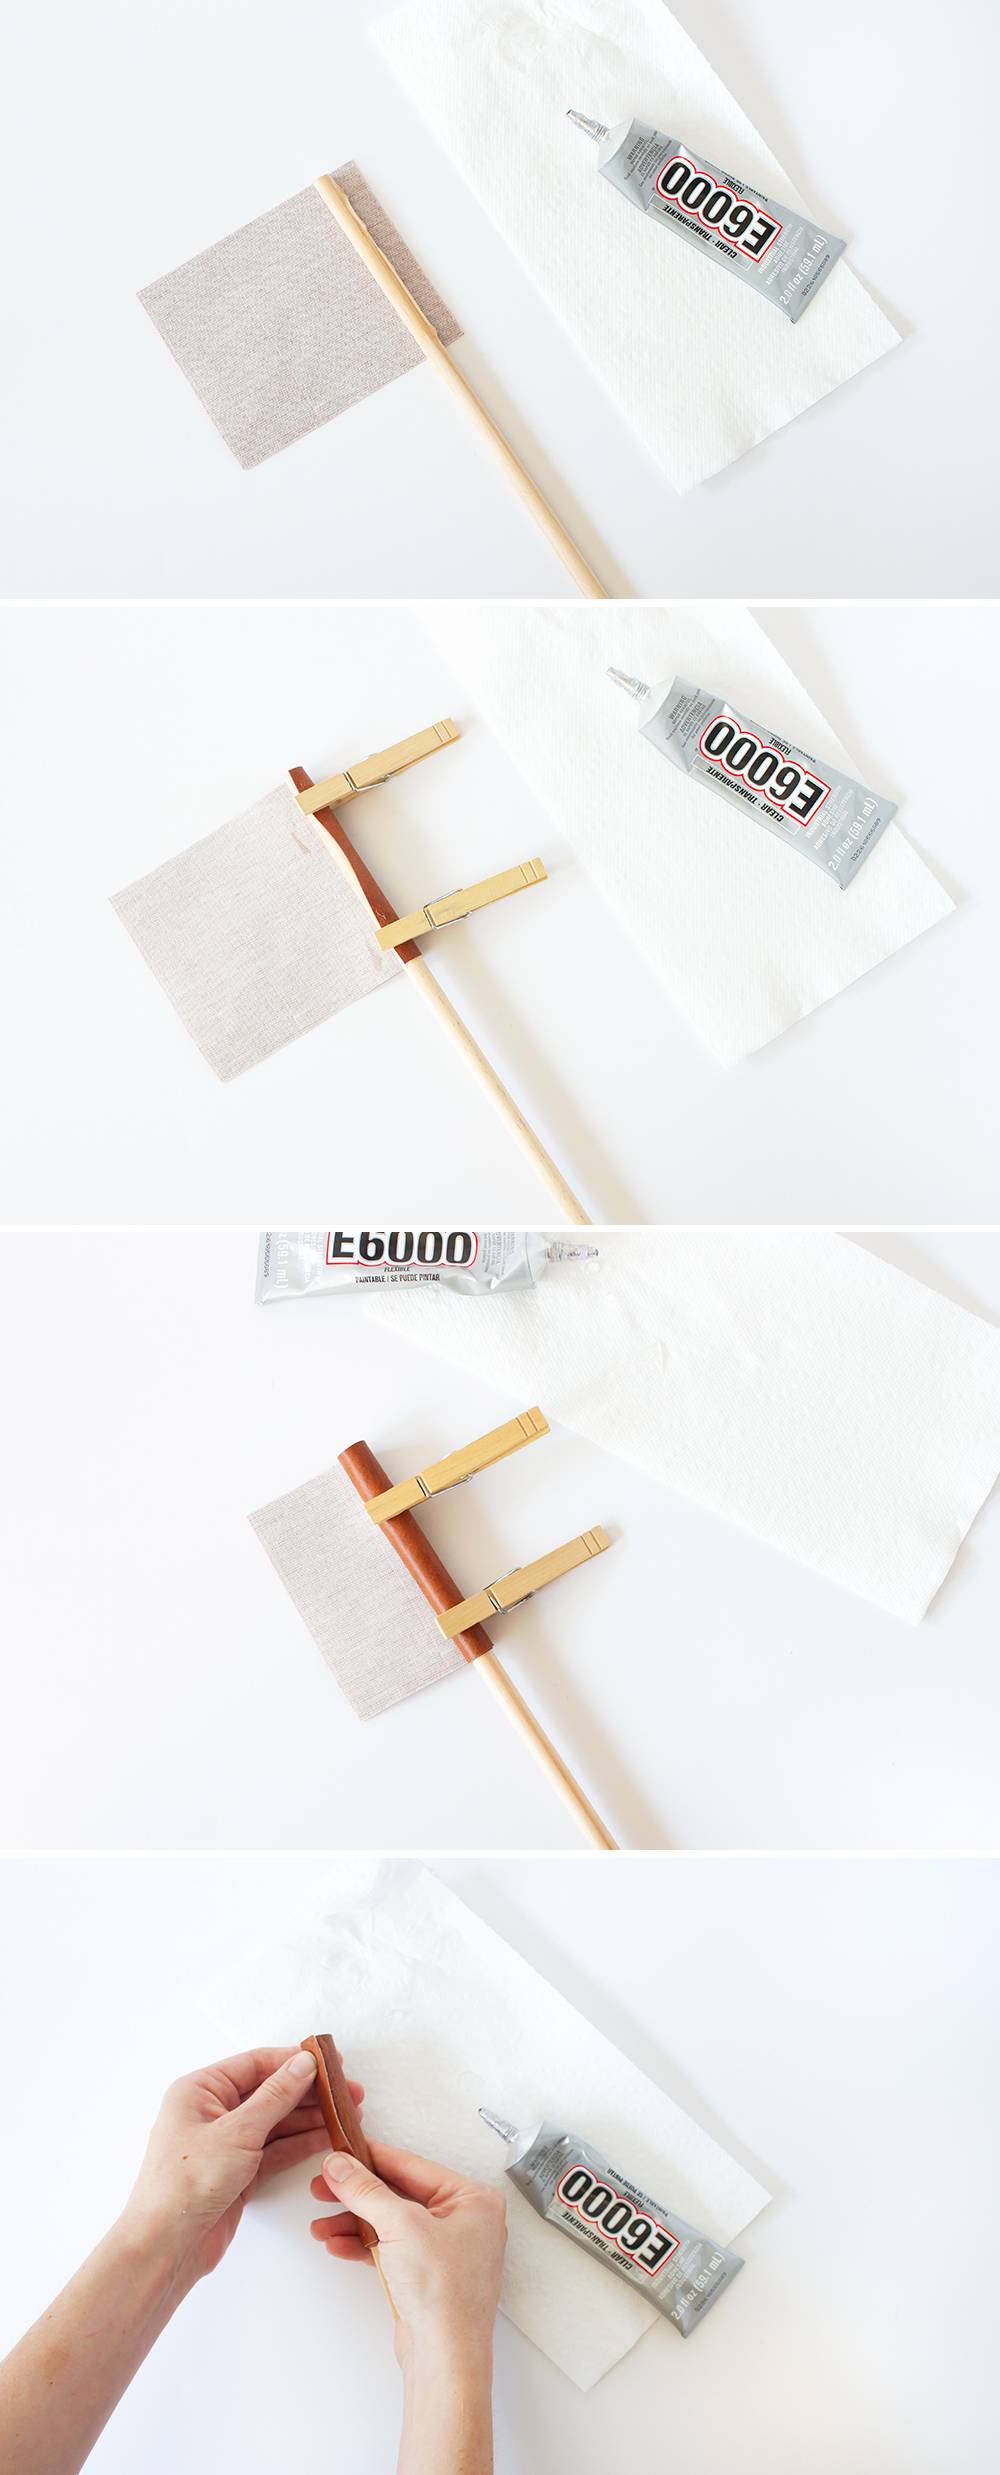
Transforming a simple wooden dowel into the sleek handle of your DIY cat wand toy begins with selecting a piece of faux leather fabric.
Cut this fabric to about the width of your hand, which will serve as the “grip” for your wand. This size not only ensures a comfortable hold but also adds a modern touch to your toy.
Start by positioning the faux leather fabric at one end of the dowel. Apply a thin line of the E6000 or another clear, strong glue along the edge of the fabric. Carefully wrap the fabric tightly around the dowel, adding a new line of glue every few turns to secure the fabric in place.
The key here is to maintain tension on the fabric to ensure that it adheres smoothly and doesn’t unravel during playtime.
To aid in the drying process and ensure the fabric stays wrapped tightly around the dowel, consider using clothespins or binder clips as makeshift clamps.
Place these along the wrapped section, being careful not to distort the fabric. Allow the glue to dry for a few minutes before continuing; this pause is crucial for creating a durable grip that will withstand even the most enthusiastic play sessions.
This step is not just about practicality; it’s about infusing your DIY cat wand toy with a touch of elegance and personal style.
The faux leather grip not only enhances the toy’s aesthetic appeal but also ensures a comfortable and secure hold as you engage in playful interactions with your feline friend.
Remember, the joy of creating a DIY cat toy lies not just in the crafting process but also in the quality time spent with your pet, enriched by the personal touch you’ve added to their new favorite toy.
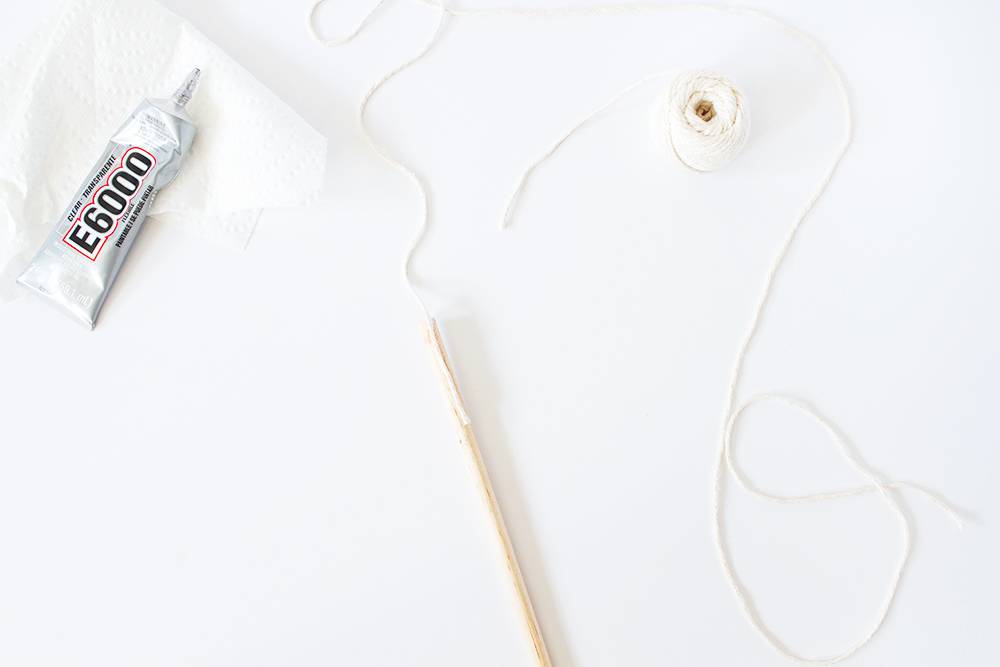
Attaching the String for the Wand Toy
Once the faux leather grip has completely dried, indicating your DIY cat wand toy is taking shape, it’s time to turn your attention to the playful end of the wand.
This step involves attaching the cotton string, which will eventually hold the enticing leather tassel for your cat to chase. Carefully flip the dowel so you’re working with the opposite end from the grip.
Select a piece of cotton twine, cutting it slightly longer than two feet to ensure you have enough length to play with and to attach the tassel securely.
The extra length is crucial for creating dynamic, engaging play with your feline friend, allowing for a range of motions that mimic the erratic movements of prey.
Prepare
Prepare the end of the cotton twine by applying a small amount of the E6000 or your chosen strong, clear glue to one end.
This adhesive step is vital for ensuring the twine remains securely attached to the wand, even during the most vigorous of play sessions.
Position the glued end of the twine on the dowel, near the edge of the faux leather grip but not overlapping it.
Hold it in place firmly for a few moments to allow the glue to start setting.
Secure
For added security, you may wrap the end of the twine around the dowel once before the glue fully dries, applying another small dab of glue to seal the twine’s end back onto itself.
This reinforcement process is crucial for creating a durable DIY cat toy that can withstand repeated play.
Remember, the goal of this DIY cat wand toy is not just to save money but to build a high-quality, personalized toy that enhances your bond with your pet.
By carefully attaching the cotton twine, you’re setting the stage for endless fun and interactive play sessions that both you and your cat will cherish.
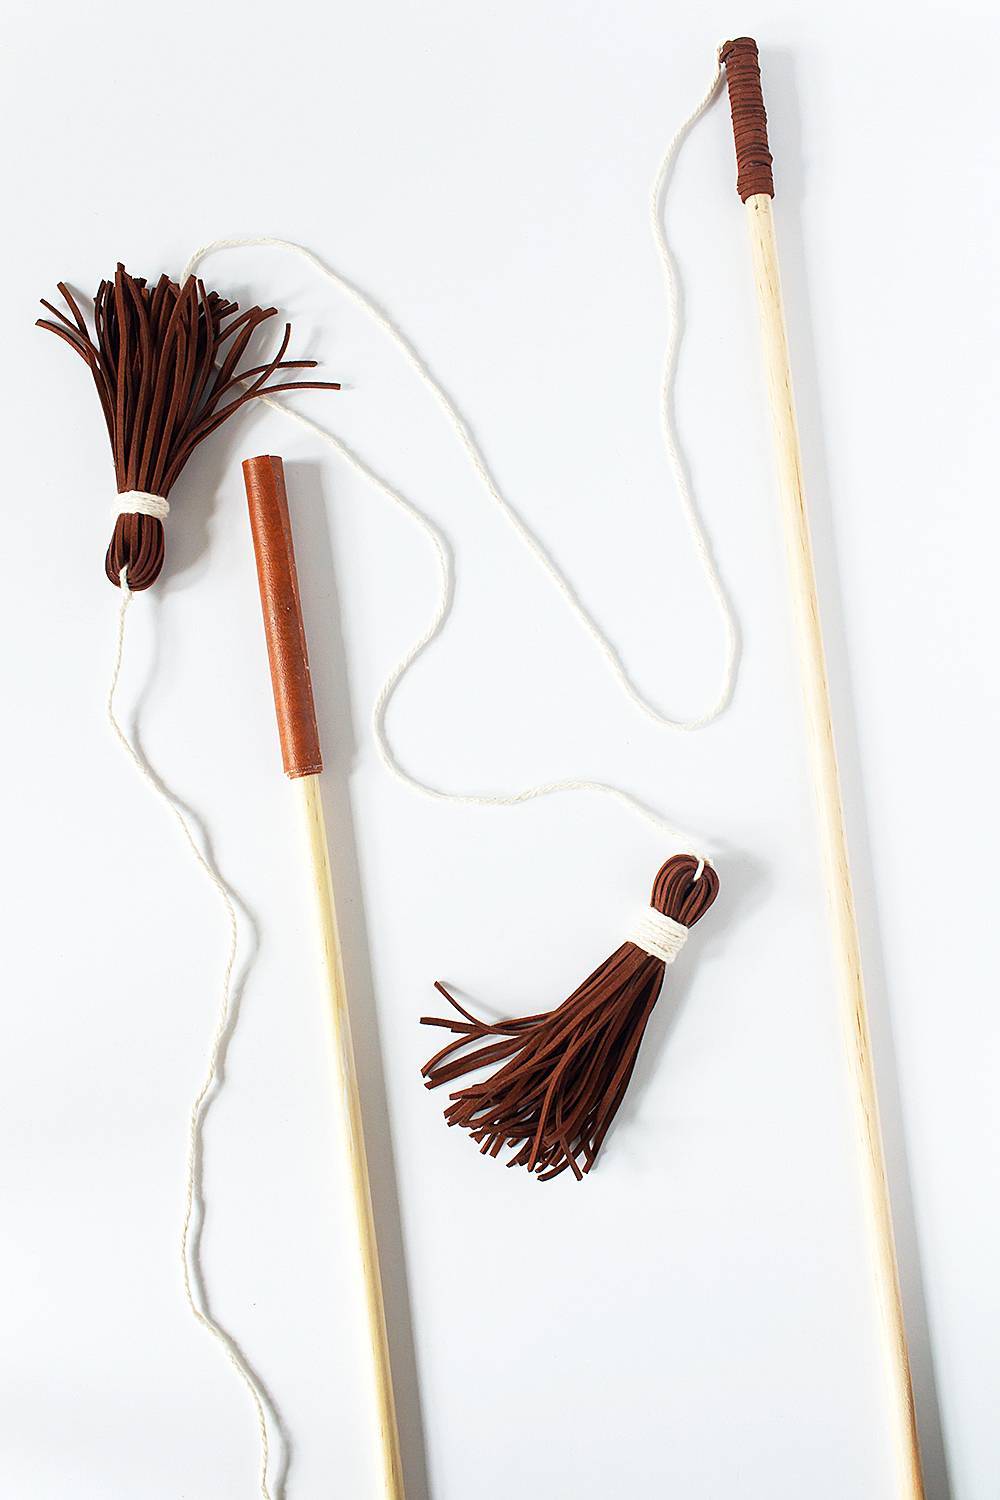
Enclosing the String With Faux Leather Lace
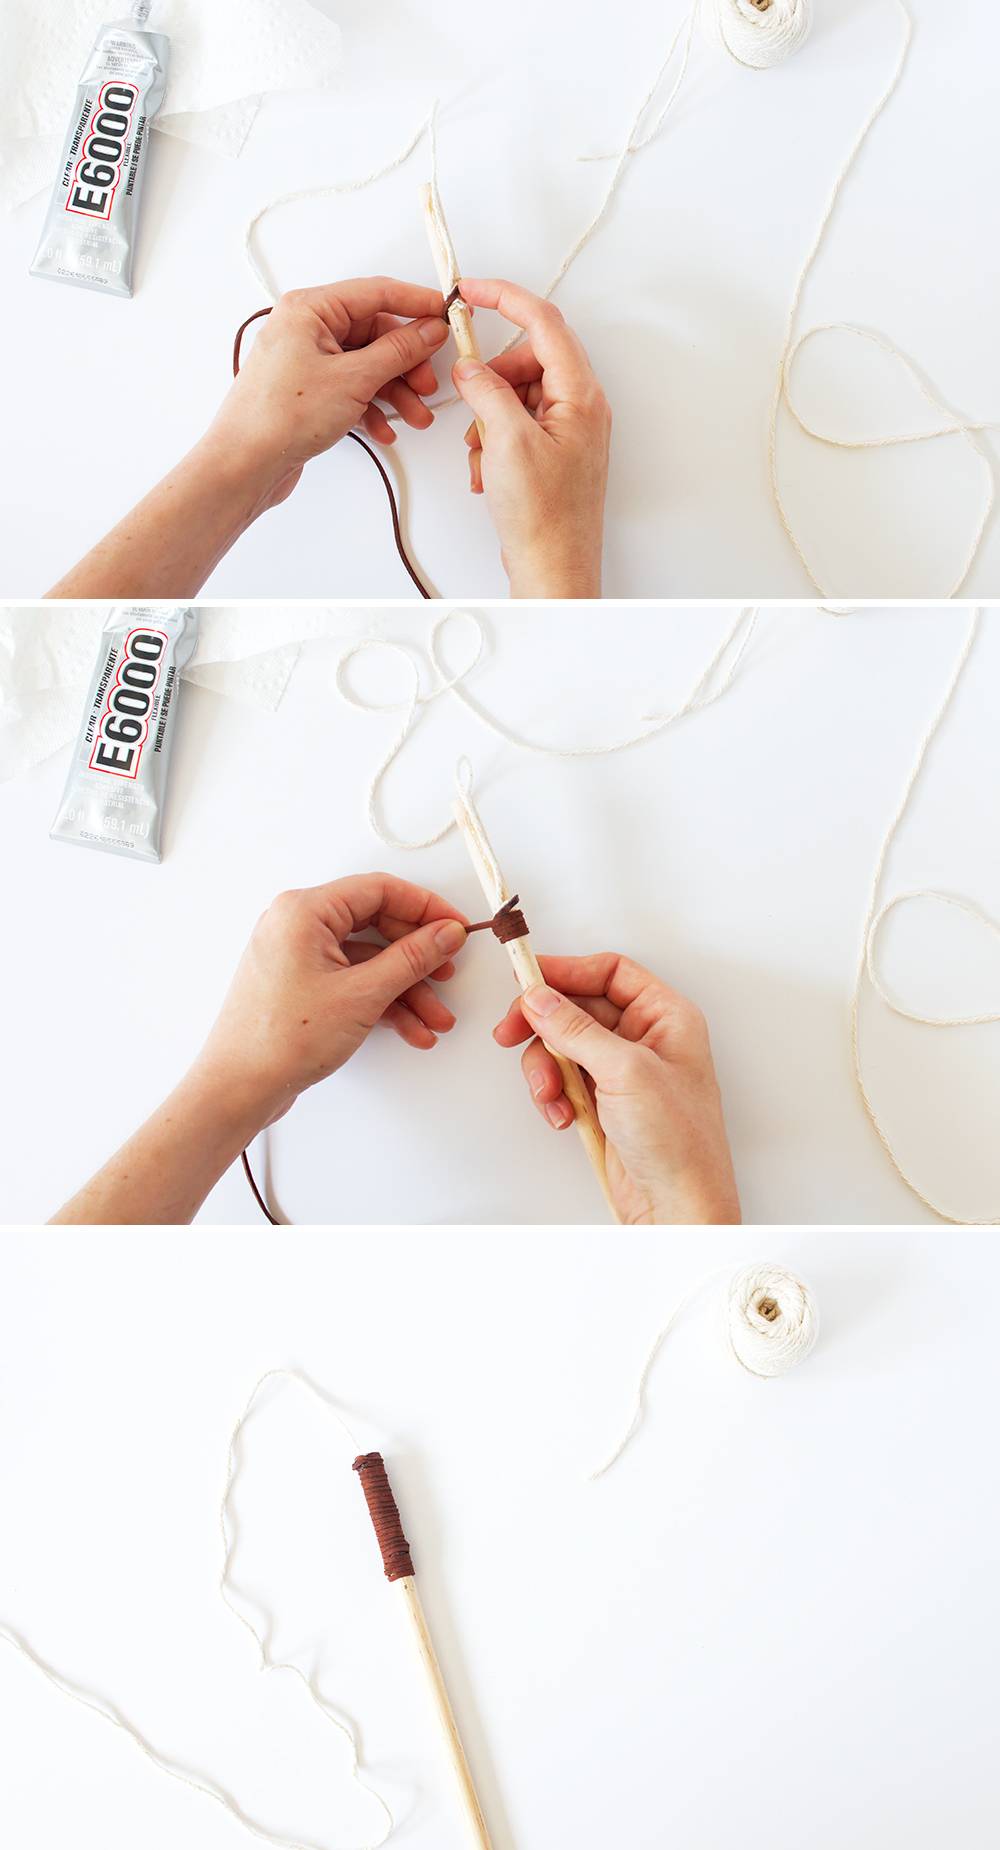
To enhance the visual appeal and ensure the durability of your DIY cat wand toy, the next step involves enclosing the string with faux leather lace.
Begin by cutting an 8-inch length of the lace. This measurement provides ample length for a secure wrap that adds an aesthetic touch while preventing the string from fraying over time.
Start by applying a dab of E6000 or your preferred strong, clear glue to one end of the lace.
Press this glued end onto the dowel, just above where the cotton twine is attached, ensuring it adheres well.
Begin wrapping the lace tightly around the dowel, ensuring each wrap lies snugly against the last to create a smooth, even layer.
Every couple of turns, pause to apply a small amount of glue to the dowel before continuing to wrap. This technique helps to maintain tension and keeps the lace securely in place.
Once you reach the end of the lace, trim any excess if necessary, then secure the final edge with another dab of glue.
Press firmly for a few moments to ensure a strong bond. This step not only reinforces the attachment point of the cotton twine but also brings an additional layer of craftsmanship and aesthetic appeal to your DIY cat wand toy, making it a unique and cherished toy for your feline friend.
Creating The Tassel For The Wand Toy
Creating the tassel is a pivotal moment in the construction of your DIY cat wand toy, as this will be the primary feature that captures your cat’s attention.
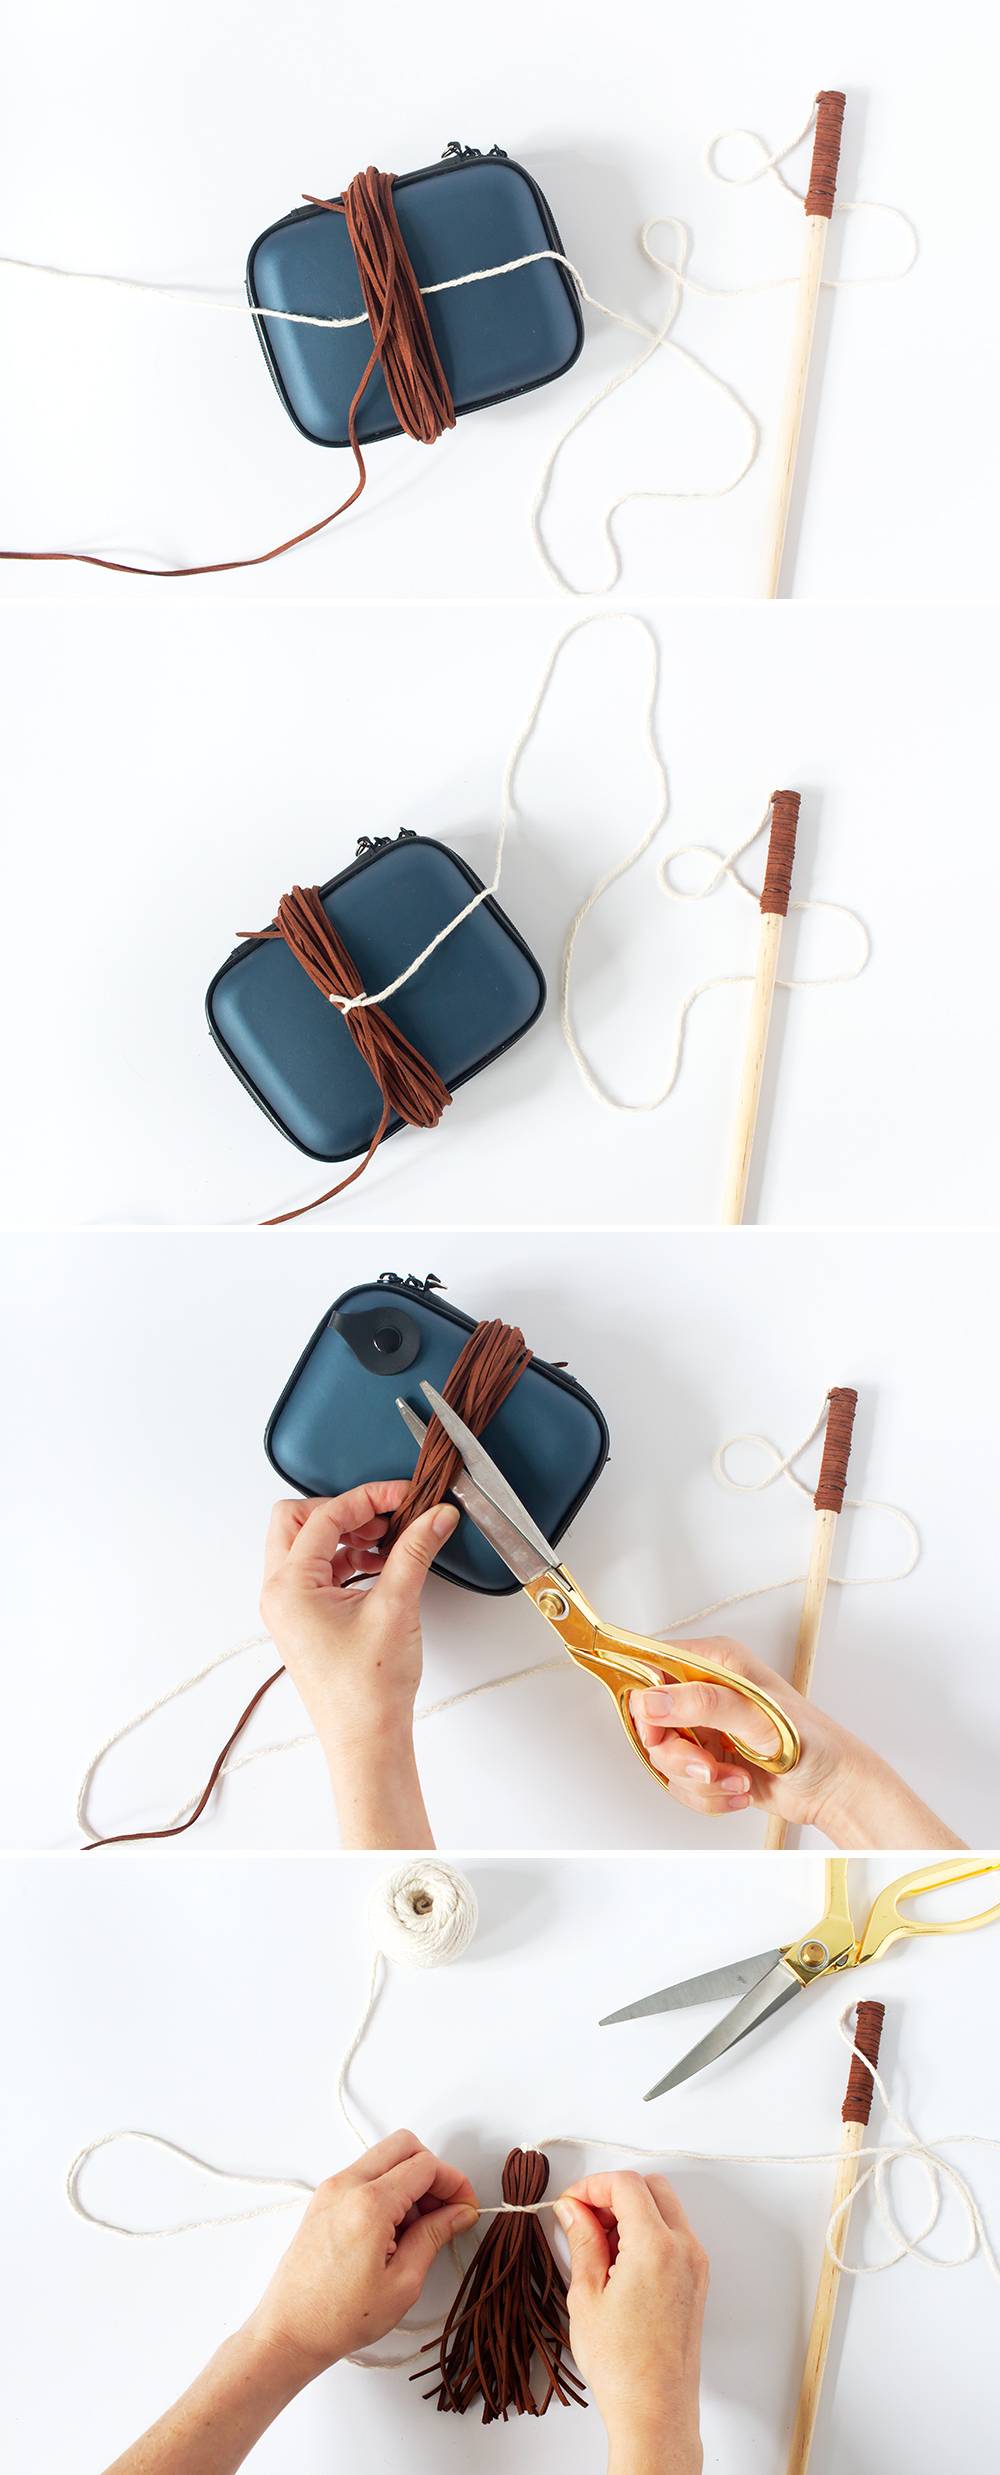
To start, select an everyday item around the house to use as a mold for your tassel – in this instance, an external hard drive case, a bit larger than a hand, works perfectly.
Position the cotton string atop the chosen object, allowing a 4-inch tail to dangle; this excess will later be used to secure the tassel to the wand. Next, take your leather lace and wrap it around the object approximately 20 times.
Adjusting the number of wraps allows for customization of the tassel’s fullness; more wraps for a fluffier appearance, fewer for a sleeker look.
Once satisfied with the thickness, use the cotton string’s tail to tie a firm double knot around the wrapped lace, securing it in place.
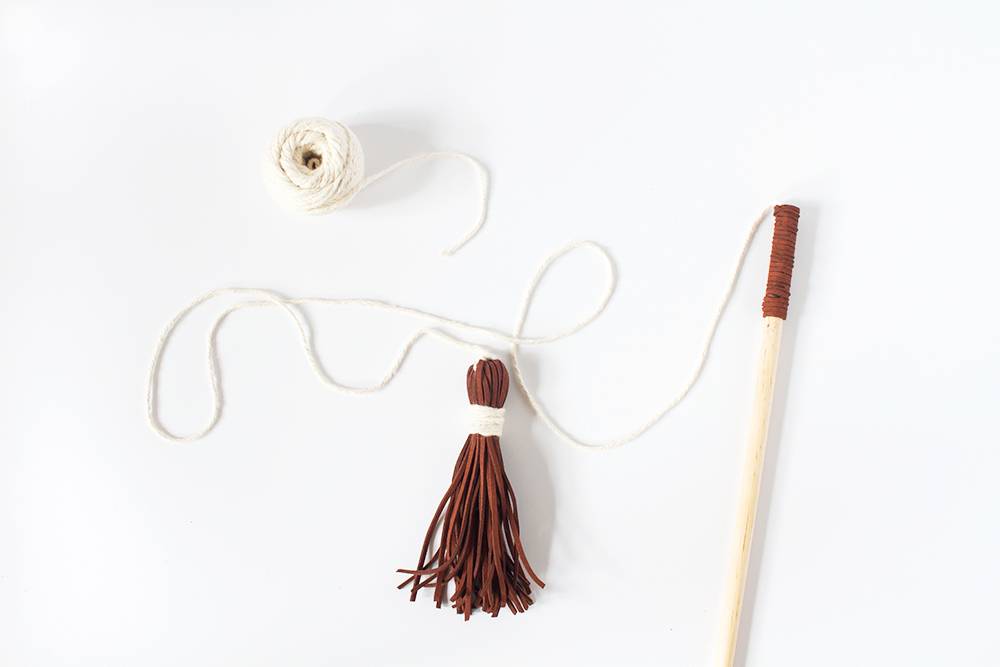
Carefully flip the object over and slice through the middle of the lace loops with your scissors, transforming it into a series of dangling strands. At this stage, the form of your tassel begins to take shape, with all pieces aligned in the same direction.
To finalize the structure of the tassel, grab another piece of cotton string and tightly tie it around the gathered strands, approximately an inch from the top where your initial knot rests.
This action defines the tassel’s head and ensures all pieces remain together during the rigorous play sessions that await.
This method of crafting a tassel not only adds a personal touch to your DIY cat wand toy but also provides an opportunity to customize the toy to your cat’s preferences.
The result is a durable, engaging toy that will keep your feline friend entertained, pouncing, and leaping for joy.
Final Touches and Playtime
With the tassel now vividly taking shape, the final touches on your DIY cat wand toy are nearly complete.
This is where the essence of your craftsmanship brings life to a playful masterpiece destined for endless moments of joy. To finalize the tassel, wrap the string meticulously around the “head” of the tassel.
This is not just a functional step, but also an artistic one, allowing you to give the toy a finished, polished look. Make sure the string is wrapped tightly several times for security, then tuck the end under these loops.
A small dot of glue will serve as the final anchor, ensuring that all your hard work doesn’t unravel during play.
Allow the glue to dry completely before proceeding to ensure the durability of your toy.
Now, the moment of truth has arrived: introducing your feline friend to their new toy.
Begin playtime with gentle swings of the wand, allowing your cat to get accustomed to its new prey.
As their interest piques, mimic the movements of live prey by making quick, jerky motions with the wand.
Watch as your cat leaps, bounds, and pounces after the tassel, their instincts fully ignited by the allure of the chase.
This not only provides them with much-needed physical exercise but also strengthens the bond between you two through interactive play.
Creating this DIY cat wand toy has been a journey of love, creativity, and craft. You’ve transformed simple materials into an engaging, stylish toy that promises countless hours of entertainment.
Remember, the real beauty of a DIY cat toy lies not just in its creation, but in the joy and companionship it fosters between you and your furry friend. Enjoy the playful adventures ahead, knowing you’ve made them all the more special with your personal touch.
How To Make a DIY Cat Wand Toy

Materials
Instructions
- Cut a piece of faux leather fabric about the width of your hand. This will make the “grip.” Wrap the fabric around one end of the dowel and secure it with glue.
- Wrap the fabric tightly around the dowel, and apply a line of glue every few turns. Clothespins or binder clips can help hold the fabric in place while you allow the glue to dry for a few minutes before continuing.
- When the faux leather grip has dried, flip the dowel over so you are working with the other end.
- Cut off a piece of cotton string a little longer than two feet, and glue one end of the string to the dowel.
- Now cut an 8″ length of faux leather lace to wrap this end of the dowel.
- Glue the end of the lace to the dowel, then wrap the cord tightly and evenly around the dowel, applying more glue every few turns. Trim the end of the lace and hold it in place with another dab of glue.
- Next, make the tassel toy. Find an object that is approximately the length of the final tassels. The object can be anything; pictured here is the case for my external hard drive, which is a little larger than my hand.
- Place the end of the cotton string on the object, with a tail of about 4″. This will be used to attach the tassel to the wand.
- Wrap the leather lace around the object roughly 20 times. More will make a fluffier tassel. Less will make a thinner tassel.
- Tightly tie the end of the cotton string around the lace threads with a double knot.
- Turn over the object, and cut through the lace threads right in the middle.
- Gather all the tassel pieces so they are hanging down in the same direction. Then, tie it tightly with another piece of cotton string.
- Finish the toy by wrapping the string around the “head” of the tassel several times. Tuck the end under the loops, and secure it with a dot of glue.