After looking at the various workbench offerings at Sears, Home Depot, and Lowes, I decided to go DIY. I knew I could make a better, more modular workbench myself by reusing parts of my existing setup and buying off the shelf components from the hardware store. I inherited my old workshop from the previous owner of my house and he built it out of old laminate closet storage units and three bathroom vanities. It was bulky, inefficient and crowded and I wanted smarter storage and a more open workspace.
The old workbench was sturdy and sized well, so I decided to keep the guts of it and just pull off all of the front trim panels, doors, and drawers from the vanities. I also took down all of the laminated shelving that was above the work bench. I always hated the way the shelves stuck out too far from the wall (24″) and hovered too closely over the work surface. After I gutted the old setup, I started building the new one with an eye towards adaptability and future customization.
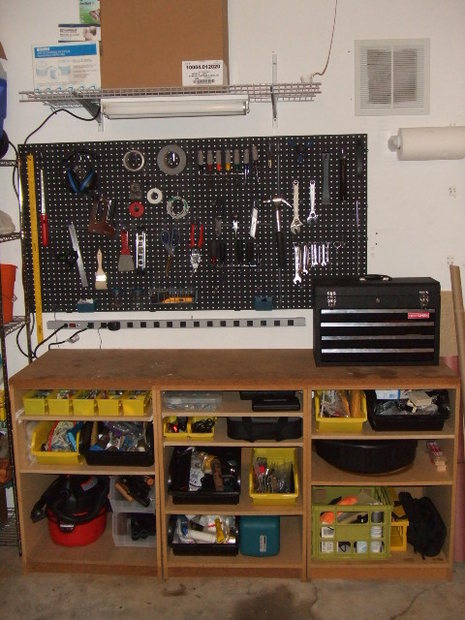
For tool storage, I knew I wanted pegboard and a small toolchest with drawers. I bought eight 16″x16″ interlocking plastic pegboard panels and peghook assortment sets from Home Depot. Although they were the costliest part of this project ($48), the plastic pegboard was a lot more durable than a sheet of 1/4″ pegboard and I knew they’d be a better long term solution. I mounted them directly onto the studs and they are very sturdy. I got a lucky break on the tool chest, my coworker had a brand new Craftsman 4-Drawer Rally Box that he gave me for free! I found a roll of Kobalt anti-corrosion drawer liner on sale at Lowes and cut pieces to fit for each drawer.
I lucked out on the power strip as well. I rescued a completey functional four foot 15A strip from a pile of electronics that were destined for the recycling center. I fastened it to the wall underneath the pegboard, right above my benchtop. Now I have plenty of outlets to plug in power tools, recharge my cordless drill and power the bench work light.
To store power tools, parts and other hardware, I opted for lots of shelves and storage bins in various sizes. I bought a bunch of Stanley Tools storage bins (sizes #2, 4, and 5) to put stuff in, and a four foot wide Closetmaid Maximum Load wire shelf to mount over the pegboard. The shelf is great for storing large boxes and also serves as a place to hang a 24″ fluorescent light fixture.
I bought a 4×8 sheet of 5/8″ particle board and had Lowes cut it into pieces for me so I could make shelves, then I arranged the shelves to best fit my tools and put everything that I could into the #4 and #5 storage bins. I had a few other unused bins and a milk crate on hand so I fit them in there as well.
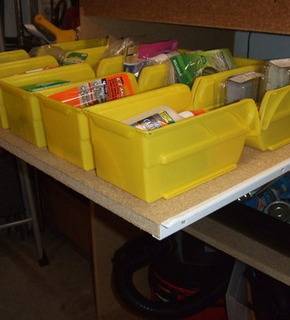
I wanted to store tiny parts in small pick bins and have those bins easy to reach, but I didn’t have the wall space to make that happen. To work around that, I took one of the new shelves and reused a set of the drawer slides to make a slide out shelf. I screwed 10 stanley #2 pick bins into the shelf so they’d stay put when I slide the drawer in and out. It works well–I have plenty of drawer slides left so I might make another one of these in the future, should I need it.

I’m really happy with the way this project worked out. It was fun to plan and build it and it only cost me about $200 to get exactly the kind of workbench I wanted.
