If you’ve been searching for the perfect hanging herb garden, let me introduce you to the DIY that will change how you cook: a wall-mounted IKEA herb garden that costs less than $30, takes under an hour to build, and delivers fresh basil, cilantro, and parsley right at your fingertips every single day.

This will become one of the most-visited corners of your kitchen.
Whether you’re working with a tiny apartment, a rental, or a full home kitchen, there are countless reasons and lots of good things about how a hanging herb garden changes the way you live — and IKEA gives you the plant pots, flexibility, and perfect add-ons to make it happen for less than you’d spend on a month of grocery store herbs.
The Real Benefits of a Hanging Herb Garden (Not Just “It Looks Pretty”)
Let’s talk about the number of unique benefits that make a hanging herb garden worth the effort, because there are more than you might expect.
A better life starts with better ingredients. Fresh herbs aren’t just tastier than their dried counterparts. They’re more nutritious, more aromatic, and more satisfying to cook with.
Having greenery literally on your wall means you’ll reach for it every time you cook, not just on special occasions.
It solves the “counter space” problem. If your kitchen counters are already at capacity, vertical growing is the answer. Hanging planters use outdoor space on your walls (and indoor space near your windows) that would otherwise go completely unused.
It’s significantly cheaper than buying fresh herbs at the store. A single basil plant from a nursery costs $3-5 and will give you fresh leaves for months if you care for it well. Compare that to buying cut basil at $2-3 per bunch, several times a month. The math makes the hanging herb garden a reason to DIY.
Pets and kids can’t reach it. If you share your home with curious pets or little hands that love to dig in soil, wall-mounting your herb garden is a practical safety solution.
It brings inspiration into your daily routine. There’s something quietly wonderful about having living greenery in your kitchen. It makes the space feel more alive, more intentional, and more like you.
The Best IKEA Products for a Hanging Herb Garden
IKEA’s flexibility as a brand is one of its greatest strengths — their products are designed for one purpose but work beautifully for others. Here are the standout options for building your IKEA hanging herb garden setup, from the classic hack to modern alternatives.

The IKEA Vurm Wine Rack (The OG Hack)
The IKEA Vurm is technically a wall-mounted wine bottle holder, but mounted horizontally, its cylindrical slots hold pint glasses — and those glasses hold herbs.
If you can get your hands on one, this is the original IKEA herb garden hack, and it remains one of the best because it’s inexpensive, wall-mounted, and holds four plants in a tidy, organized row.
The Vurm is discontinued in some markets, but it shows up regularly on Facebook Marketplace, OfferUp, and thrift stores. If you find one, grab it — it’s absolutely worth it.
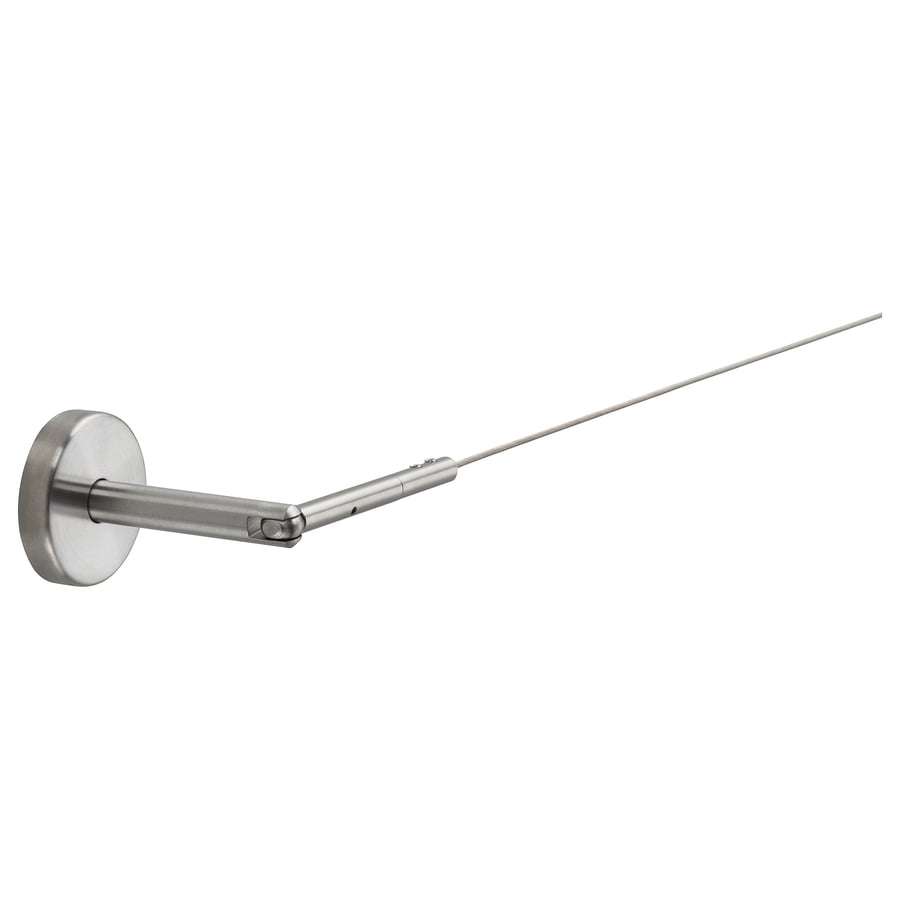
ORDNING Utensil Holders + DIGNITET Curtain Wire
For a sleeker, more modern hanging herb garden, combine IKEA ORDNING stainless steel utensil holders with the DIGNITET curtain wire system.
Thread the wire through the holes in the holders, mount to a kitchen door or wall, and you have a stunning vertical garden that looks like something from a design magazine.
Mix the tall (7 1/8″) and shorter (5 3/8″) ORDNING versions for visual variety and flexibility in plant sizing.
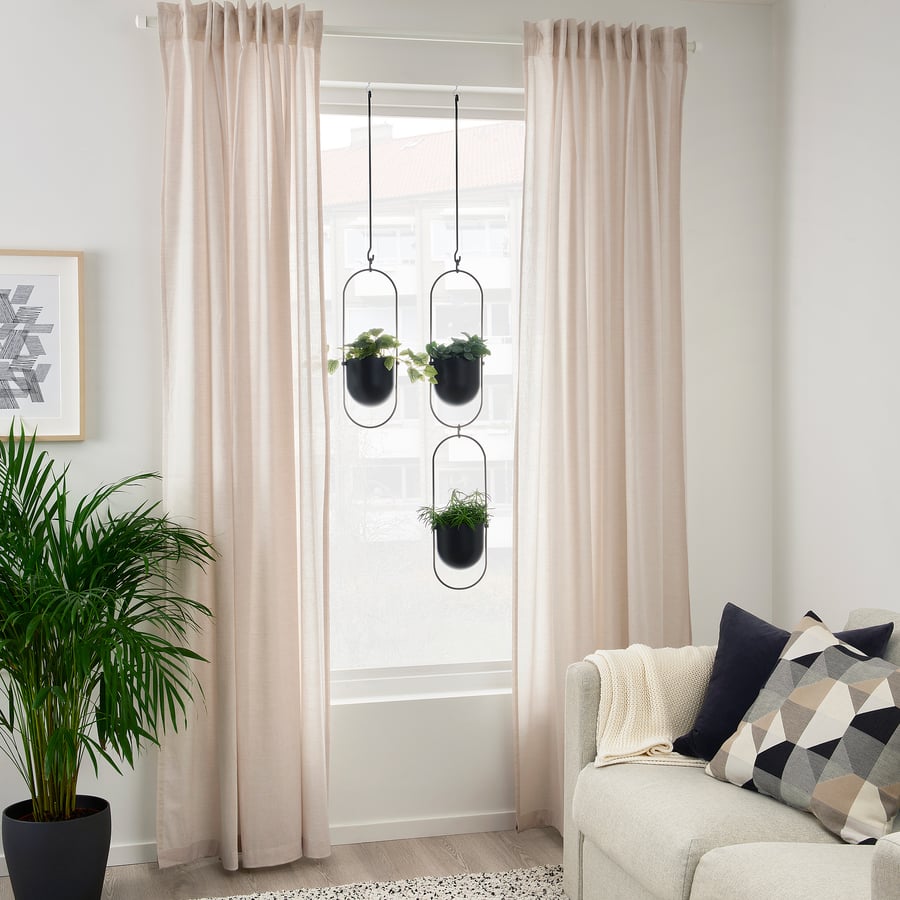
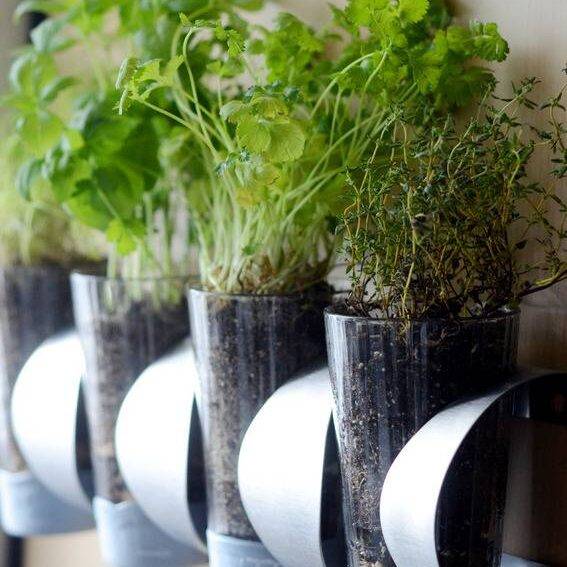
Hanging Pot System
There are several IKEA hanging pots with hardware already included. This makes these options one of the most beginner-friendly options on this list.
Details to keep in mind: these plant pots can be on the heavier side when filled with soil, so check your wall anchor ratings before installing. For a lighter setup, swap the included pots for smaller plastic or metal containers that fit the same hanging hardware.
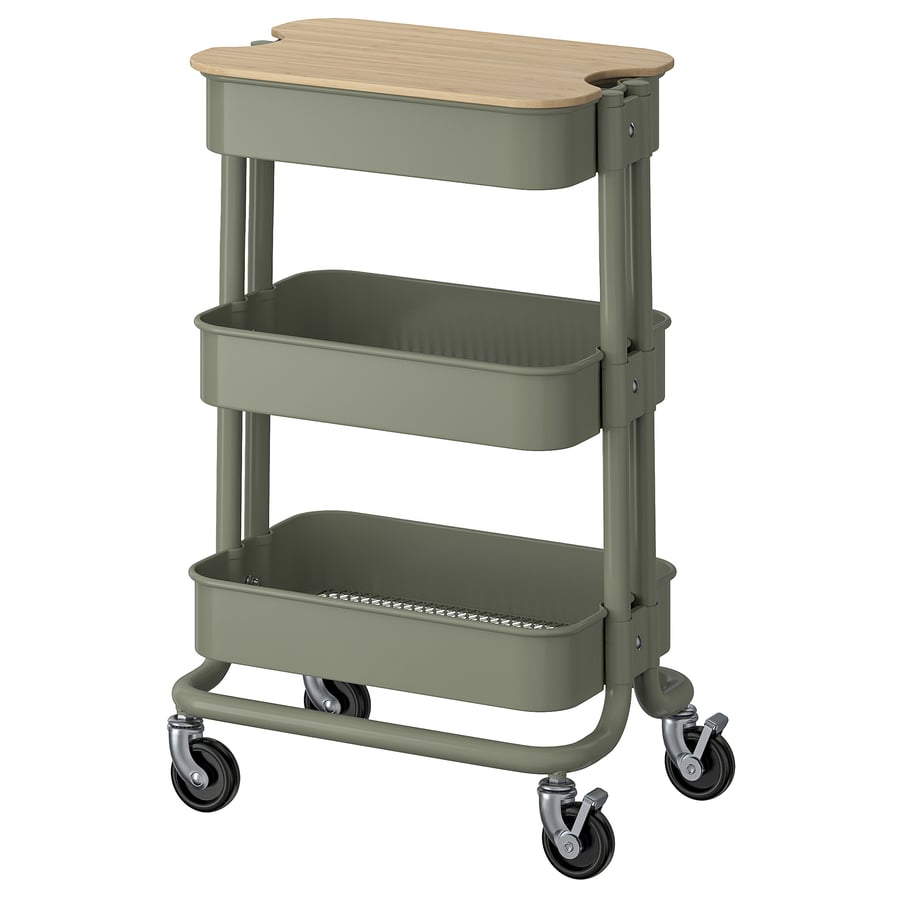
RÅSKOG Cart (The No-Drill Vertical Garden)
Not ready to commit to wall mounting, or renting, and need to avoid holes? The RÅSKOG utility cart could be your answer.
Three tiers of herbs on a rolling cart that you can wheel to the sunniest spot in your home is a genius solution — flexible, portable, durable, and genuinely stylish.
It’s less of a hanging garden and more of a vertical one, but it solves all the same plant needs with none of the permanence.
Tension Rod Method (Perfect for Renters)
IKEA tension rods placed inside a window frame let you hang planters from S-hooks with zero drilling required.
Position your tension rod at window height, hang planters or mason jars fitted with hooks, and you’ve got a floating herb garden living exactly where the light is best.
Special discounts on tension rods and hooks make this one of the most affordable setups of all.
Step-by-Step: How to Build the IKEA Vurm Hanging Herb Garden
Ready to build? Here’s the complete tutorial — including updates on drainage and plant care that will keep your herbs thriving long after the initial build.
What You’ll Need
- IKEA Vurm wine rack (or similar rack with cylindrical openings)
- 4 pint glasses
- 4 small herb plants (basil, cilantro, parsley, thyme, mint — more on choosing below)
- Drainage rocks or pebbles (Dollar Tree is a great source!)
- Potting mix for herbs
- Latex paint in any color (optional)
- Americana Clear Chalkboard Coating (optional, for labels)
- White chalk
- Drill and wall anchors, or picture-hanging hardware rated for 20+ lbs
- Stud finder
Decorate Your Glasses (Optional but Adorable)
Dip the bottom inch of each pint glass into latex paint. Let the excess drip off, set on wax paper to dry, and move each glass slightly after an hour so it doesn’t stick. Once the paint is completely dry, brush on a coat of Americana Clear Chalkboard Coating. Let it dry for an hour, add a second coat, then let the glasses dry overnight.
To “condition” the chalkboard surface so chalk wipes away cleanly: rub the flat side of a piece of chalk over the entire painted area, then wipe off with a dry paper towel. Your labels are ready to write.
If you prefer a minimalist look, skip the paint entirely — clear glass with colorful pebbles visible through the sides looks beautiful too.
Create Your Drainage Layer
Add rocks or pebbles to the bottom of each glass, filling about one-third full. This step is non-negotiable: pint glasses don’t have drainage holes, so without a rock layer, water has nowhere to go and root rot sets in quickly. The pebbles create a reservoir below the soil where excess water collects harmlessly.
Pro tip for better drainage: Place the small plastic nursery pot your herb came in directly inside the glass — water will drain through the pot’s holes into the rock layer below. Paint the glass fully to hide the plastic pot if you go this route.
Plant Your Herbs
Gently loosen the root ball of each plant. You may need to remove some soil from the sides so it fits inside the glass without forcing. Don’t damage the roots — just be patient and work slowly. Add fresh potting mix around the plant to fill gaps, leaving about half an inch of space at the top. Press lightly to remove air pockets, then water gently to settle the soil.
Mount the Vurm (The Right Way)
This is the most important step — a rack full of water-heavy plants is heavier than it looks. Do this correctly and your herb garden will be sturdy and safe for years.
If using the Vurm, rotate the Vurm horizontal (this is the hack — mounted sideways, the slots hold glasses rather than wine bottles).
Hold it against the wall in your chosen spot and mark the mounting holes with a pencil. Use a stud finder to locate studs. Mount at least one side of the rack into a stud; if that’s not possible at your preferred location, use drywall anchors rated for at least 20 lbs.
Drill pilot holes, insert anchors if needed, then screw in the mounting hardware. Hang the rack and give it a firm tug to confirm it’s secure before adding your plants.
Add Plants and Label
Slide each planted glass into a Vurm slot — they should fit snugly. If there’s any wobble, wrap a rubber band around the glass before inserting to create friction. Write herb names on the chalkboard bases with chalk. Done!
Choosing the Right Herbs: Which Plants Will Actually Survive Indoors?
Do herb plants need sunlight?
Yes. But not all herbs need the same amount, and understanding this makes the difference between a thriving garden and a sad, leggy tray of struggling plants.
Herbs for lower light (north-facing windows or spots a few feet from a window): Mint, parsley, chives, and cilantro are more forgiving in lower-light conditions. These are great starting points if your kitchen doesn’t get much direct sunlight.
Herbs that need bright, direct light (at least 6 hours of sun daily): Basil, rosemary, thyme, and oregano need the sunniest window you have.
If your kitchen doesn’t get enough natural light, a small LED grow light strip mounted above the rack is a perfect add-on that makes a huge difference.
Herbs to avoid in small indoor containers: Dill and fennel grow tall quickly and don’t do well confined in small glasses. Save these for outdoor space in larger pots or garden beds.
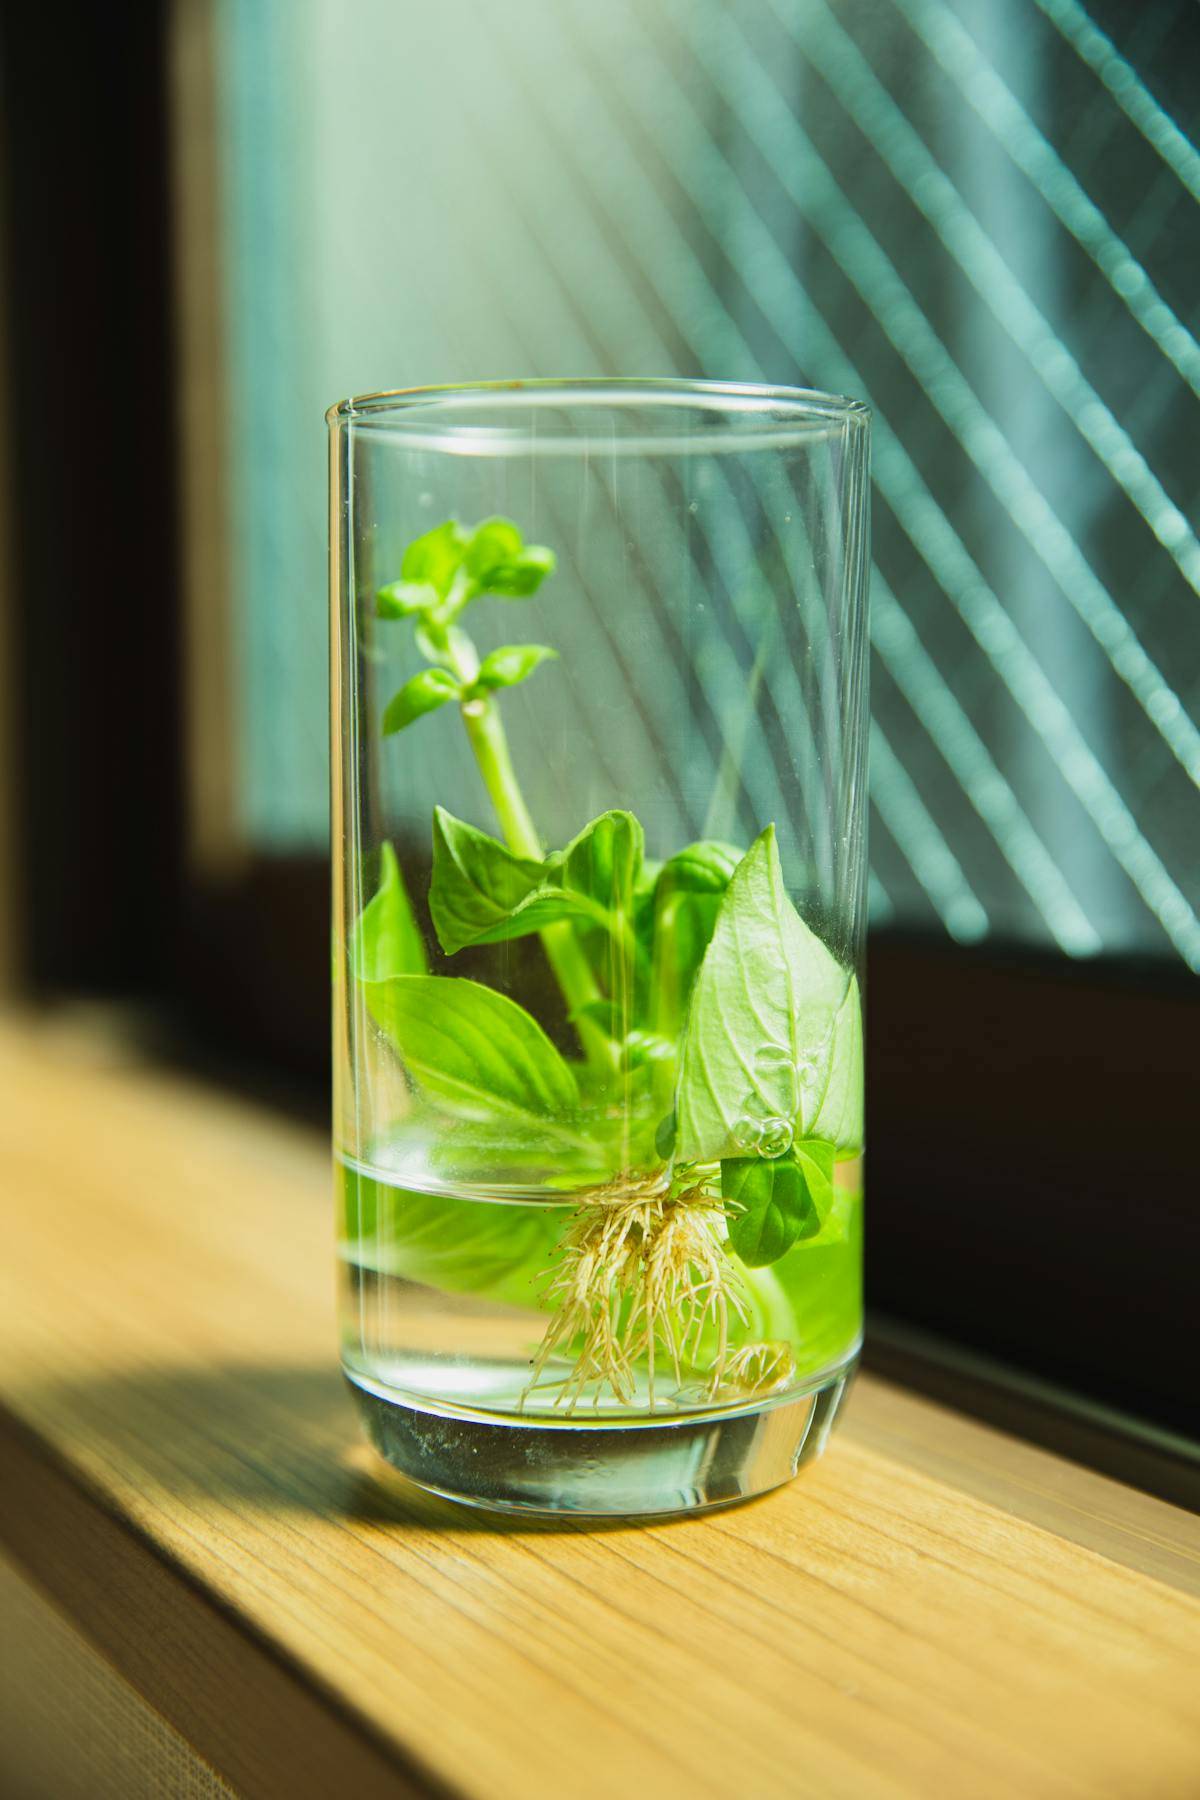
Can you grow herbs in a hydroponic bowl?
Yes, and it’s a great option if you want to skip soil entirely. Herbs like basil, mint, and cilantro grow very well in water with added nutrients.
Keeping Your Herbs Happy: Care Tips That Actually Work
Watering
The most common herb garden killer is overwatering.
Check soil moisture every 2-3 days by inserting your finger about an inch into the soil — water only when it feels dry at that depth.
If you see standing water above the rock layer and the soil is still wet, hold off completely until things dry out.
How does a plant do in water? Herbs in closed containers (like our pint glasses) can stay moist for longer than herbs in traditional pots with drainage holes, so err on the side of less water rather than more.
Light and Rotation
If your herbs get light from only one direction, rotate each glass weekly to prevent uneven, lopsided growth toward the light source.
Harvesting for Better Growth
Here’s the secret most people miss: the more you harvest, the more your herbs grow. Pinch stems from the top, never taking more than a third of the plant at once.
For basil especially, pinch off any flower buds the moment they appear — once basil bolts (flowers), it puts all energy into seeds, and the leaves turn bitter.
Regular harvesting keeps plants compact, bushy, and productive.
When Herbs Do Poorly: Troubleshooting
Leggy, reaching plants: Need more light. Move closer to a window or add a grow light.
Yellowing leaves: Usually overwatering or nutrient deficiency. Let soil dry out between waterings, and feed with diluted liquid fertilizer every 2-3 weeks.
Wobbly glasses: Add a rubber band or two around the glass before inserting into the slot.
Fruit flies: Almost always a sign of overwatering or decaying organic matter in the soil. Let the soil dry out and check the rock reservoir for debris.
Root binding: Pint glasses are small — fast-growing herbs like basil may become root-bound within a few months. If you notice stunted growth or roots circling the bottom, it’s time to repot or start fresh.
How Long Does a Leaf Plant Last?
Herb plant lifespans vary. Annuals like basil and cilantro typically last one growing season (3-5 months indoors) before going to seed and declining. Perennials like mint, thyme, rosemary, and chives can last for years with proper care.
Planning your hanging garden with a mix of annuals and perennials gives you both reliable, long-term greenery and seasonal variety.
How to Make an IKEA Hanging Herb Garden
Materials
- IKEA Vurm wine rack
- 4 pint glasses
- 4 small herb plants
- Drainage rocks or pebbles
- Potting mix
- Latex paint + Americana Clear Chalkboard Coating (optional)
- White chalk
- Drill, wall anchors, stud finder
Instructions
Step 1: Decorate Your Glasses (Optional) Dip the bottom inch of each glass in latex paint and let dry. Apply two coats of chalkboard coating, drying one hour between coats. Condition by rubbing chalk over the surface, then wiping clean.
Step 2: Add a Drainage Layer Fill each glass one-third full with rocks or pebbles. This prevents water from pooling at the roots.
Step 3: Plant Your Herbs Loosen the root ball and place each herb in a glass. Fill gaps with fresh potting mix, leaving a half inch of space at the top. Water lightly to settle the soil.
Step 4: Mount the Vurm Rotate the rack horizontally. Mark mounting holes on the wall, locate studs with a stud finder, and drill in. Use drywall anchors rated for 20+ lbs if you can't hit a stud. Hang the rack and tug to confirm it's secure.
Step 5: Add Plants and Label Slide each glass into a slot. If it wobbles, wrap a rubber band around the glass for a snugger fit. Label with chalk.
No matter how you choose to implement your herb garden, it is the perfect addition to your kitchen and incorporating fresh ingredients into your meals.
@Anonymous I love it! Great idea to use colorful flowers… so pretty.
This is wonderful! I also purchased a Vurm months ago, only to discover that it didn’t fit any of our wine bottles. I was disapointed initially, but now I’m glad it didn’t work- I like this use even more! Thanks so much for sharing 🙂
Congrats on a great hack! My son found it and forwarded it to me. I have purchased the rack and the glasses (4 for $5 at local grocery store), and found a great cheap source for pretty rocks for the bottom (Dollar Tree). So I just need to find mounting hardware – it was not included in my sealed bag, but I didn’t buy it from Ikea. I am going to skip the paint and labels, I think. I am looking forward to being able to “save” some of my outdoor organic herbs in the fall!
First this is a great idea! We just made one today. Has anyone had success with their herbs growing? I’m afraid that the glasses may be too small for them to flourish, but I’m not a gardener so idk
Did you not get root rot from the lack of water drainage?
@Leanna the rocks help with drainage and preventing root rot (but it may eventually happen, because of the closed containers). Be sure not to overwater… that will help. And you might consider putting the plastic pot that the plant comes in inside the glass so that the water will drain through the pot and into the bottom of the glass. You might want to paint the whole glass though, so you don’t see the plastic pot!
I will be using attractive stones in the bottom and NOT painting the glass. This way I can visually observe the amount of water in the bottom and the condition of the roots.
Wonderful and fun DIY. Will give it a try. Thanks
Herbs need a lot a sunlight to continue to grow. This method is fine, but might last longer on a patio wall. Somewhere that gets sunlight. The painted bottoms are a good idea, for those thinking otherwise. The stones are good drainage, but the water gets muddy as it filters through. Pretty stones won’t show after several waterings.
Extreme closeups and odd perspectives make it difficul to visualize this project. Straightforward shots would have been appreciated.
So how did you solve the wine bottle storage dilemma? I am building a wine rack that will accommodate the larger bottles, and would love to see what you did. Thanks!
@anonymous we’ve been storing our wine in a modular shelving unit… still haven’t found the perfect storage solution! Good luck with your wine rack project 🙂
Love the idea. Same thing happened to me, left in storage. My question is won’t the glass tip over and fall? Are they secure?
@Daney mine are very secure… as long as the glasses fit snugly, you shouldn’t have a problem!
how about drilling a couple of holes in the bottom of glass for drainage?
Omg I can’t wait to try this!