Though screen printing is the most efficient way of printing on textiles (check out my how-to here), it’s a lot of work to print a one-of-a-kind t-shirt. Here’s a cool way to create a stencil on the computer, and handprint it upon your shirt. It produces a different aesthetic than silk screening, as your completed shirt won’t look brand new, but nicely broken-in.
Ingredients:
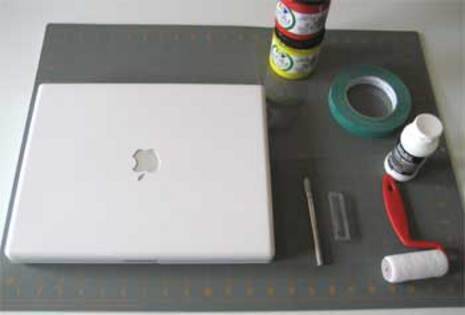
- Computer with image editing software (the instructions here are for Adobe Photoshop)
- Craft knife and blades (such as X-Acto)
- Cutting Mat, or scrap piece of plywood
- Thin or Medium sheet of acetate (overhead transparency)
- Masking tape
- Textile Ink, or Acrylic Ink and Textile Fixer
- Small Painter Roller
- T-Shirt
- Iron and Parchment Paper
Designing the Stencil
(The instructions are for use in Photoshop. The same techniques can be used in any software, or your can simply hand draw an image.)
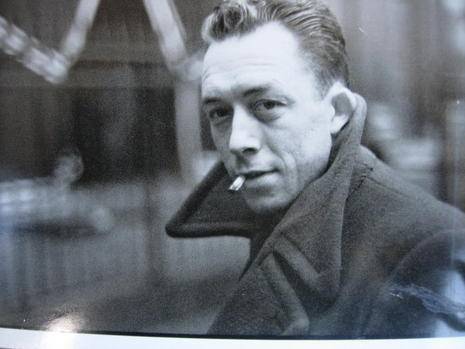
1. Select your image and import into Photoshop. I’ve chosen a photo of French philosopher and author Albert Camus. (Al-Behr Kah-mou)
2. Create a duplicate layer, and using the eraser and the magic wand tool, isolate the subject from its background. I find it useful to use a solid fill layer in a bright color for contrast.
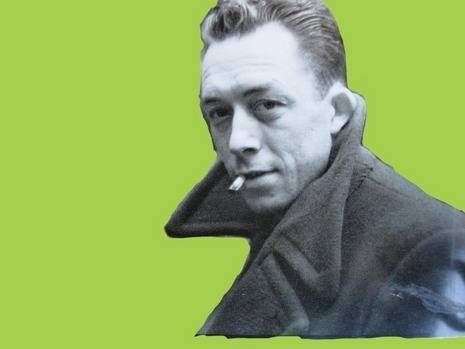
3. Force your image into pure black and white using Image->Adjustments->Threshold, and adjust the slider for the best balance of white and black.
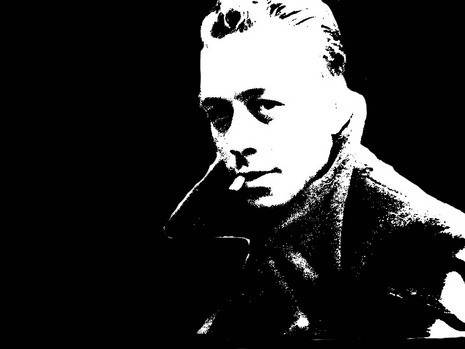
4. Apply a blur using Filter->Blur->Gaussian Blur, with the radius in the low pixel range (.01-2), which smoothes out some of the pixelating from applying the Threshold.
5. Using the paintbrush tool, connect each black area to the larger black outline. No blob of black can stand alone, or it will be lost when you cut out the stencil.

6. Invert your image, and print it out on an 8.5 x 11” sheet of paper (a thick, high quality paper will do best).
Cutting the Stencil and Printing the Shirt
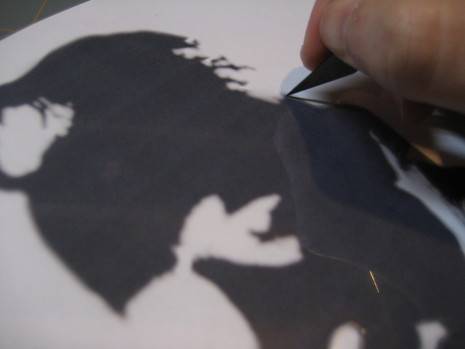
1. Place the acetate atop the printed image, and secure the edges with masking tape.
2. Using the X-acto knife and a sharp blade, carefully cut out the (now) black part of the image. You should cut through both the acetate and the paper below it. Work slowly, and don’t be discouraged if you spend over an hour cutting your stencil.
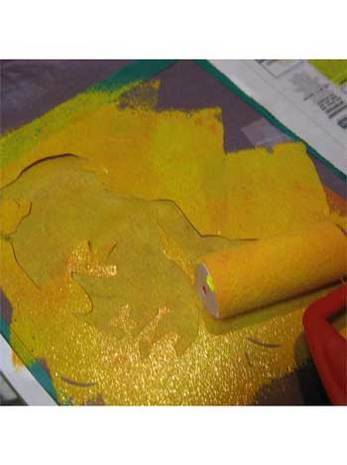
3. To print your shirt, place your stencil as you wish, and tape the stencil down with masking tape. Adding newspaper to the uncovered fabric will also protect it from the ink.

4. Mix your ink color, adding in the fabric fixer if necessary. Unfortunately, you’ll use a lot of ink to fully saturate the roller, so be sure to mix a lot. (I wonder if a rubber brayer would work on fabric and cut down on wasted ink.) Test your stencil on a sheet of paper to get a feel for the process.
5. Fill the roller with ink, as you would when painting a wall, and then apply the ink atop your stencil, working in from the outside. It’s okay to do multiple coats, just be sure that the stencil doesn’t move.
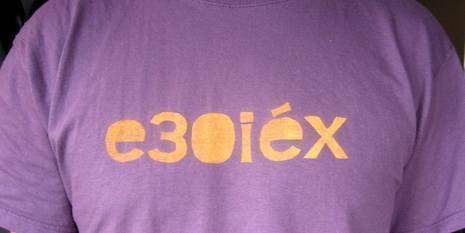
6. Carefully remove the stencil, tape, and newspapers, and admire your good work. Let the ink dry, and then iron on a high, dry setting, using a piece of parchment or wax paper between the iron and the short, which heat-sets the ink.
7. Hand wash your shirt, and dry on a low setting, with some old towels to cut down on the agitation to the fabric.
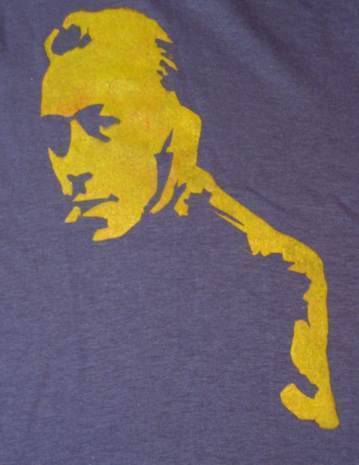
I added some nonsense to the front, just for kicks.
Feel like making some more graphic art, this time for your wall? Then check this out.