
I have no formal training in the visual arts, but I’ve been determined to learn to do photo silkscreen prints since I learned about the process in high school. Unfortunately, a lot of the ‘how-to’ literature scares one to thinking one needs a vacuum-press table, a complex exposure system inside a formal dark room, enormous wash basins, and pro-grade halftone filters, etc, etc, etc…
As it turns out, one does not. Using a pre-made and readily available materials, it is quite simple to do quality prints for only $75 USD.
The process works like this: A light-sensitive emulsion is applied to the screen. A black and clear image is placed atop the screen, and the screen is exposed under a photo bulb, which hardens the emulsion, except under the black image. Then the un-hardened emulsion is washed away, leaving the screen open only where intended. Brilliant.
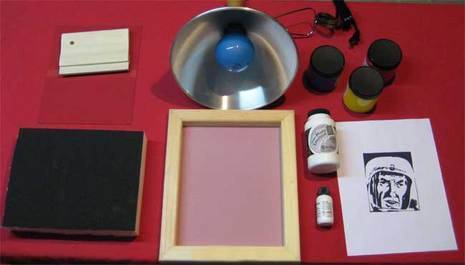
Ingredients:
Pre-fab or homemade polyester screen [I used an 8”x10”]
Piece of glass the same size as your screen
Thick foam that matches the INSIDE dimensions of your screen, painted or covered in black
Rubber squeegee, two inches smaller than your frame
Diazo Photo Emulsion and Sensitizer (such as Speedball® brand)
Water-based Silkscreen ink
250 or 500 Watt Photoflood bulb and reflector apparatus (available at a photo supply store)
Electric Fan
Preparing your image:
Select or create an image, and import into editing software. Force your image into only two colors – black or white. This has to be on or off. To do this in Photoshop, go to Image‡ Adjustments‡ Threshold, and play around with the Threshold Level. This can also be done in any software by converting the image to a bitmap. To create shades of gray, one must use halftone dots, which I can’t figure out how to do in Photoshop. Please share your ideas.
Print your image in black and white. If you have digital “stair steps” on the edges, trace over them with a black marker. Next, photocopy your image onto clear acetate, AKA overhead transparencies. To aid in the exposure process, make two identical transparencies, and secure them atop each other (using staples along the edges, or double-sided transparent tape. (You can also draw directly on the acetate with india ink, or use vinyl letters.)
Preparing the screen:
Tape the inside edges of wooden frame of your screen. (I did not do this, and regret it.) Following the directions, mix your photo emulsion with the sensitizer, until it has a uniform color. Work in a dark room, and dim the lights (it does not need to be darkroom safe), and stay away from windows. Add the emulsion to your screen, using your squeegee or a strip of cardboard, and cover the entire surface. Keep flipping the screen, and spread the emulsion evenly. Elevate the screen above the floor (e.g. on some scrap 2x4s) and place next to a fan in a COMPLETELY DARK room, such as a windowless basement, bathroom, or closet. I let mine dry overnight, but an hour would be adequate with a fan.
Exposing your screen:
In low light, place your dried screen upside down on top of the foam. Place the doubled-transparency on top, and then add the glass.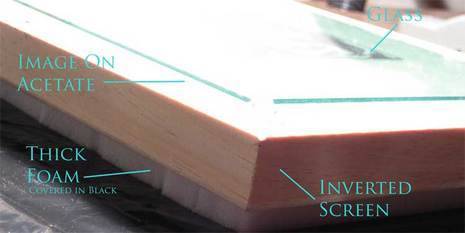
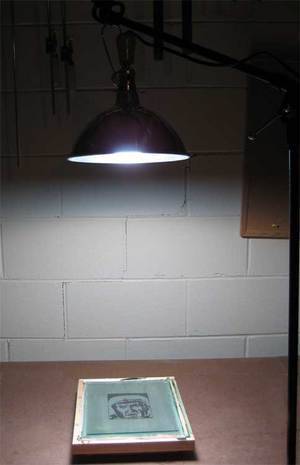
Secure your lamp 24” above the screen. I used a microphone stand for maximum adjustability, but you could secure yours to the ceiling, or suspend it from a chair or foldable TV tray. If using a 500-watt bulb, expose the screen for 15 minutes. For a 250-watt bulb, increase the time to 30 minutes. (There are ways to do this with standard lamps and high-watt light bulbs, but I think it’s worth the $30 to do it right, for both clarity of image and electrical safety. You can also use the sun, but the results are uncontrollable.) The exposed emulsion will darken significantly.
Wash the screen:
Wash the screen in a sink or the bathtub with warm water. You can attach a spray nozzle to increase the force of the water. Take your time, and eventually the goo will start to magically disappear. You can rub lightly with the soft parts of your fingertips, but eventually it will just start to happen. Incredible!
Dry the screen again for another 30 minutes. 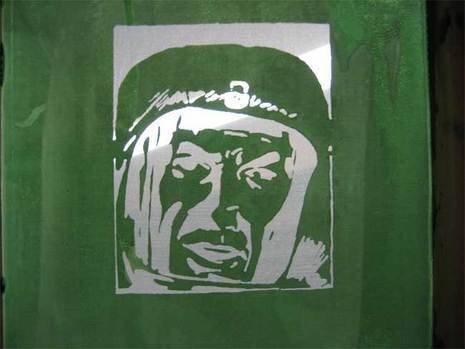
Print your image:
Lay the screen down on a piece of paper. Add a thick glob of ink alongside the top width of the image, atop the emulsion. Keeping the frame secure, grab the ink with the squeegee and pull all the way down in one motion. Experiment to learn how much pressure is required. Pull the screen off carefully, and be amazed at your good work.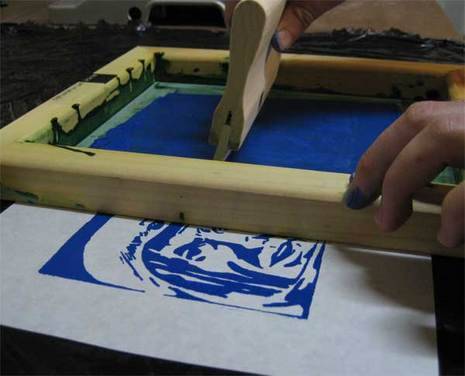
If you wish to print on fabric which will be washed, add a fixer such as Versatax® to your ink before you make your print. You can also the iron the image on high, with a piece of parchment paper between the iron and the fabric.
You can buy diazo emulsion remover, which allows you to use your screen again and again. I’m amazed at how easy this is with the right equipment, and after a little more practice, I plan to build a larger screen system with a high “dpi” screen. Post will follow…
Enjoy!