
I have a penchant for purchasing stuff that’s cool, but for which I don’t have specific plans or use. Case in point: I have piles of pulp and sci-fi novels from the 40s-60s. The art and colors are amazing, and the language provides for ridiculous quotes for ages. But after I slice out the illustrations, and force my way through the first and last chapters so I can say I ‘read’ them, these dime store masterpieces don’t escape from their cardboard homes often.

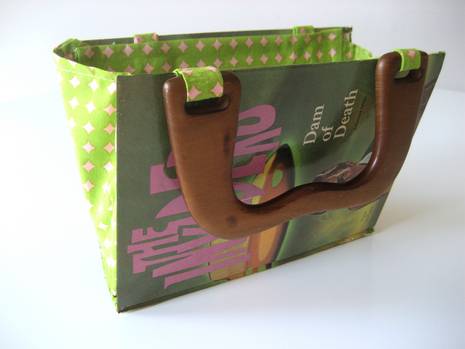
Thus, enter this project: an adorable handbag featuring the incredible art of ‘literature’.
Click play, or go here to watch the video.
Materials
- A hardbound book with an appealing cover
- Fabric (1/2 yard or so)
- Sewing machine or needle and thread
- Scissors
- Utility knife
- Craft glue
- Store-bought [or handmade] purse handle
- Colored markers
- Polyurethane finish, Mod Podge, or watered-down white glue
Step
Use the utility knife to cut the pages away from the binding. Be careful if you’re using an old book (especially a initially inexpensive one); don’t cut through the cover. Make several light passes if necessary.
Step
If your book is worn, color in any white areas with matching markers.
Step
Stand the book vertically on a piece of paper, opened as wide as you’d like the handbag to open. Trace its shape on the paper. Cut out the shape, adding a half inch (for seam allowance) on each side.
Step
Cut the triangle in half along its height. Copy each half of the triangle onto the fabric twice, adding another half inch for seam allowance along the height. You’ll have four triangles, two of each shape.
Step
Pin one of each of the triangles with right sides together, and sew along the height. This will recreate the larger triangle that you traced from the book. Sewing a seam along the middle helps to encourage the sides to fold inside the handbag when closed.
Step
Copy this larger triangle onto a fresh piece of fabric. Pin the sides right sides together, and sew along all three sides, leaving a tiny opening at the bottom to invert. There’s no need to sew the opening, as it will be glued on the inside of the book.
Step
Repeat steps 5-6 to create a second triangular side panel.
Step
Cut four 2×3” (or whatever will fit in the slots of your handles) strips of fabric, fold along the length, and sew right sides together. Invert them (it’ll be difficult) to create four 3” tabs.
Step
Lay the book cover flat on the fabric, and cut out the shape, adding an inch on all sides. Fold this extra inch over and iron to make a lining panel.
Step
Attach the handles by gluing the tabs to the cover. Then, glue one side of the side panel onto the edges on one side of the book.

Step
Dot that half of the book with glue, and glue one half of the lining panel to the side glued in step ten.
Step
After the glue dries a bit, glue the other long side of the triangle end pieces to the other half of the book, and cover with the lining panel. This will take a little patience and finagling, but it will come together. Press down to secure the glue.
Step
Add any embellishments, such as buttons, beads, etc, if you wanna give your bag a little additional flair.
Step
Finish with a protective coat (either glue or polyurethane based).
Step
Fill with the essentials (or, in my case, give it to someone with impeccable taste), and be on your very stylish and recycled way
Like repurposing old stuff? Then you’ll want to check this out…
I’m having a heart attack watching you use a rotary cutter with no ruler….those poor fingers…….please get one!!
Great tutorial, btw. : )