
If you live in a smaller home, you know that Christmas trees take up a lot of valuable space during the holidays. Space that you may not have to spare. Right? So why not try this fun and fringy DIY alternative Christmas tree idea, that towers over 6 feet tall, but takes up virtually no space at all. Oh, and by the way, it also makes the perfect holiday photo backdrop. Pretty cool, huh? Here’s how to make your own giant wall art Christmas tree at home.
Supplies
- 5 pieces of 20×30 white foamcore or mat board
- fringe scissors
- regular scissors
- tissue paper (green and brown (at least 30 sheets))
- painter’s tape or masking tape
- duct tape (white preferably)
- one bottle of craft glue
- Xacto knife
- marker or Sharpie (optional)
- picture frame hook
How to do it
Step
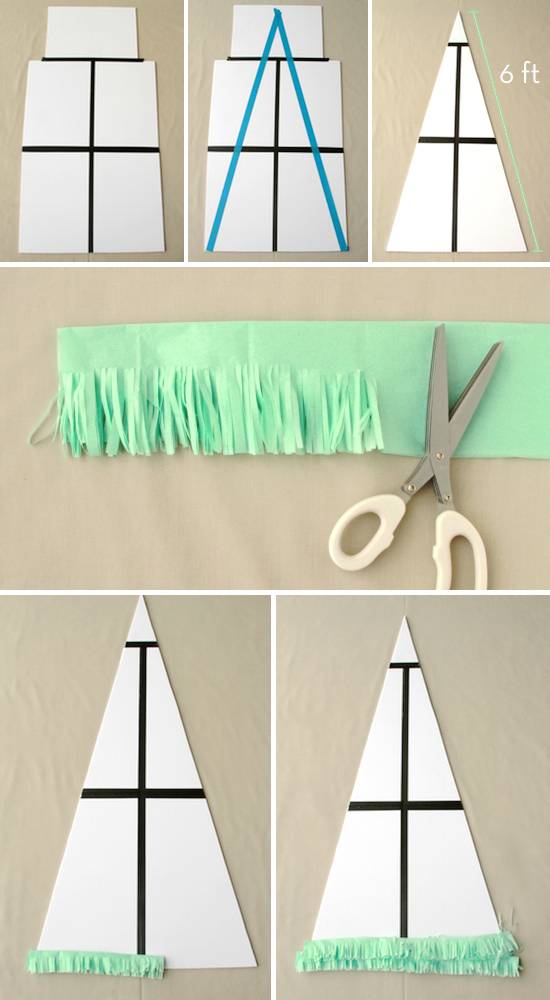
Lay out four of the five pieces of white foam core vertically, two up and two down, to form a larger rectangle. Place fifth piece of foam core at the top of the newly-formed rectangle, horizontally. Make sure that top piece is centered. Using duct tape, attach all the pieces together to form one giant piece. I added a few layers of duct tape on both sides, along the creases. NOTE: I am using black tape in the photos so you can see where I’ve added duct tape. Your duct tape will be white to blend in with the white boards.
Step
Map out the size and shape of your tree with painter’s tape or masking tape. Make sure your tape is secure to you boards before moving on to step three.
Your tape lines will now serve as a straightedge. You can use a yard stick instead if you’d like, but the tape actually works really well on it’s own. Using your Xacto knife, carefully cut your Christmas tree shape.
Step
Once your Christmas tree is cut, you are ready to start creating the tree fringe with tissue paper. Cut a full sheet of tissue paper in half (hamburger NOT hot dog). Take one of your half sheets and fold it into thirds, still the hamburger way, so you create a really long rectangle with three layers. Now it’s time to let the fringe begin. Using your fringe scissors, cut fringe, leaving about one inch of room at the top. You will be making a lot of these sheets, so you might want to grab a drink, and a comfy seat.
Step
Starting at the very bottom of your tree and working your way up, you can now start gluing your fringe. Flip your fringe over, add a bead of glue across the length of the top (where you left that extra inch of non-fringe). And attach to the bottom of your tree. You’ll want the very bottom layer to hang off the end of the board so that it can cover your tree trunk, which you’ll add later. Depending on how large your make your tree, you will most likely need two fringe strips for each line toward the bottom of the tree.
Step
Start your next layer (the second line of fringe) a little higher than the one below it. You want to cover the non-fringey area from below, but just barely. Continue this process until you’ve covered your tree all the way to the top.
Step
Once dry, flip your tree over so the back is facing toward the sky. Glue any overhang to the back. This is also a good time to attach a picture frame hook as well, so it is ready for hanging.
Step
To create the tree trunk, cut a scrap piece of foam core into a stubby rectangle that is roughly one fourth the length of the bottom of your tree. Cover in brown craft paper and then cut small fringe strips, just like you did with the tissue paper, with recycled grocery bags. Secure fringe to trunk with glue.
Step
Attach trunk to tree with duct tape on both sides (front and back), which will be covered by your tree fringe in the front. Now you are ready to hang your tree, add some garland, and enjoy.
Here is the finished project:
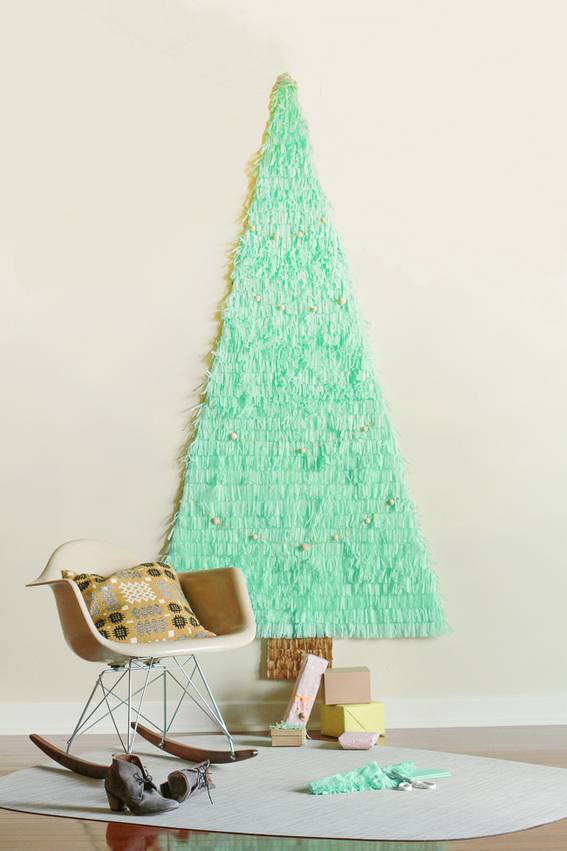
Now that my tree is hanging, I think it is feeling a little lonely. It may be time to invite over some friends for a photo op. I really want to use this as a photo backdrop for our Christmas pizza party.
How to Store: Since the boards are pieced together with duct tape, it would be easy to score the tape in the back with an Xacto and fold it into sections when you are ready to pack it away. Store in an air tight container (the long skinny ones that can be stored under your bed would be perfect if you are folding the tree up to store it). When you are ready to use it again, just re-tape the back and fluff up the fringe. If any areas of the tissue are damaged, you can easily replace the damaged strips next year. Just keep a couple extra pieces of tissue paper around in the color you used.
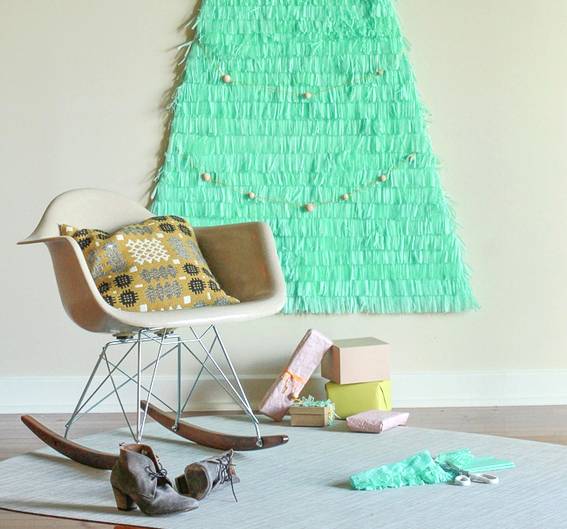
And on another note, in case you aren’t interested in the tree trunk look, here’s what the tree looks like without it…
What do you think? Would this alternative Christmas tree idea work in your home?

Oh, and don’t forget to check out my garland how-to right here. It only takes five minutes to make. So easy!
I really like this, but I am wondering if there would be a way for me to hang some of my kids personal ornaments??
Thoughts??
Thanks!