Brittni Mehlhoff

Inspired by an Anthropolgie installation I saw a few months ago, I created a three-dimensional piece of wall art that is easy to install and relatively inexpensive to make (the final budget came in under $50). Aside from wall art, this project also doubles as a photo booth prop, and if you have the time, it would make an awesome photo booth backdrop too. Want to learn how to make your own? Get the full tutorial and see the finished piece after the jump.
Before you get started, I wanted to touch on color schemes for a second. I thought a lot about the colors I wanted to use beforehand, and had originally selected five colors to use. The fifth color didn’t end up working well with the rest, and so I ended up scratching it after a few botched circles.
So what is the lesson here? Don’t be afraid to ditch a color if it’s not working. I also recommend sticking to a five color maximum. In this case, the wood acted as my fifth color because I left the bare wood showing in many of the circles.
Okay, now let’s get started…
 Brittni Mehlhoff
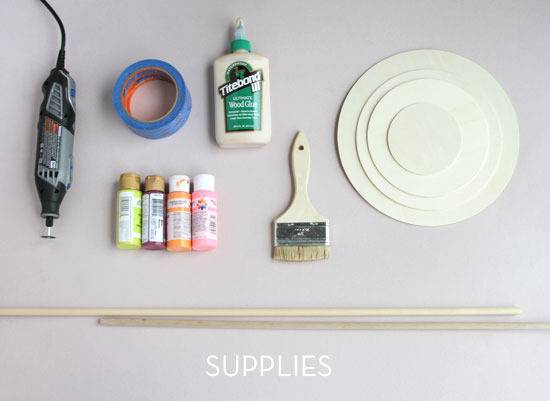
Supplies Needed:
- Wood circles *The ones I used are from here and the sizes used are as follows: 4 in, 6.5 in, 8 in, and 10 inch. Similar wood circles can be found at craft stores as well.
- Acrylic craft paint in several colors (up to five), paint brushes, and blue painter’s tape
- 1/2″ thick dowel rods
- Rotary tool or small saw (to cut the dowels)
- Wood glue
- Sheet of 1/8″ – 1/4″ hardboard or plywood
- Hammer and nails
- Saw tooth picture hanger
 Brittni Mehlhoff
How-To:
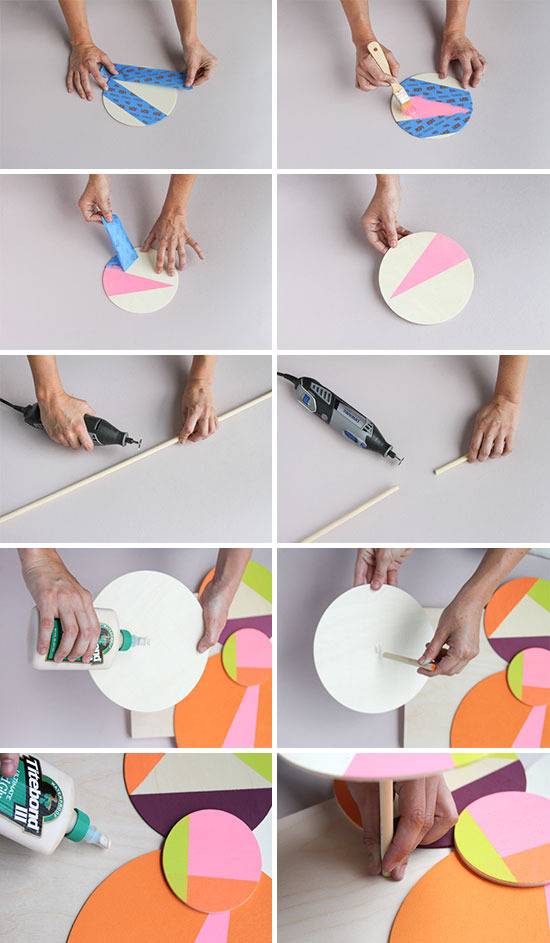
1. Start by taping off various shapes on one of the wood circles. Be sure to press the tape down securely, especially at the edges, for a crisp line when finished.
2. Paint inside the taped off area, and allow to dry.
3. Remove painter’s tape and begin the process again with another color. Or keep it simple, and use only one color. Or use three! Have fun with it.
4. Repeat this process for all of your circles in various sizes, and be sure to mix up the patterns and color combos.
5. Now, it’s time to cut some dowels. Using a rotary tool or saw, cut various lengths from the dowels (I stuck to four different sizes for this project – one short, one medium-short, one medium, and one tall). The dowels will determine how far away each circle will rest from the main wood frame that everything is connected to. NOTE: I also attached several circles straight to the wood panel base, without any dowels, which gave me a fifth height.
6. Once the dowels have been cut, set aside and do a dry fit to roughly map out the positioning for where you want the painted circles to line up when everything comes together. Once you start putting everything together, this layout might change, but it’s good to have a game plan when you get started.
7. With the design in place, it’s time to start gluing the dowels to the back of each circle. Flip over all of your circles and using wood glue, attach a dowel to the center of each circle and let them dry according to the instructions on the glue bottle. Clamp if necessary for thirty minutes to an hour and do not stress joints for a full 24 hours. You can also use the painter’s tape to hold things in place while the glue dries. NOTE: I selected the dowel heights at random, for the most part, making sure that no two circles next to each other would be at the same height.
8. Next attach a saw tooth hanger to the upper center of the hardboard or wood base. Flip over.
9. Now, that you have given the dowels enough time to fully dry and attach securely to the circles, you are ready to attach the dowels to the wood base with more wood glue. Additionally, nails can be hammered through the underside of the wood base and into the dowels for extra security. This helps keep the dowels in place while the glue is drying, in addition to extra security, but is not required.
9. Allow the entire piece to dry for a full 24 hours before hanging.
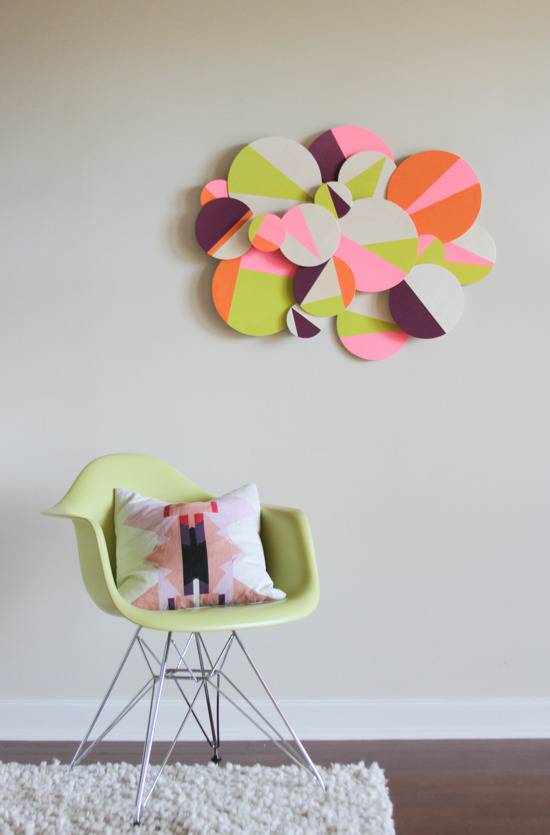
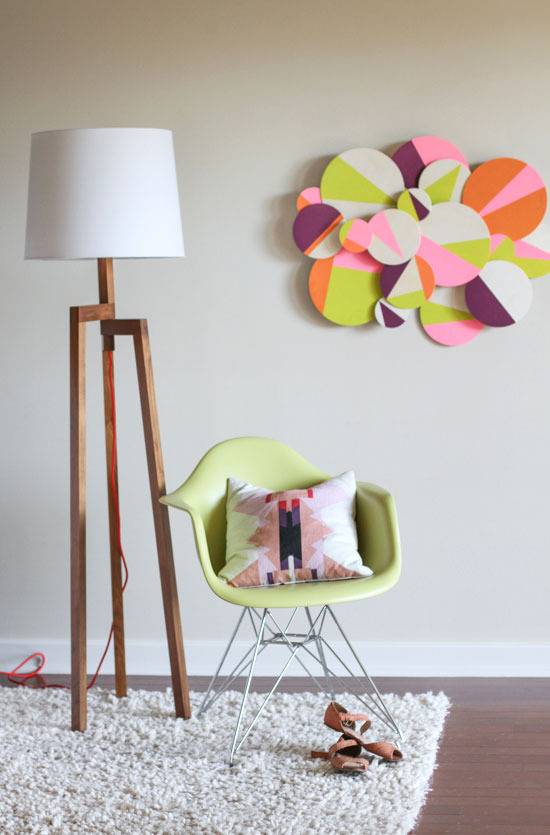
Aaaaaand! Here is the finished piece:
 Brittni Mehlhoff
And, as I said before, it also makes a cool photo booth prop. Or anything prop.
 Brittni Mehlhoff
 Brittni Mehlhoff
So what do you think? Will you be making one of these clouds for your home?
?
I really love this idea and I want to make one for my living room. My living room is charcoal grey and plum. What color palette would you suggest? Can glitter be used as well?
Great idea. Instead of painting the circles, I’ll be printing some old photos and gluing them on to make a nice photo wall item.
Please make a video!!This is amazing!
Wow!! I have been wondering how to create the 3 affect you are genius I saw it with mirrored cycles and wood circles cut straight from benches of tree in a boutique Hotel in Namibia. It looks magnificent!! Please could you send me video of how you did it to [email protected] thank you so much.
I mean branches of a tree. Predictive text hates me lol and I also meant 3 D
Wow!! I have been wondering how to create the 3 D effect…You are genius I saw it done with mirrored cycles and wood circles cut straight from branches of tree in a boutique Hotel in Namibia. It looked magnificent!! Please could you send me video of how you did it to [email protected] thank you so much.
I’m confused about the base? I would have liked to see a picture of the back, so I can understand how it all comes together. This is a beautiful piece though.
I absolutely love this idea and I am definately making one for my house. I was just wondering if you thought that it would still work if I skipped the dowel step and just stuck them straight onto each other? Thanks.
Hi, how many of each size circle did you use for this installation?