
So, how awesome is the really cool piece above? I wish I could take credit, but I can’t – it was invented by my friend Jimmy. He’s a prop master working on Hollywood films and TV shows and crafty by nature. When I saw this really cool piece in his home I had to know all about it! It looks like a mod piece of art that could be sold in a museum gift shop. It can be constructed with items found at the local home improvement store, and Jimmy was kind enough to share the full how-to with Curbly. So, read on!
Supplies:
- Drainage pipe (4″ diameter measuring 20 feet long)
- 26 feet of vinyl coated wire rope (cost at my Home Depot store is $.36 a foot)
- 4 turnbuckles (you can pony up for steel or use the less expensive zinc plated)
- 8 cable clamps
- 1 stainless steel clamp (this is to use as your guide when cutting the pipe)
- a strong utility knife (for cutting the drainage pipe)
- heavy duty wire cutters (for cutting the rope)
*note that a lot of these turnbuckles, clamps and wire rope come in varying materials with different prices attached to them so you can go super cheap or more expensive in your shopping.
How to make it:
Jimmy drew up the awesome illustration to accompany the directions below (love him!!)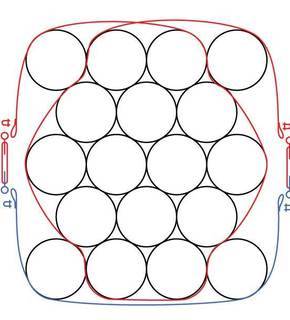
1. Cut the drainage pipe into 18 – foot long tubes (if you don’t have a power saw, this is where you use that industrial utility knife and the stainless steel clamp as your guide to cut against for a straight line)
2. Cut the 26 feet of rope in half (two 13 feet pieces)
3. Stand the 12″ pipe sections on a table in the formation just like the above diagram
4. Use 13 feet of the rope and thread it around the tubes as indicated in the RED color on the diagram. the rope should be placed about 3 inches from the end of the tubes
5. Pull it tightly for a snug fit and make loops through the turnbuckle eyes and add the cable clamps
6. Cut the excess rope (note you will be using this excess rope from the first 13 foot section for the next step)
7. Now wrap and attach the remaining bit of rope as indicated in the BLUE part of the diagram
8.Tighten the turnbuckles to make it slightly snug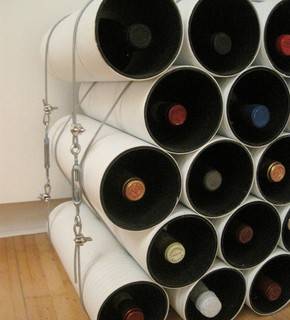 9. Flip the formation of tubes upside down in order to repeat the process (again, laying the rope 3″ from the end of the tubes) with your remaining 13 foot piece of rope
10. Now that you are done, tighten all of the turnbuckles until the tubes are held together tightly
Now, ooh and ahh and remark in wonder at your fab creation!
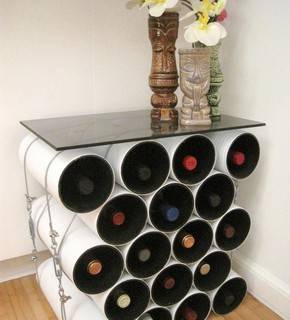
You can add a thick glass or even a wood top to this to use it as a side table like Jimmy did….I love a two-fer! Anything that has double or triple duty in my book is a good thing, especially since I live in a small space. And, you can make it different sizes too.. it could be a wine rack coffee table, console, or even just a tall piece of modern art… the options are endless!
So a great big THANK YOU to my friend Jimmy for having the patience to explain the process to me AND provide a diagram. He rocks! And he’s not in the blogoshpere so I don’t know how else you would have learned about this creation….. I feel it is my duty to share!
Holly Westhoff is the founder of adventures of an almost 40 year old intern where she chronicles her experience of starting over from exec to intern and also share lots of intern budget-friendly projects. (She works for free).