
I’m a terrible sleeper. I struggle with falling asleep, and staying asleep. I got it from my dad, and I’ve tried meditation, different levels of mattress and pillow softness, earplugs, heavy curtains, and everything I can think of. And I’ve learned a few things over the years of trying to feel rested: I need a little bit of distraction to occupy my mind to fall asleep, and once I’m there, I need an absolutely black and silent room to stay that way.
Thusly, I did everything I could to not upgrade my alarm clock I’d had since I was ten. Not an analog clock with hands (the ticking drives me nuts), but a basic, electronic LED red alarm clock that told me the time, had a non-distracting face, and stayed out of the way.
And then it broke, and I needed a new one. So I went to the store, and bought a basic, simple replacement. And it glowed like a freaking train engine. I mean it: I could read by the light of this thing. So, I took it back, and tried another. Same thing. See, most contemporary alarm clocks are lit by LCDs, and apparently, LCDs are really bright, and I mostly hate them.
It took four more alarm clocks, and I finally found an alarm clock that has an adjustable brightness. Brilliant! Plus, I can charge my phone and listen to music with it. But, it’s still pretty bright in an otherwise dark room. Luckily, I came up with a solution that helped immensely, for only a quarter.
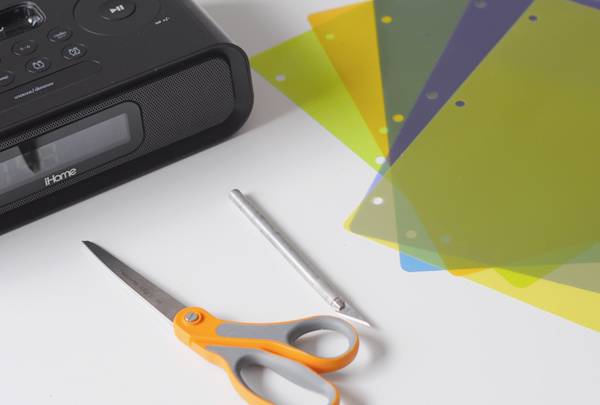
Materials and Tools
- Alarm clock
- Measuring tape or ruler
- Semi-transparent, colored plastic binders dividers ($1.19 for 5 at the office supply store)
- Scissors and/or craft knife
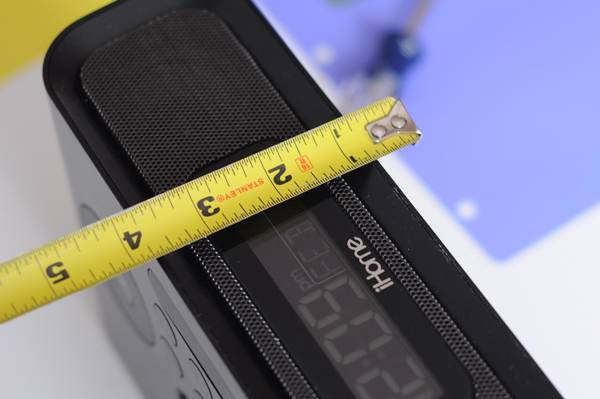
1) Begin by measuring the display of your alarm clock. Don’t just say, “It’s roughly 3 x 1 inches;” be very exact, and don’t be afraid of figures like “19/64s”.
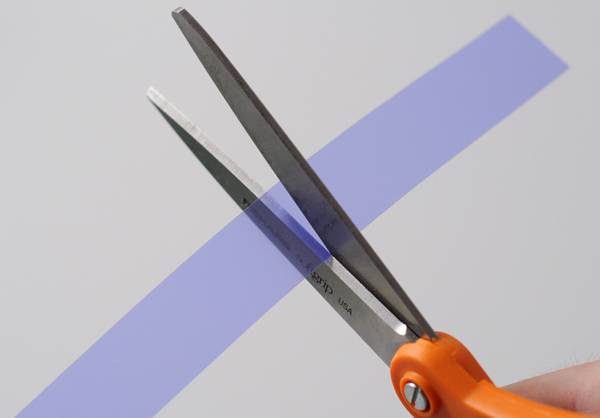
2) Cut a strip the same height as the display, and then cut it to length. My display has rounded corners, so I tried to mimic that.
3) You might be lucky, and the new “diffuser” might stick by static cling. Mine didn’t, so I spritzed just a little water on it, let it nearly dry, then smacked it on. It’s stayed in position for two weeks, and doesn’t seem like it’ll go anywhere.
Here are two photos to compare the difference. Of course, it’s tough to take pictures of a tiny light source in the dark, but here’s the alarm clock before and after, using the same exposure (F1.8, 1/60, ISO 1000) on both images. As I mentioned above, the clock does have an adjustable brightness, but both of these are taken on the dimmest setting, I promise. (You can see that the lighted buttons above are the same)
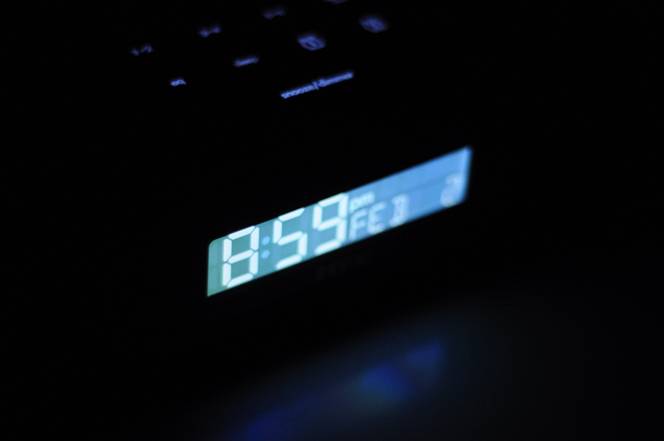
And with the addition:

It may not look like a huge difference in the photos, but in a dark room, it’s like night and day. Sorta literally… It does change the color, which I think actually helps, but the biggest difference is in the reflections. Without the addition, the light bounces off my dresser and the walls the surround it, lighting up the whole corner. With the binder divider attached, the reflection is calmed a lot, and the overall brightness is much subdued. You can still see the numbers clearly at nighttime and during the day.
Pretty sweet, huh?
Thank you!!! This has been driving me crazy for years and I usually just drape a tissue or 2 over it to block the light. Glad to know I’m not the only one that likes it completely dark at night.
I know what you mean. The leds are way too bright. Bright LED Shades makes an adhesive plastic that covers over the led to cut way down on the glare. Nice and sleek. And it pulls off without any sticky residue. Just a thought.
I just altered the circuit on mine to reduce the voltage applied to the LEDs; while still keeping the dimmer function intact. Set on low for night, which is barely visible, and high setting for daytime.
I went to a window tinting shop and they gave me a strip of tinting. They throw out a lot of it when they trim windows. It took two layers to make my clock dim enough. I put the tinting on the face of the clock. It looks fine.
dose any one know of a clock that remains dark to a touch or wave for a night table
Great idea, but blue is the wrong color for a night clock. The brain reacts to blue light by thinking it’s daytine (blue skies!) and triggering wake hormones instead of sleep hormones. You don’t sleep as well. Ideally, you want red lights at night, which the brain reacts to as evening (sunset), get ready to sleep.
I have a “radio controlled thermo clock” that lights up only when you touch the front screen panel. So you can see the time at night by tapping it lightly. The rest of the time it cannot be seen (completely visible in day light or with the lights on). Best alarm clock ever!! There is no brand but I know it was bought at Selfridges in London.
I did exactly the same thing with my same iHome radio but I used car window darkening film. I went to a local window car place and asked for a small piece that I triple layered to make it almost unreadable in daylight but so subtle at night. Like a dim glow. Love it. Only now wish it would be brighter in the day, and power my newer iphone!
I see that this site is old…but I am now going to search my home for something like this plastic to fix that horribly bright glow. You are a genius.
Great idea.
Had the same problem with the room being lit up. My timex had been red led so the change was brutal.
Made it work with a cut out piece of a plastic bag from Dodger stadium. Perfect dark blue tint, and best of all, free!
Huh. Clear, plastic binders… I was using cling wrap for my bright green LED (LCD?) clock, but it wasn’t dimming the display enough for my licking. Looking at the photos… I think this might be what I was looking for. Thank you!
THANK YOU! It totally worked and didn’t cost a thing as we had all needed at home already. Same thing happened with us; red LED from alarm clock was fine until clock broken and we couldn’t find another with red numerals. We settled for a green LED but it was so bright, I couldn’t sleep! Thank you again!
Hey Chris,
I appreciate the detailed guide. Unfortunately, the colored binder dividers did almost nothing to dull my display.
My issue was not a bright *backlight* like yours — my display has no backlight. Instead, my issue is the brightness of the numerals themselves, which are super bright red LEDs.
Here’s the solution that I ended up on:
– A cut-out of a manilla folder, taped onto the display with clear packing tape, followed by a strip of blue painter’s tape (i.e., masking tape).
Finally, the display is not painfully bright! The only problem now is that the numbers are so blurry that I can barely make them out…
You can also use ladies pantyhose. Cut a part of the foot off. Then slide that over the clock. It works perfectly. Too bright still ? Use the 2nd foot cut out and put that over as well for a double layer.
Having the same problem with the brightness of my clock. Bought the dividers today. Hoping it will help. Don’t see how the little numbers can put out so much light. I like darkness.
Absolutely brilliant! Was looking at those blackout stickers but they were horribly overpriced what they were. Read this and remember I had binders in my last notebook. One is a transparent black one. Unfortunately my clock has a sleek wooden affect with no real screen which takes away from that but I stopped caring when my room was pitch black again and I can still see it in the light! Brilliant!
Tracey – so glad you this is working for you! Sleep well!
This is brilliant. I was trying to avoid having to buy some gimmick led or lcd cover set for just 1 problem clock!