
Metallics have been all the rage for the last few years, but 2011 was the year they really shined (heh). So, like any dutiful design blogger, I decided to apply the trend to a simple DIY project and even mixed in some paint dipping shenanigans to boot! It’s a regular ol’ trend explosion up in this joint–but classy, of course. Always classy.
This faux-porcelain, (faux) gold-dipped bowl (well, it’s more of a dish, really), is capital E-A-S-Y. My clay molding skills haven’t been put to much use since I was about the age of 7, and even I could pull this off. If you’re ready to dive in and start DIYing your way to trend heaven, here’s what you’ll need!
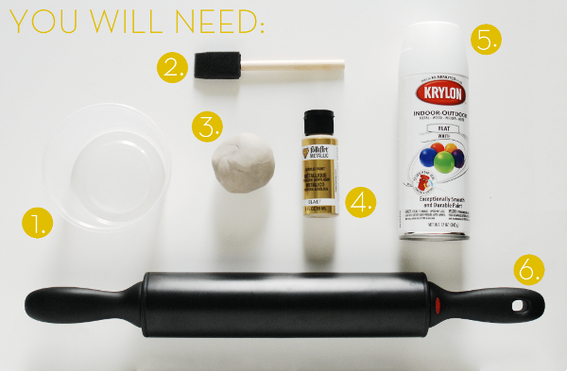
- round plastic container (or a circular cookie cutter, mason jar, etc.)
- foam brush
- air dry clay (the same kind you used as a kid)
- gold paint
- white spray paint
- rolling pin
The clay can be found at most craft or hobby stores and is about $15 for a 10 pound box. This is enough to make about 10294875 bowls. Save one of those newsletter/mailer 40% off coupons for this! Also, a note on the spray paint: I used flat. Why? Because in the end it makes your bowl look like unglazed porcelain, which is a super nice contrast to the metallic gold. And I am all about contrasts. So. Let’s get started!
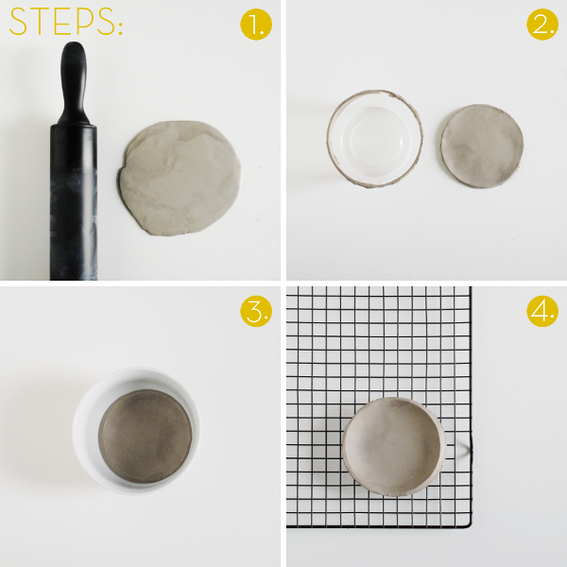
Step 1: Take that ball of clay you carved off that massive 10 pound block and roll it out, trying to keep the thickness even (about a quarter of an inch).
2. Armed with your plastic container/cookie cutter/other circular object, press down on the clay and twist a few times to make sure everything’s good and cut out. Peel off the excess clay and reattach it to your 10 pound block for future use. The twisting helps separate the clay from your work surface, so now just peel it off of your cutter.
3. Grab a bowl you already own. Set your clay disc in the center and gently press down around the sides and edges until it has a nice dish/bowl-y shape.
4. After about 30-45 minutes, the clay should be dry enough to pop out of your bowl mold. Simply turn it upside down and tap a few times to remove. Set on a cooling rack (so the air can reach the bottom and top at the same time… like magic) and allow to dry completely. This takes a while. Watch a movie, read some blogs, go to bed.
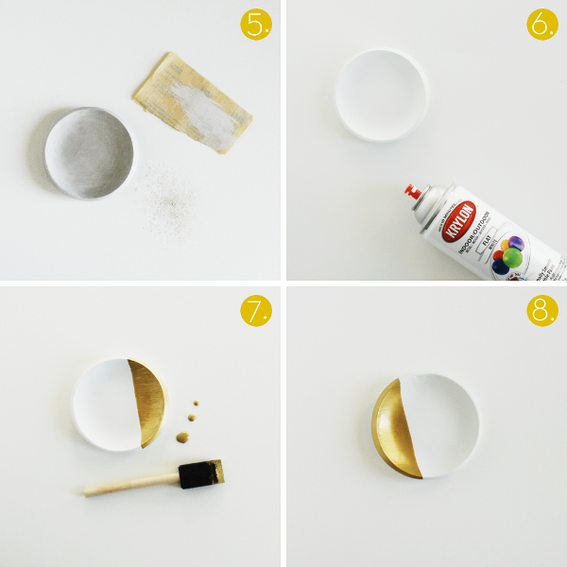
5. After a night of dream-filled slumber, go check on your bowl. Whaddya know, it’s dry! If your edges look a little wonky from the plastic container/cookie cutter, sand them down smooth using a fine grit sand paper. Or carve them away with an xacto knife/razor blade. Or leave them as they are. Sometimes wonky is good.
6. Take your precious bowl to a well-ventilated area and hit it with some white spray paint (remember: ‘flat’ for that unglazed porcelain look). A couple coats should do.
7. Grab that metallic gold paint that’s been patiently waiting for its time to shine (heh). Oh, and your foam brush, too. Decide how “dipped” you want your bowl to look and start painting (either eyeball it or draw a light line with pencil). One coat at first, easy does it. Allow that coat to dry or blast it with a hair dryer to speed things up. Repeat until you’re satisfied. Alternate technique: actually dip your bowl in gold paint.
8. After a few coats and some drying time, your bowl is ready to be admired. Admire it. Name it. Pat yourself on the back for being on-trend and then give it away as a holiday gift.
BONUS POINTS: Use neon paint and paint yourself a pretty little bowl. Your status as Trendy McGee just shot through the roof. Pat yourself on the back and give this bowl away as a holiday gift.

try with glow in the dark paints 🙂