
Earlier this year, I moved across the country, taking with me only what I could fit in my car. I lived a week without an apartment and another week without any furniture. Then, I bought a bed. Well, a mattress and box spring. I wasn’t in any rush to buy furniture, especially not furniture that I couldn’t fit into my car. This made me the office charity case. A coworker gave me a kitchen table and chairs. Then, another coworker found a couch on the side of the road in a nice neighbourhood. He smelled it and checked for stains, then picked it up and put it in his pickup truck. That night, he and I carried the couch up the stairs to my apartment.
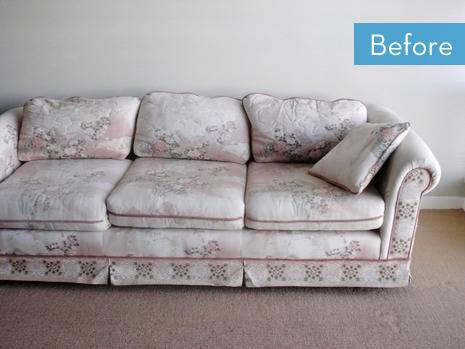 It was a solidly constructed couch. There were a few cat scratch marks on the sides of the upholstery, but otherwise, it was in decent condition. I just couldn’t shake the idea that bugs or animals had crawled all over the couch while it sat out on the road. So, I undertook a plan to reupholster it.
I had no experience with reupholstery and very few tools. I read a few articles online, but they weren’t very helpful. All of the upholstery books at the library were out. However, I have a bit of a “just do it” attitude when it comes to crafty things, so I jumped right in. These are the basic steps. Warning: This was a lot of work, and physically tiring at times. It took me almost two months to finish, but mostly because I was busy working and doing other things.
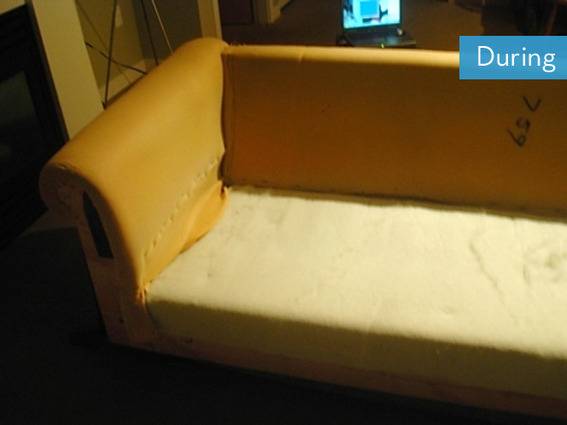
1. I started pulling parts of the upholstery off the couch, wherever I could grab on. I pulled off the dust ruffle at the bottom. I started pulling out staples on the bottom of the couch using a kitchen knife and scissors. A standard staple remover proved pretty useless. I eventually bought some needle-nosed pliers, which helped a bit. I bought a heavy-duty staple gun and staples while I was at it. I took digital photos of the couch as I progressed, so I could remember how everything was attached.
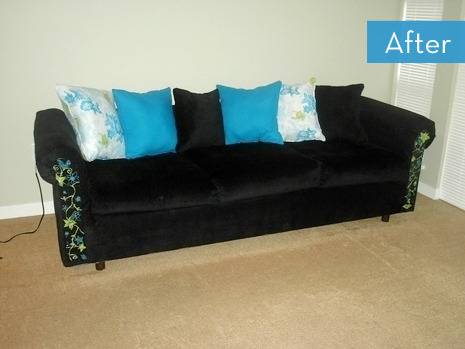
 2. I went to the discount fabric store. Home decor fabrics were pretty pricey, especially the ultra-suede and velvety ones that I wanted. I wandered the other aisles and found a thick, wide-striped corduroy in black. I came home with an amount that I had estimated before taking the fabric off the couch.
3. I finished removing all the old fabric from the couch and put the cushions aside. I left the foam padding and paper in place. I had some trouble removing the fabric from the inside corners, so I ripped it out. Actually reupholstering this couch professionally seems like it would require taking apart the wood pieces.
4. I laid the corduroy out on the floor and pinned the old couch fabric to it. I cut out the new fabric.
5. I stapled the new fabric onto the couch in the reverse order that I took the old fabric off, using my digital photos as a guide.
6. I took the covers off the cushions, which had zippers on them. I used these as a pattern for new cushions. This step requires actual sewing, unlike the rest of the couch. Fortunately, I’m fairly competent with a sewing machine. Some of the fabric is a little loose on the cushions, which I intend to fix later, but they look pretty good. I broke a couple of zippers in the process of taking apart the old covers, so I ended up closing the new cushion covers with hook and eye closures.
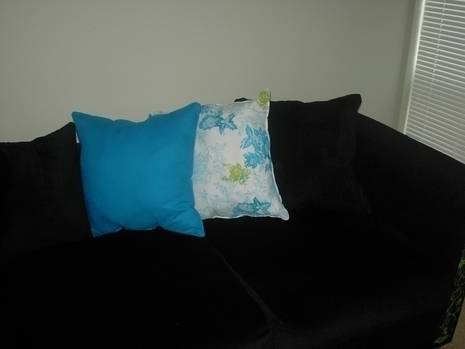
7. I didn’t like the shape of the original back cushions, so I sewed some simple square pillows using two cotton fabrics and some of the couch fabric. I took the stuffing out of the old back cushions, which was in good shape (i.e. still white), and used it to fill the new cushions (pictured below).
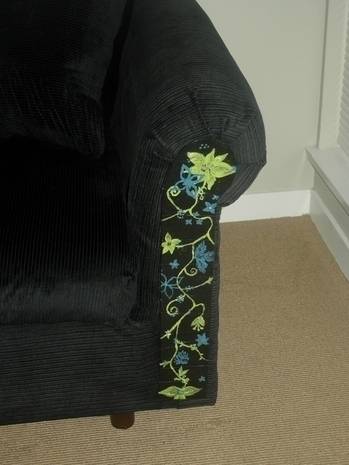
8. The front of the arms had wooden pieces nailed on with four large nails each. The wood was in pretty bad shape, splintering in some places. If I had more patience, or talent with woodworking, I would have made new pieces for the arms. I had to improvise something, seeing as I was expecting company the next day. So, I covered the wood panels with a layer of black duct tape. Then, I mixed up some acrylic paints to match the colours in the pillows and painted a similar pattern onto the duct tape base (pictured below). I glazed the whole thing over with glossy mod podge. I put the panels back on by pushing the nails into their existing holes on the couch arms, hammering them lightly. I may redo these with actual new wood at some point, but it looks pretty cute for now.
That’s it. I hope this explanation, and photos, helps to make reupholstery seem not so scary. It’s not professional, or probably even close to correct, but it looks really nice and people can’t tell that it’s not store-bought. Plus, it’s unique and makes me happy to look at it and know that I did it myself.
Interested in seeing more upholstery makeovers? Check this one out…
