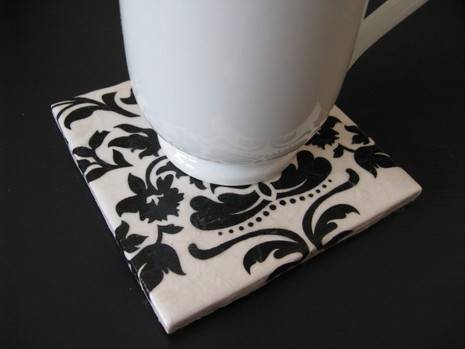
Curbly Video: Using Paper Napkins to Make Decorative Tile Coasters

By: Diy maven Feb 16, 2009

created on: 02/16/09

With the help of some 4" square ceramic tiles, turning decorative paper napkins into a set of very polished-looking coasters is easy.

↓ Continue reading

To make a set of 4 coasters, you’ll need:

  • 4-4" square ceramic tiles (you can find these at your big box store for about 15 cents a piece)
  • Mod Podge (I used the Matte-Mat)
  • small paint brush
  • polyurethane (I used Aqua-Zar in satin, but glossy would look great too)
  • decorative paper napkins
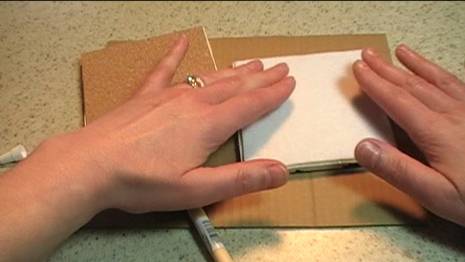
  • Squares of thin cork or felt, both available at your local craft store
  • Water-proof glue, like E-6000
  • A foam or stiff bristle brush to apply the water-proof glue

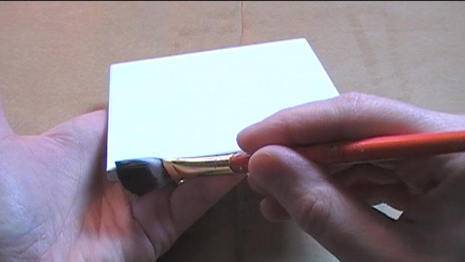
 First, brush the tile tops and their edges with a coat of Mod Podge.

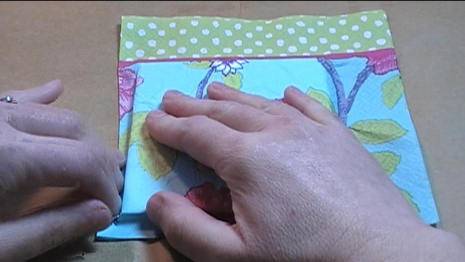
UNFOLD your napkin and find a pretty spot on it, center the image on your tile and then apply them to the tile, making sure you fold the napkin down to cover the edges. DO NOT worry about wrinkles!! They just add character to your coaster!!! Also, you might find it easier to cut your paper napkin into more manageable pieces before applying them to the tiles.

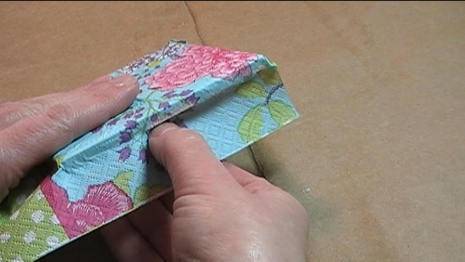
Wait 3 to 5 minutes and then carefully rip away the excess paper napkin, pulling downward as you tear. (This is illustrated in the video.)

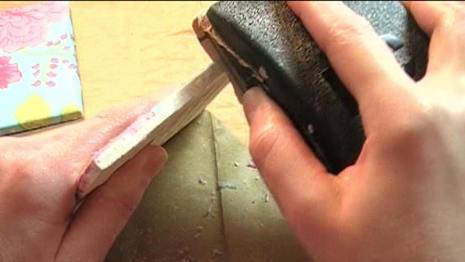
After the Mod Podge is COMPLETELY dry, you can address the edges. Leaving them ripped, gives them a ‘hand painted’ look. If you want a more polished look, use a bit of sandpaper to sand off the napkin from the edges.

(At this point, if you aren’t satisfied with the way your coasters are looking, you can still turn back by soaking them in a bit of warm water. The paper napkins and Mod Podge will come off. Wipe the tiles off and let them dry for a re-do!)

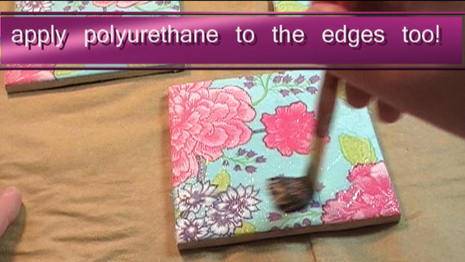
Then, apply three coats of polyurethane to the tops and the sides of the tile, letting it dry completely between coats, of course.

Finish up by brushing on a bit of E-6000 to the bottom of your tile and gluing on a square of cork pad or felt.

And that’s it! Here’s another one I did, currently protecting my desktop.

created on: 02/16/09

Tagged : , , , , , , , ,

33300 views | Comments (37)

Comments

Thank u for your wonderful tips this is legit the easiest project ever! Tiles were .16 and I mAde 4 from 1 cocktail napkin! I'm obsessed now!!! Originally I was frightened bc it was so bubbly and wrinkly but I kept going and it came out beautiful!!!!!
@laura, I found mine at my local Ace Hardware. If you can't find it, another go-to poly of mine is Minwax's Polycrylic Satin Finish. It's water base and dries crystal clear. @Anon, no, they wouldn't get ruined at all. Just treat the finish like you would a piece of furniture. The wrinkly texture is much more forgiving than a smooth surface, so you don't really have to worry about scratches. Damp cloth to remove stains, that's about it. Glad you like them!
i could not find that polyurethane at Home Depot. I have an oil based one but that yellows the tiles. Where did you find that polyurethane? I've been using mod podge acrylic sealer spray but I would like a sealer I can paint on. thnks.you can email me at [email protected]
What if I accidentally spill water or coffee on them will they get ruined? Btw they are so pretty and a great idea!! :)

@Jackie...no, do not put them in the dishwasher. A damp cloth swiped across the surface is all that's needed for cleaning. 

Thanks for the fastest reply ever! It is very helpful.

How did you wash your coasters? Are them waterproof? Can you use the dishwasher?

Thanks again!


@ Jackie--Most people might suggest just using mod podge as a finish, but beware it dries kinda sticky. There are polyurethanes out there that are marketed as non toxic. My favorite isn't marketed as such way, but it has little to no odor (looks like weak milk, actually, and dries crystal clear), and it cleans up easier than mod podge, with only soap and water. 

Hi, I loved the idea, and it seems so simple that I would like to make it as a project with children... But I think that the polyurethane might be to strong for the kids... Do you have any suggestion that substitutes the polyurethane and that kids could use? I'm really not much familiar with all crafts materials... Thanks a lot!

@pm--I've had no issues at all.

Is there any issues with hot beverages on these?


@Biz--Nope, they're ready to go!

I absolutely love this, and your directions are so clear, which makes it easy for me (an un-crafty person) to do.  Does anything need to be done after the last coat of polyurethene dries and before use (besides adding the felt to the bottom) - I mean like cleaning or anything?

@Dana, I doubt you messed anything up. The wrinkles appear after applying the napkins with the Mod-Podge, but they can wrinkle a bit more with the poly application. (Personally, I like the look as they make the tiles appear more hand-made and natural.) Additional coats of poly will build up around the wrinkles, however, and make the surface feel a bit more smooth. 

So I am trying this now and the first coat of poly has made the napkin all wrinkled...will this even out in the following coats or have I messed something up?

@anon...oil versus water base...I don't think there should be any difference. 

I just used an oil based polyurethane, I've done one coat so far. Just noticed you used a water based polyurethane. Other than the clean-up factor is there any reason not to use oil based?

Thank you!

@vanes--I'd say yes, but I'd print them on paper using an ink jet printer. 

I was wondering if you could do the coasters wtih real photos? Have you tried it? If so, would you do it the same way?

Thank you.

Any suggestions about a polyurethane substitute?

» All comments
» Comments RSS

To help stop SPAM, please follow the directions in the graphic below: