
For the past six months, I’ve been hammering and banging on a flimsy folding plastic table. That’s right. I’m a full-time DIY and how-to blogger, a hobbyist woodworker, and everyday tinkerer, and my garage workbench (if you could call it that) was a thin piece of flexible plastic sitting on flimsy legs, previously only employed as extra seating when we host Thanksgiving dinner.
See, my wife and I just bought our first home, and while we were lucky to find a house in inner Southeast Portland with both a garage and a basement (no small feat), we’ve spent our free time fixing up the more public – and practical – spaces: the living room, kitchen, dining room, bedrooms, etc.
While those projects progressed, my tools sat in moving boxes and plastic bins, disorganized and impossible to find when I needed them. My work surface was the silly plastic table, which served mostly as a place to set stuff while I searched for tools and hardware.
But now it’s summer, and we’ve got all sorts of exterior projects, gardening/landscaping, and serious room makeovers going on. Our work and tool solutions simply have to change. We need a proper garage workbench, one that will work for every sort of hands-on task: a potting bench, a DIY work table, a bike tinkering station, a home repair hub, a photography studio, and whatever other hobbies and around-the-house fixes we decide to take on.

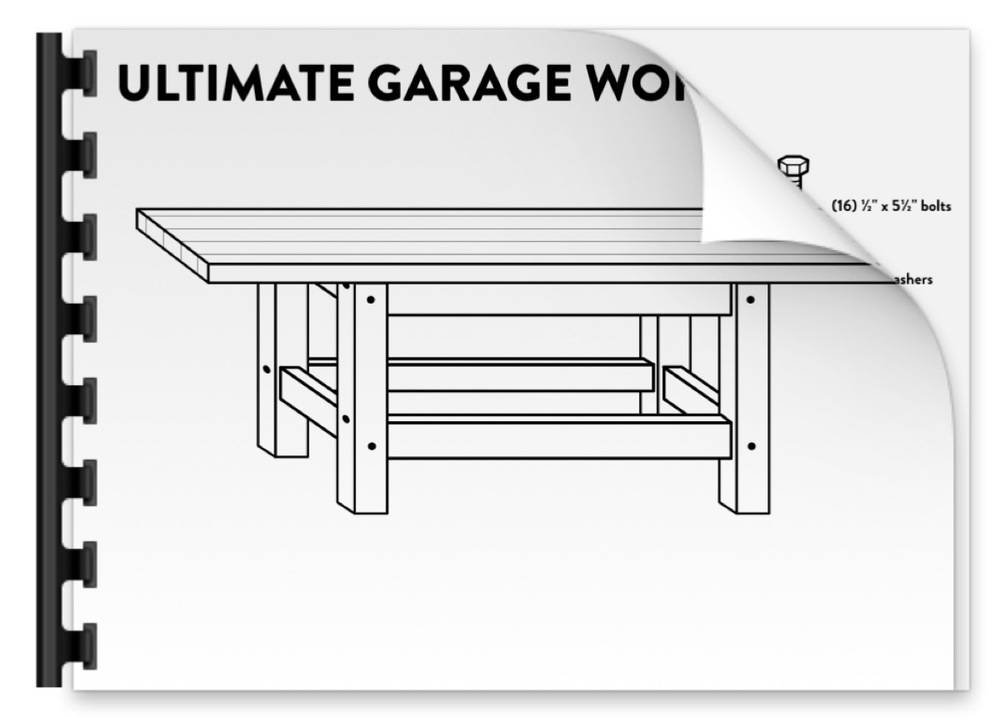
So I came up with this plan for the ultimate garage workbench and table, as well as some serious tool organization (so long, plastic totes!).
Materials
- (2x) 4x4s, 8 feet long
- (4x) 2x4s, 8 feet long
- (5x) 2x6s, 8 feet long
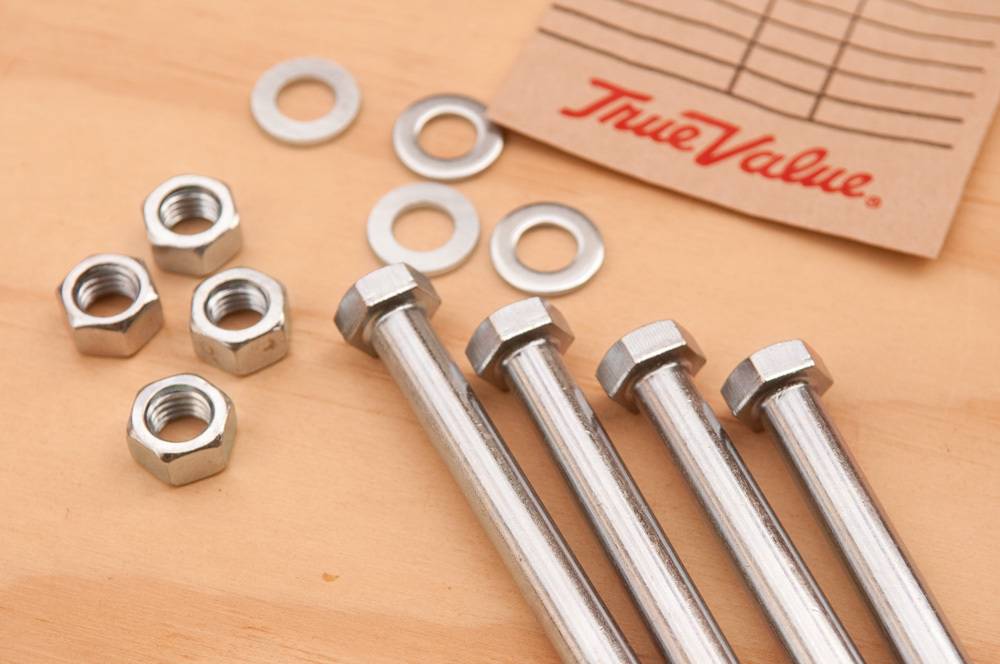
- (16x) 1/2″ bolts, 5 1/2″ long
- (16x) 1/2″ nuts
- (32x) accompanying washers
- (20x) 4″ long screws
- Wood glue, sandpaper, oil finish
Tools
- A cordless drill
- A circular saw or miter saw
- A socket wrench
- A chisel
- Clamps
- 1-1/4″ Forstner bit
- 1/2″ brad-point drill bit
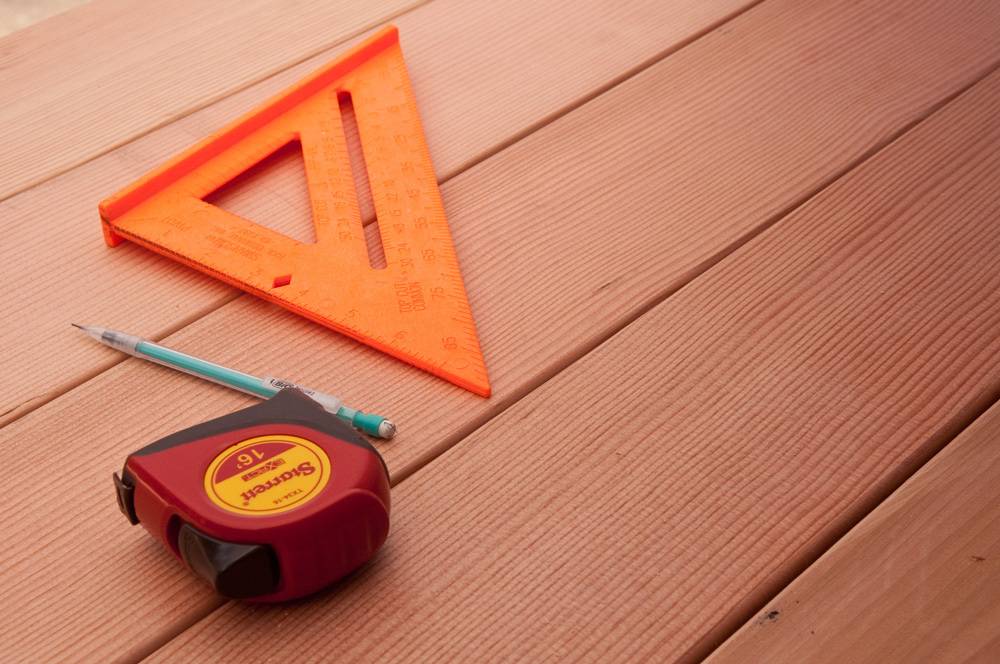
- Tape Measure
- Safety glasses and dust mask
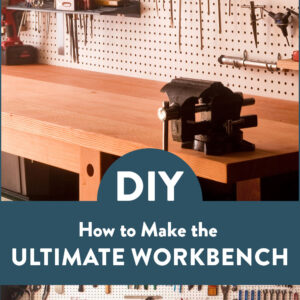
The Ultimate Garage Workbench Plans: Get ‘Em Here
- Get the full, printable plan sheet here (PDF)
Designing the Garage Workbench
This is our “forever” house, and I plan to live in this thing as long as I’m around … or at least until we decide retire, sell everything, buy an RV, and tour the National Parks eating at awesome roadside restaurants (fingers crossed!). So, with that in mind, I wanted to build something that will last, and that we’ll never outgrow.
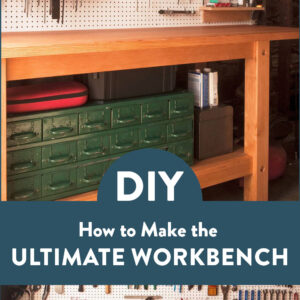
The plan was for this to be the ultimate homeowner’s bench – a huge work table that could handle whatever we would throw at it.
What makes it the ultimate workbench? Strength. Versatility. Beauty. And, of course, it’s able to be built by anyone who’s willing to get their hands a little bit dirty.
Rules for the Ultimate Garage Workbench
- Must be built from easy-to-find dimensional construction lumber (2x4s, 2x6s, etc.)
- Must be built in a single weekend
- Must be supremely rock solid but not rely on any complex joinery, like mortise and tenons
- Must be able to be built with a simple power tool kit such circular saw and cordless drill, basic hand tools, and hardware you can find at your local True Value store
- Must have a top large enough for a wide variety of home and garden tasks: potting and planting, home repair, DIY tasks, simple woodworking, bike repair, etc.
- Must be built to last: you’ll never have to build a workbench again
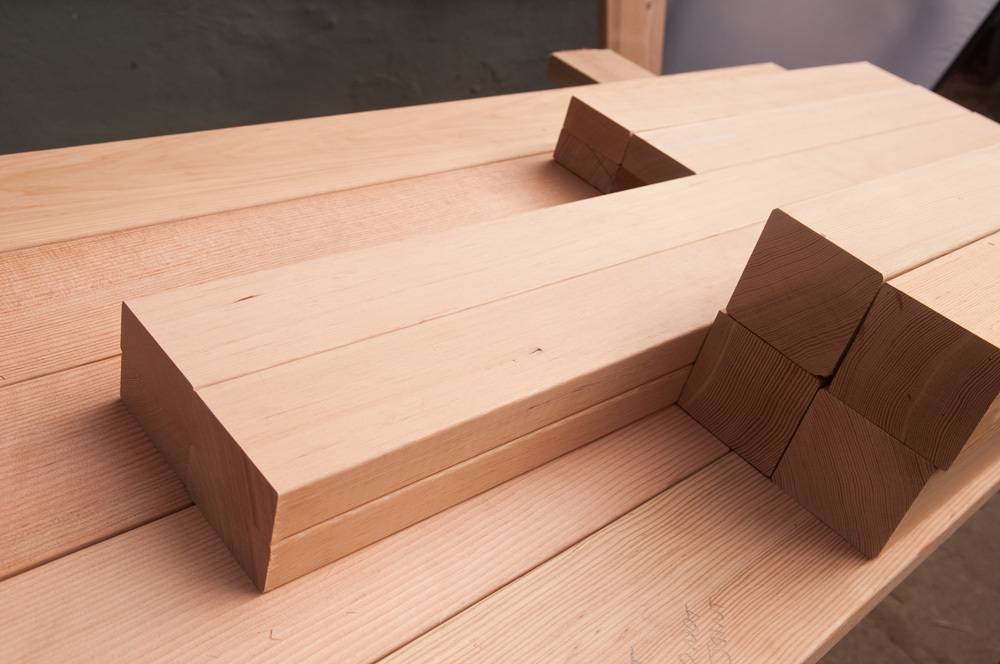
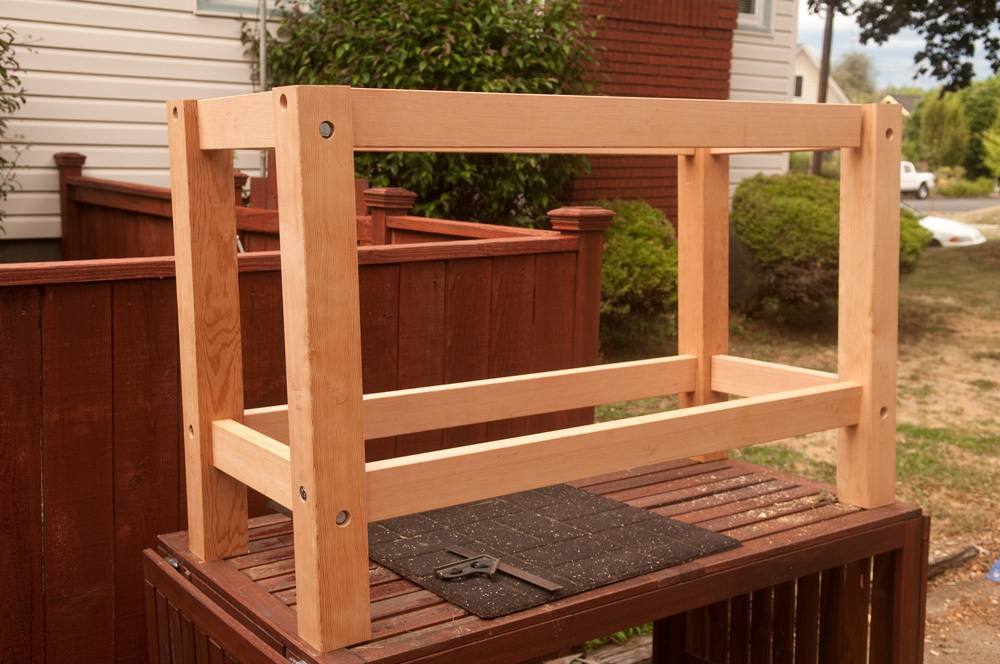
This project is made from simple construction lumber. I live in the Pacific Northwest, so that means Douglas fir, but yours might be Southern Yellow Pine or Whitewood, depending on what species grow in your region. The legs are 4×4 posts, the cross members are basic 2x4s, and the top is a set of glued-up 2x6s.
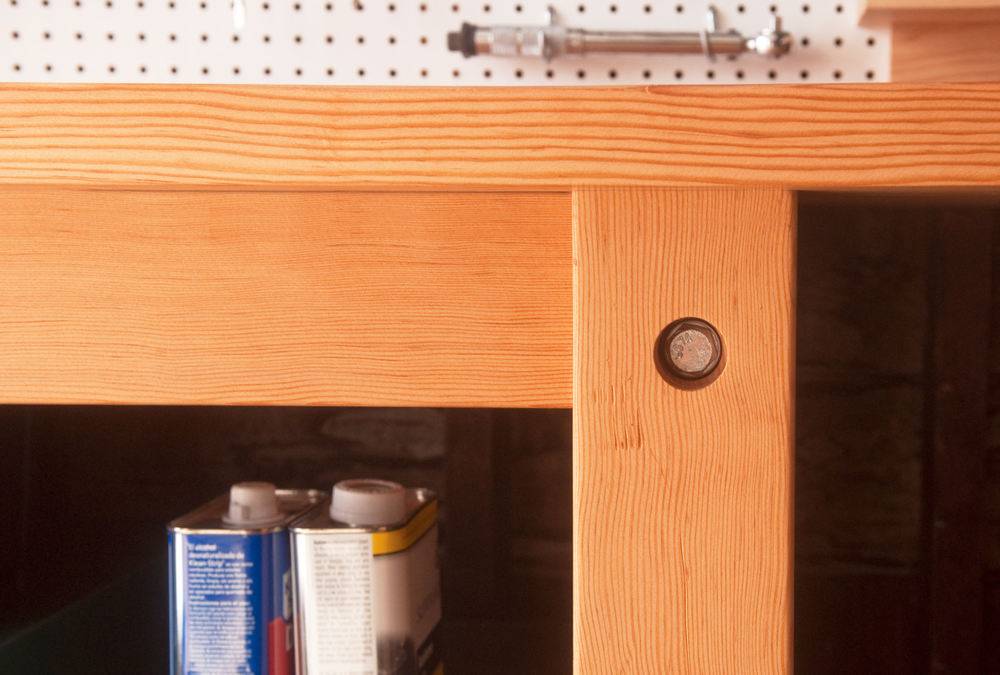
I wanted to avoid visible screws on the outside of my project. I spent a long time looking through the stacks for nice straight-grain wood, and I didn’t want to mar the surfaces with a bunch of black drywall screws all over the place. So, I decided to borrow a technique from bed making that uses a nut and bolt system that would allow me to re-tighten the bench up over the years and keep things solid.
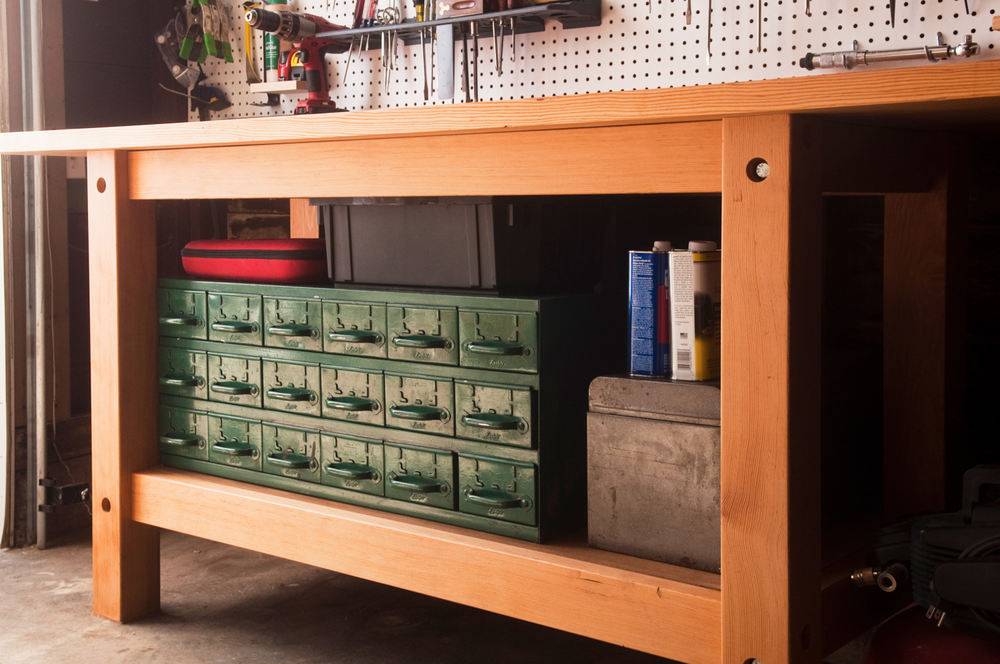
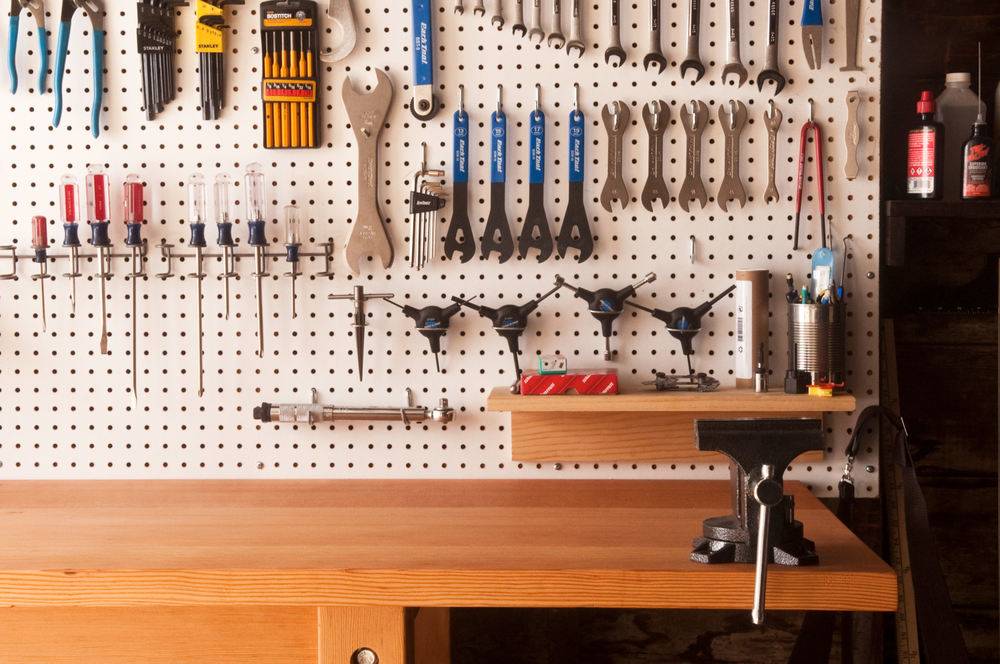
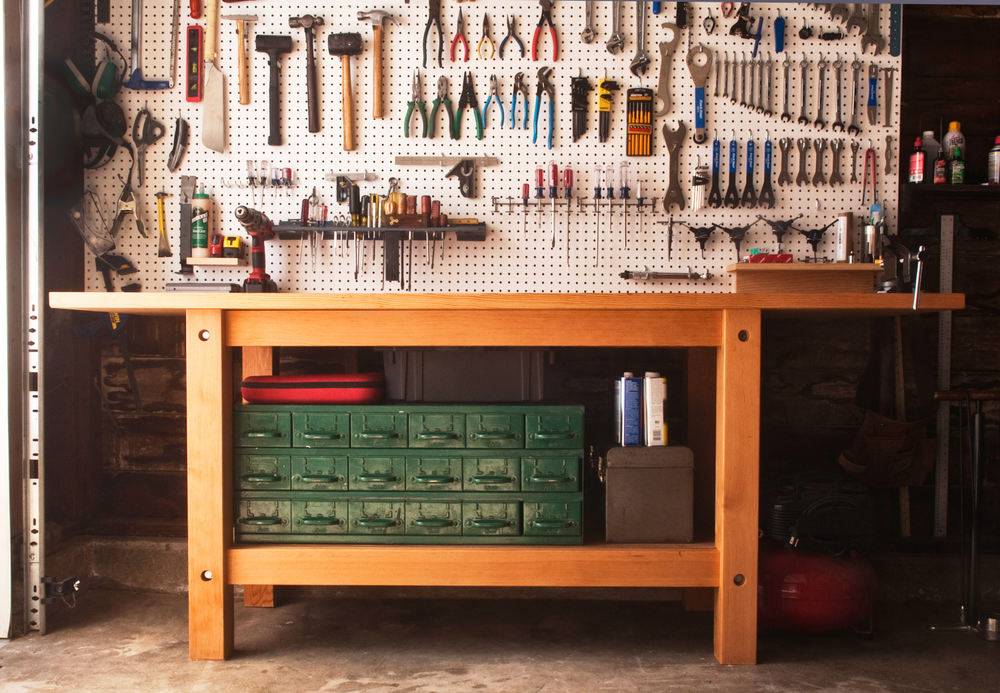
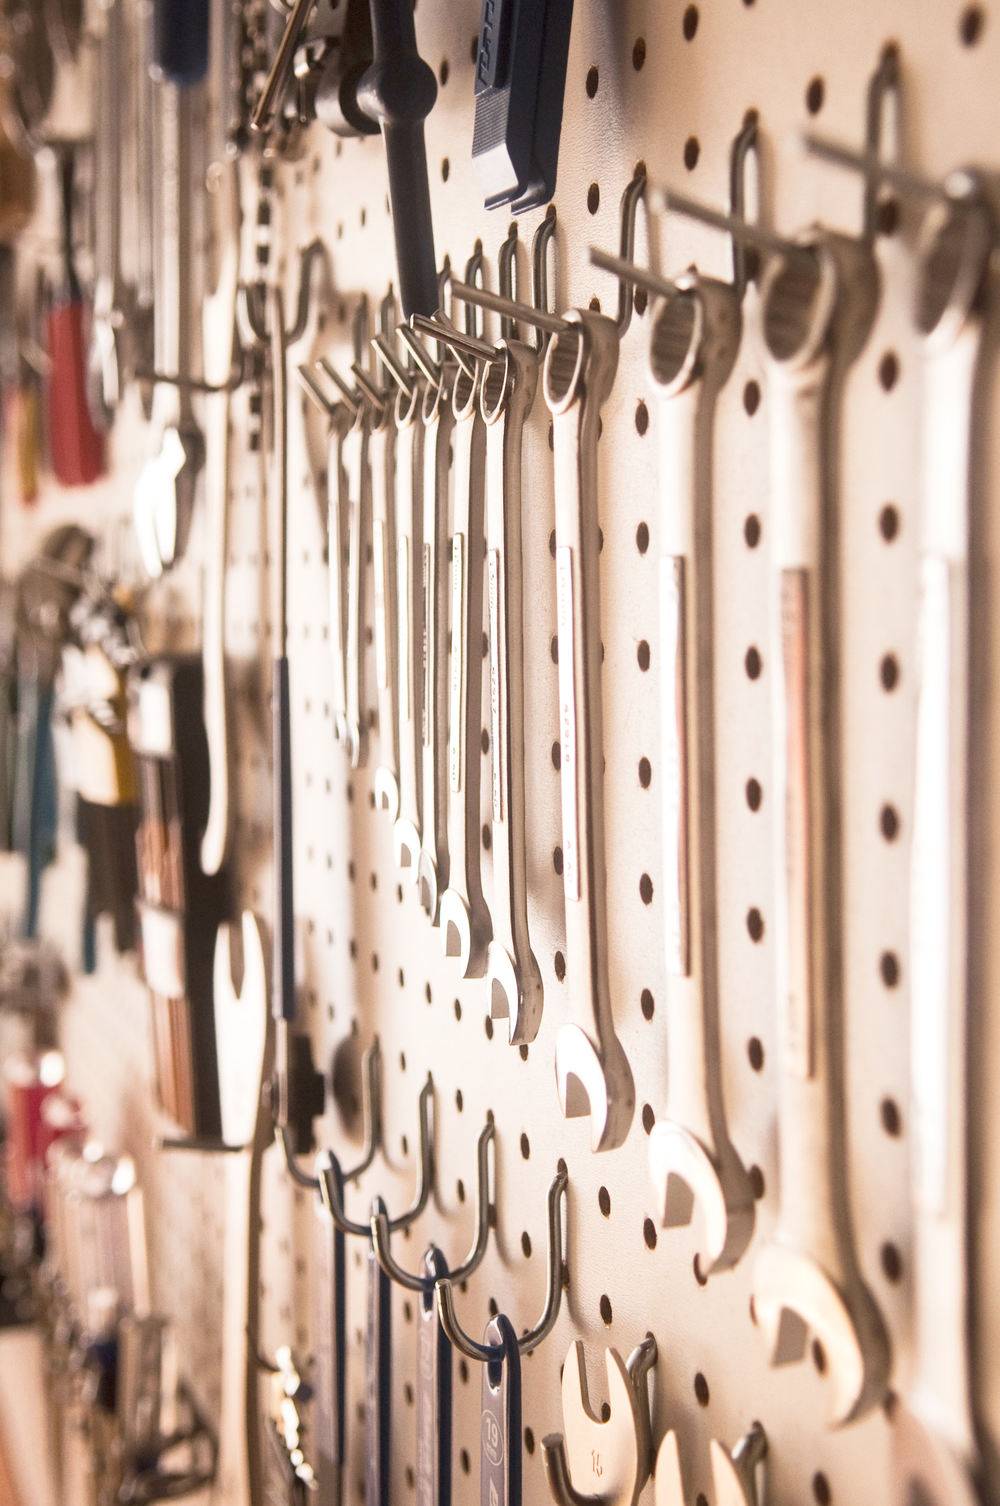
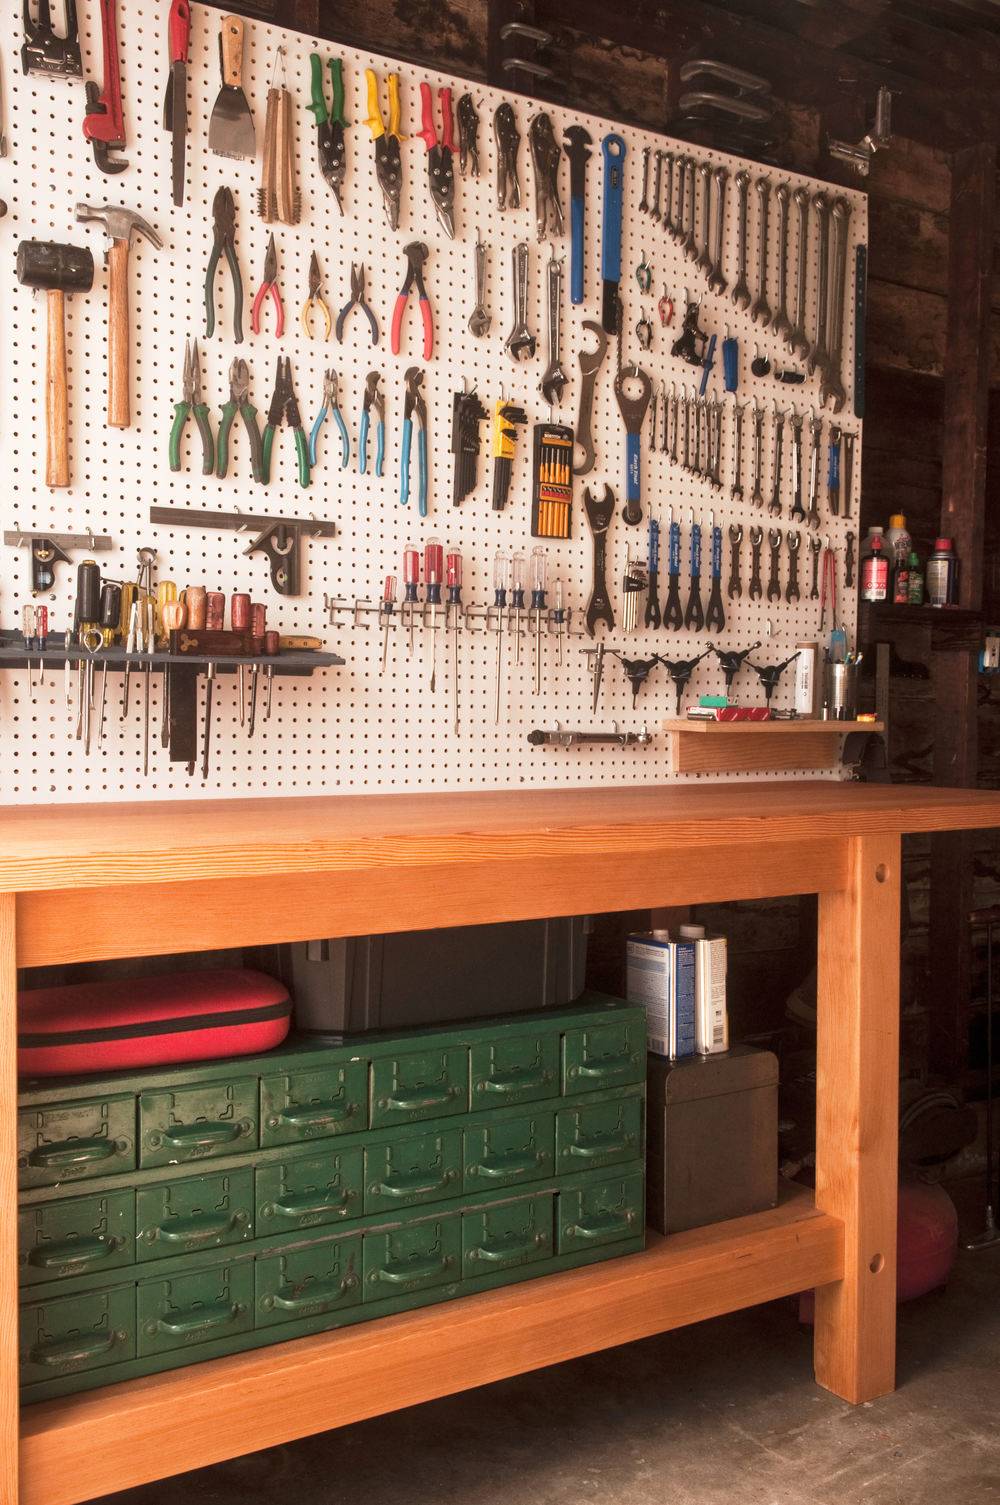
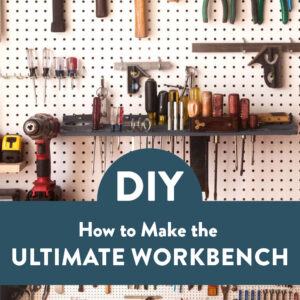
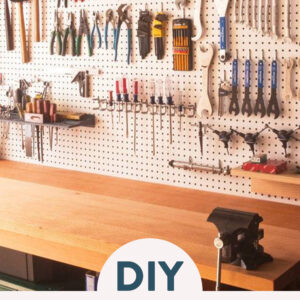
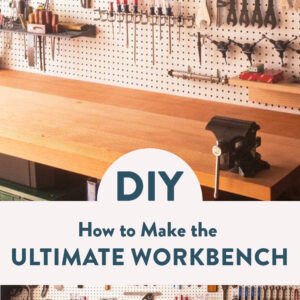
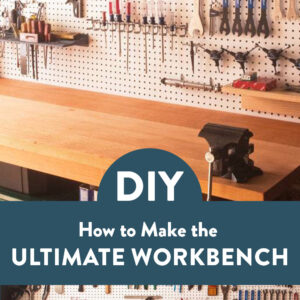
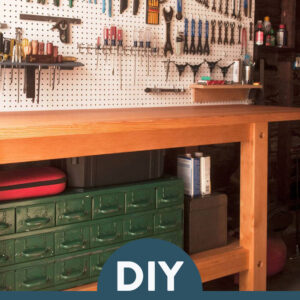
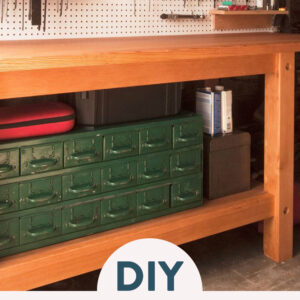
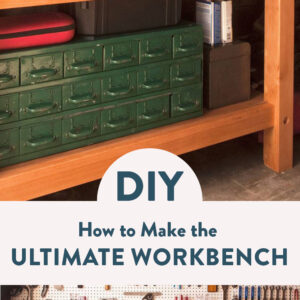
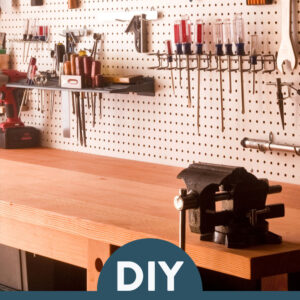
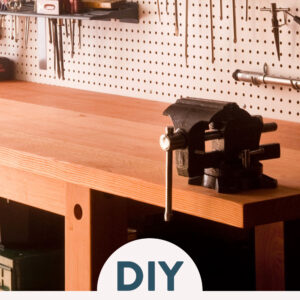
My bench is pretty big – a full seven feet long – so it fits in front of a full sheet of pegboard. It also provides a large work surface so I can be working on a couple projects at once, if necessary. Not to mention a nice, big, flat surface for drawing, paper cutting, organizing, and all sorts of other home tasks and creative projects that get dreamed up in garages. I also made sure the shelf was sized properly to fit a large machinist’s tool chest I inherited from my grandfather. There’s so much storage in this thing, I wanted it to be a key feature of the (and finally get it off the floor).
This can be sized down to fit your space.. The base will work for any workbench that’s bigger than 4′ 6″; if you want to go smaller, just shorten the front and back rails.

How to Build Your Garage Workbench
Buy your lumber and hardware
Head to your local hardware store and select the lumber for this project. Take your time to sort through the options and look for the straightest, knot-free grain you can find. Make sure it’s as dry as possible. If you’re unsure about selecting lumber, don’t be afraid to ask for help!

To build the base for the garage workbench, you’ll need:
- Two 4 x 4 x 8 posts
- Four 2 x 4 x 8s
- Five 2 x 6 x 8s
If you want to add a lower shelf, pick up two 1 x 2 x 8s and a 2×4′ quarter sheet of 3/4″ plywood or MDF.

Then, make your way to the hardware aisle and get:
- Sixteen 5 1/2″ long bolts, 1/2″ in diameter
- Sixteen accompanying nuts and thirty-two washers, 1/2″ internal diameter
- Sixteen each of 1 1/4″, 2″, and 4″ long wood screws
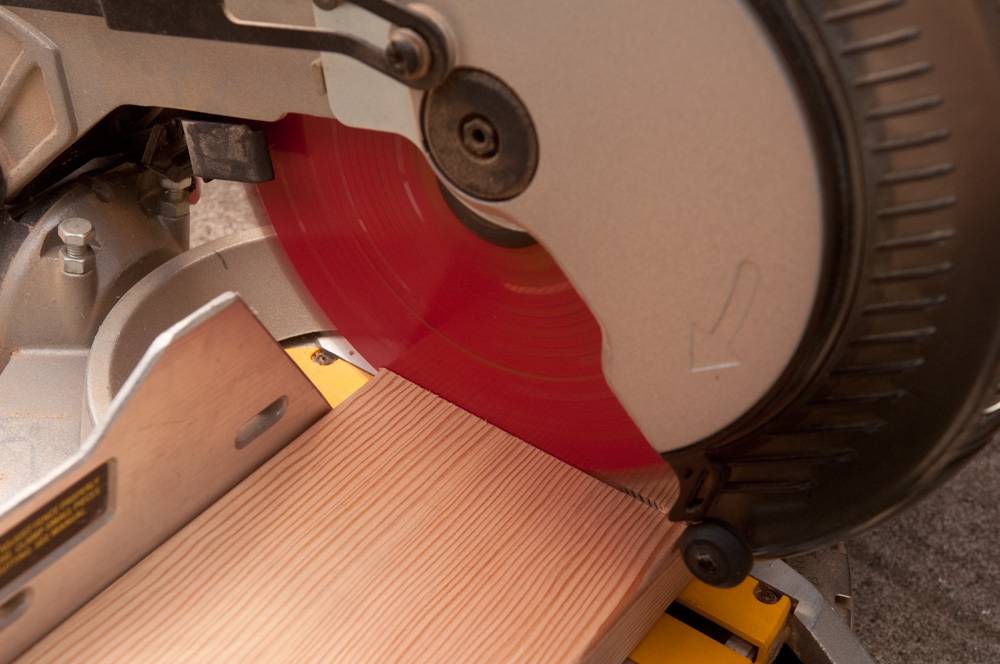
Cut the wood to length
Use a circular saw or compound miter saw to cut your wood to the following dimensions:
- 4×4: Four @ 32 1/2″ long (legs)
- 2×4:
- Four @ 46″ long (front and back rails)
- Four @ 16″ long (side stretchers)
- 2×6: Five at 86″ long (These are oversized. We’ll trim them flush once the top is assembled.)
Layout the joinery
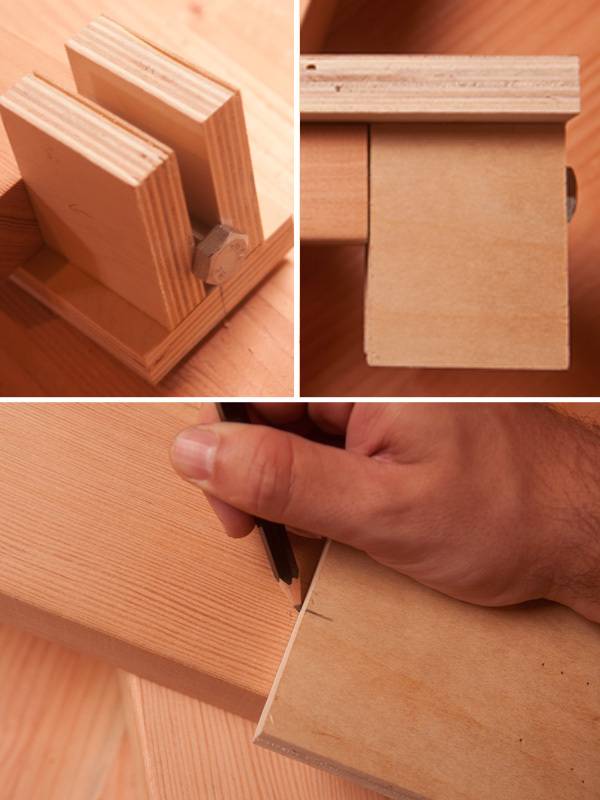
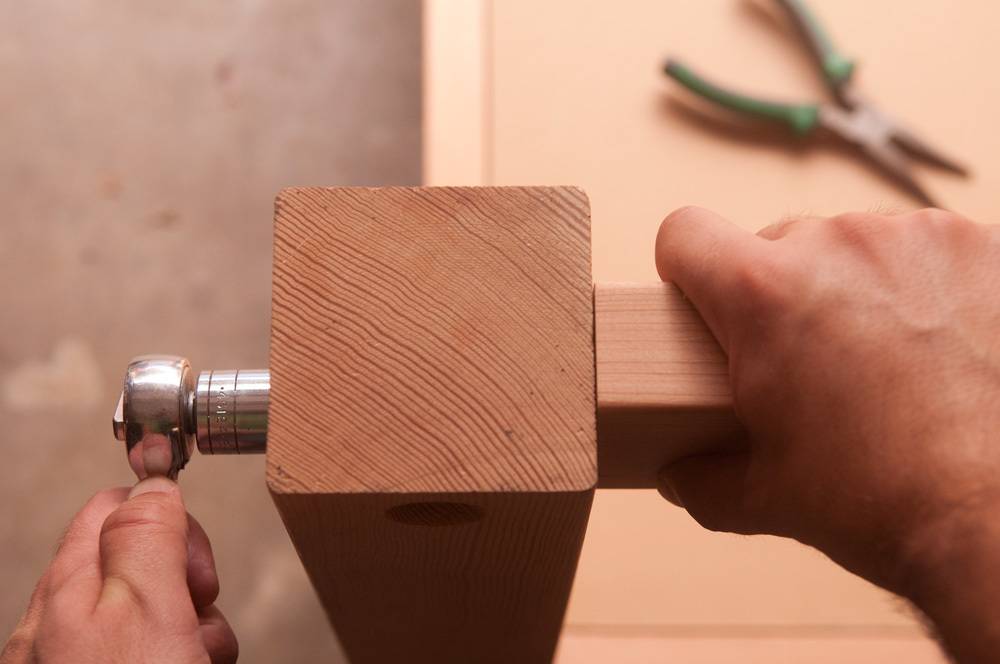
The workbench is held together by a “bed bolt” system, where a nut is mortised, or sunk, into the cross members to accept a bolt that’s been fed through the legs. Since the legs must accommodate bolts for both the front/back and sides, it’s important to keep things laid out carefully.
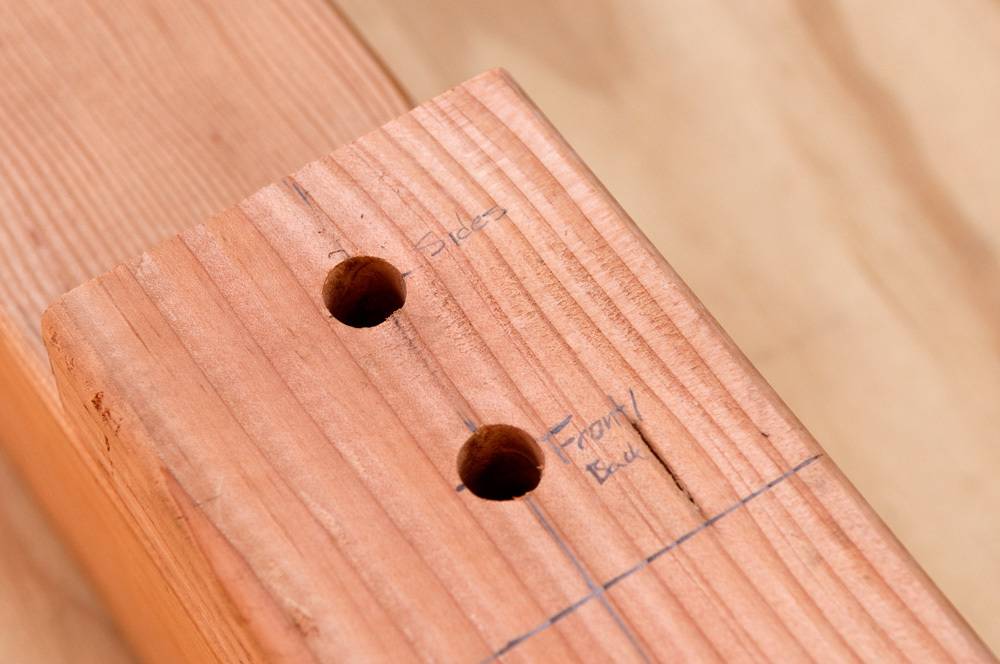
So, make yourself a little template or jig from a scrap piece of 2×4, 10 1/2″ long. Drill a hole 1″ from the top, and another at 2 1/2″, perfectly centered. Write “sides” near the top hole, and “front/back” near the bottom to keep things straight.
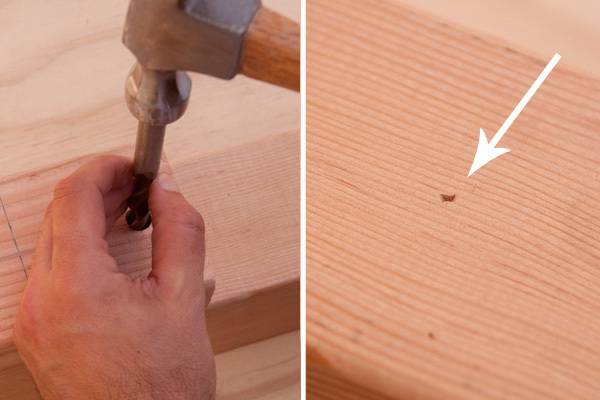
Place your template at the BOTTOM of one of the 4x4s, and flush up the bottoms. Mark this face “side” and then transfer the 1/2″ hole to the 4×4. One easy way to do this is with a 1/2″ brad point drill bit. Just place the drill bit in the hole, and tap it firmly with a hammer to transfer the center point of the hole. Fill it with a pencil cross so you can keep track of the locations later. Repeat with the other three 4x4s.
Then, set each of these on end with the marked sides facing each other in pairs. (They’ll be on the insides). Note which face will accept the front and back rails, and use your pencil to mark these for later. (Write in the center of the wood so it won’t get drilled out). Then use your template to mark the bottom hole to lay out where the front/back rails will go.
Now, repeat a similar process by using the template to lay out the top cross members. Register the jig on the TOP of the 4x4s, and mark out both front/back and side locations, making sure they’re on the same sides as before.
Drill out the legs
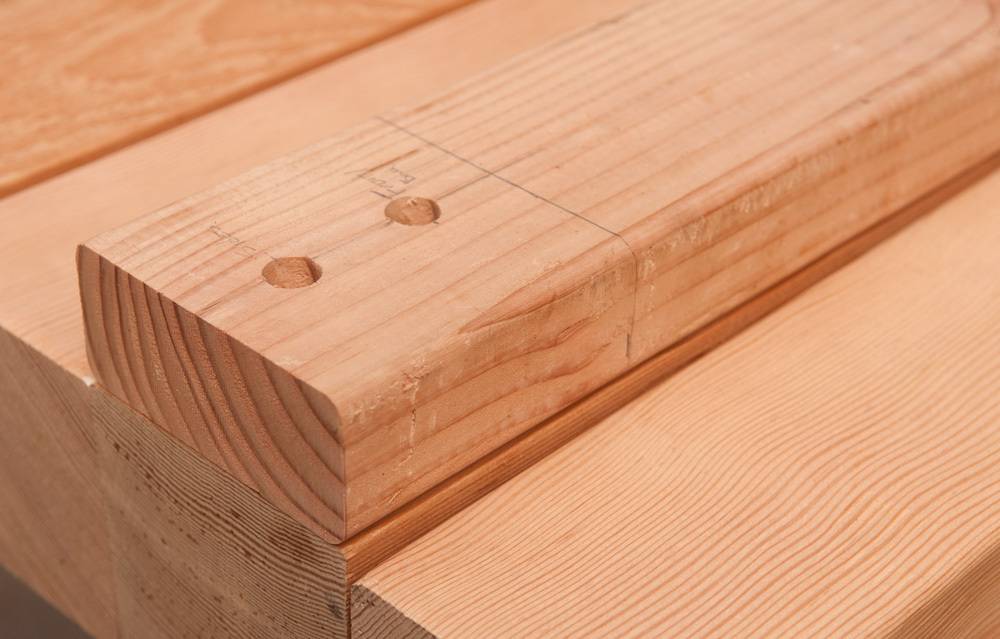
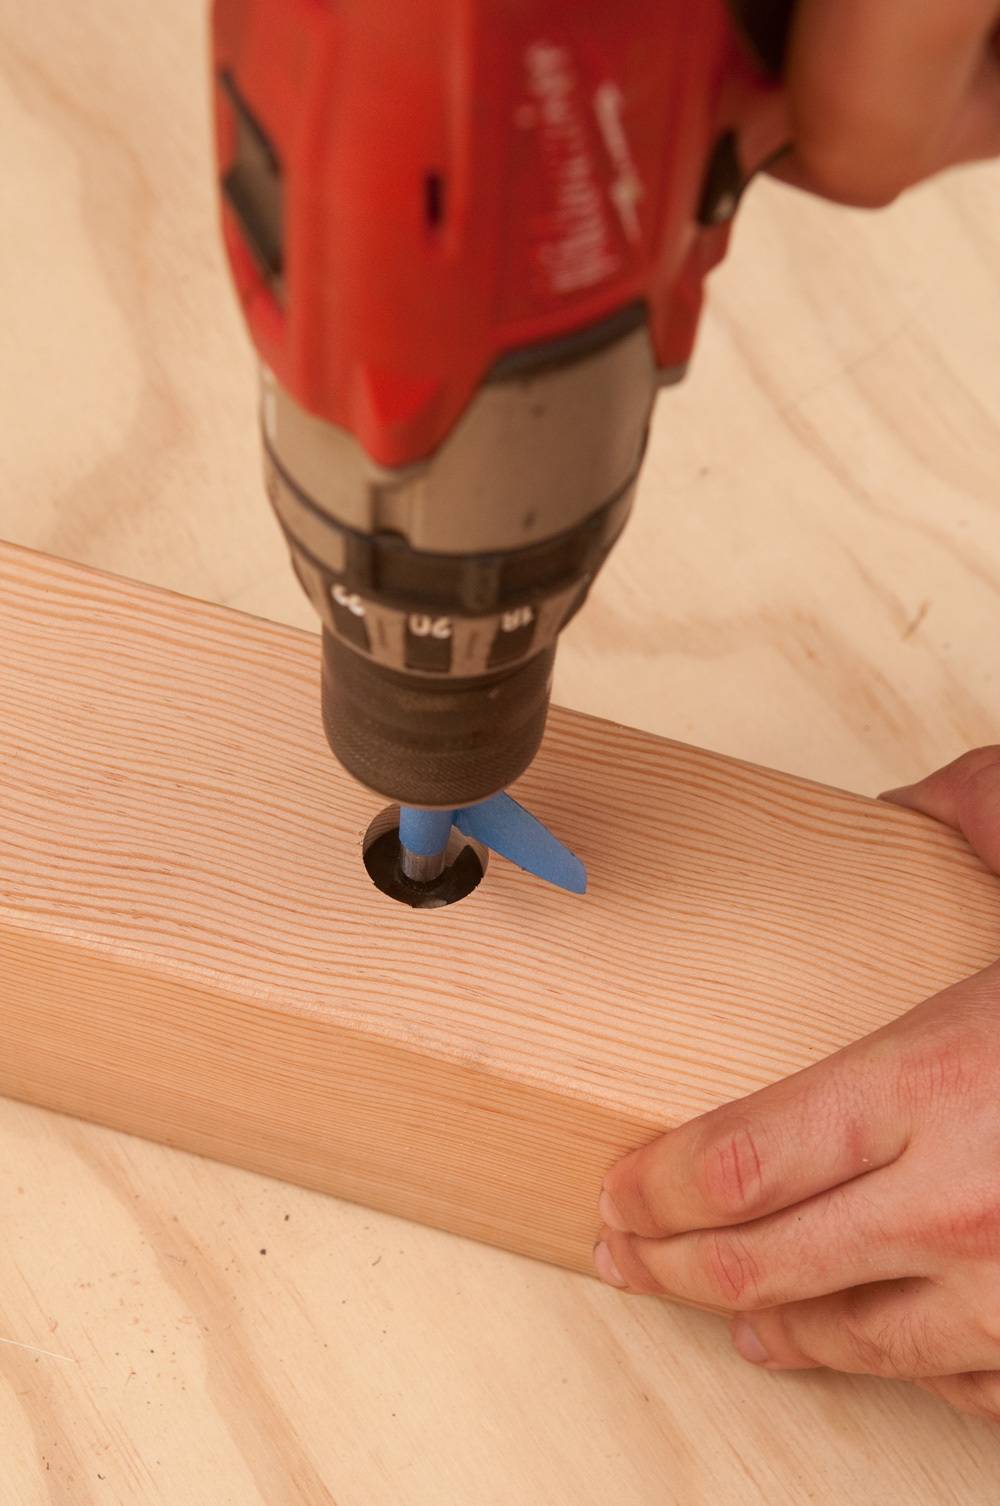
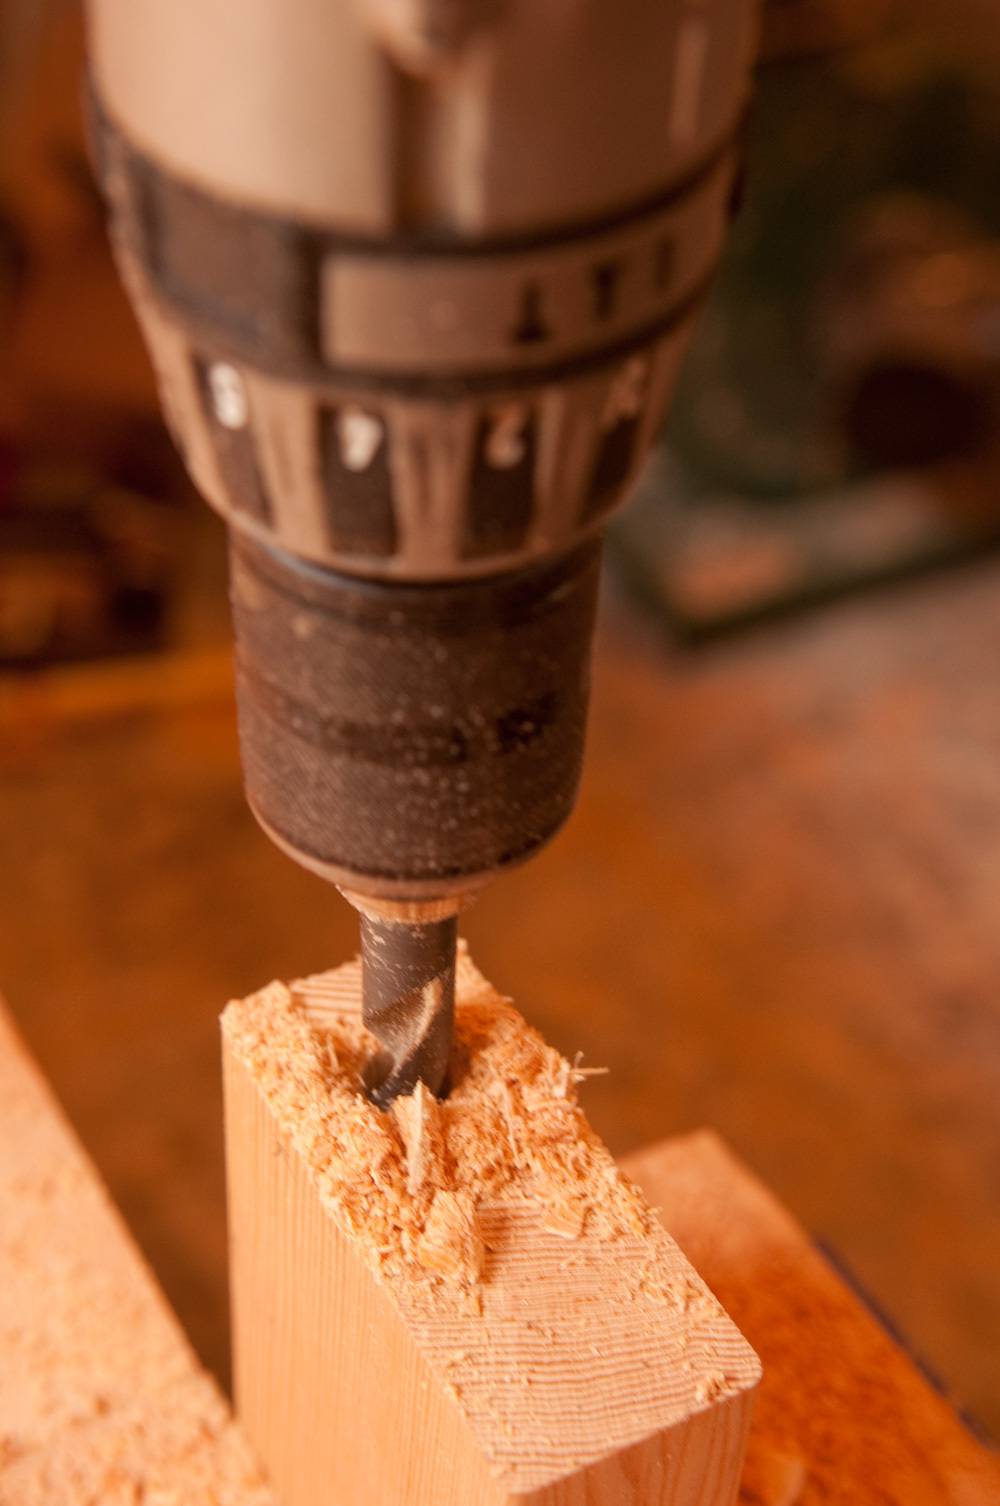
Now, chuck in your 1 1/4″ Forstner bit, and place its center point on your mark. Drill straight down (use a square or drill guide to help you) to a depth of 1″. A piece of masking tape wrapped around the drill bit can help you mark your depth. Repeat for all sixteen holes.

Now, switch to a 1/2″ drill bit, and using the mark left from the Forstner bit as a guide, drill all the way through the 4×4. Be sure to place some scrap on the other side so the wood doesn’t blow out.
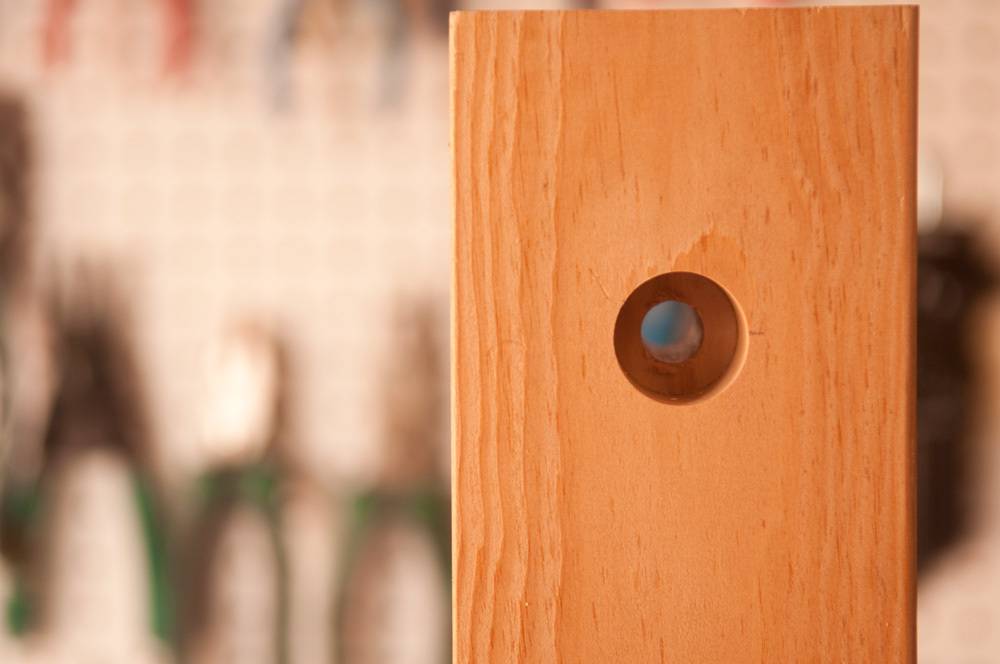
Congrats! Your legs are now done.
Drill the cross members
With the leg faces identified, begin to layout the 2×4 cross members. Choose the most attractive 2x4s for the parts you’ll see, and write “top front,” “back bottom,” “top left outside,” to keep your joinery consistent.
Then, place each cross-member between the appropriate legs and mock up the eventual fit. Making sure things are square and flush, use the drill bit trick to mark each cross member. Write an A on both the leg hole and the stretchers, then continue with B, C, etc., on both pieces to keep things organized.
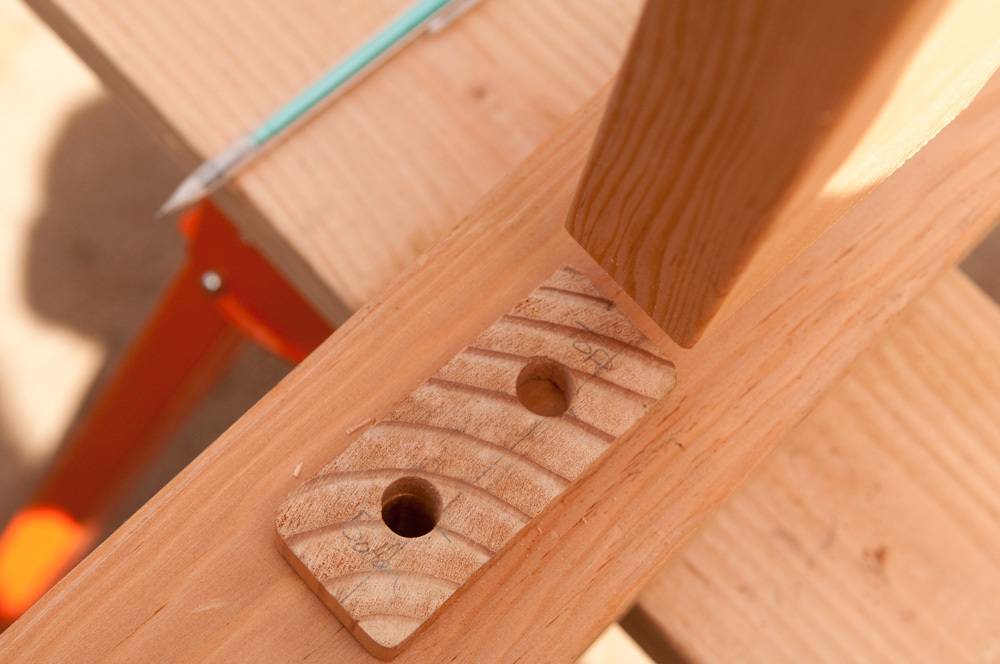
I made another little jig by drilling 1/2″ holes into the end grain of a scrap 2×4 and then slicing it off with the miter saw. This allowed me to maintain the right spacing between the two holes on all the pieces. I simply placed it in between the leg and the cross member, lining up the edges. This was especially helpful on the bottom set of holes, where the 2x4s aren’t flush with the top or bottom.
Then, drill all the way down into the cross members with your 1/2″ drill bit. Take extra care to drill these as straight as possible. A drill guide or doweling jig can be super helpful here.

Make sure the shorter side pieces have all the holes on the bottom, and the front back have them on the top. If you’ve made a mistake, you can go ahead and drill the proper hole now. No one will ever see it 🙂
Now, assemble everything for a dry fit to make sure things are all laid out right. Use the bolts as pegs to hold things together. If you find any errors, go ahead and fix them now.
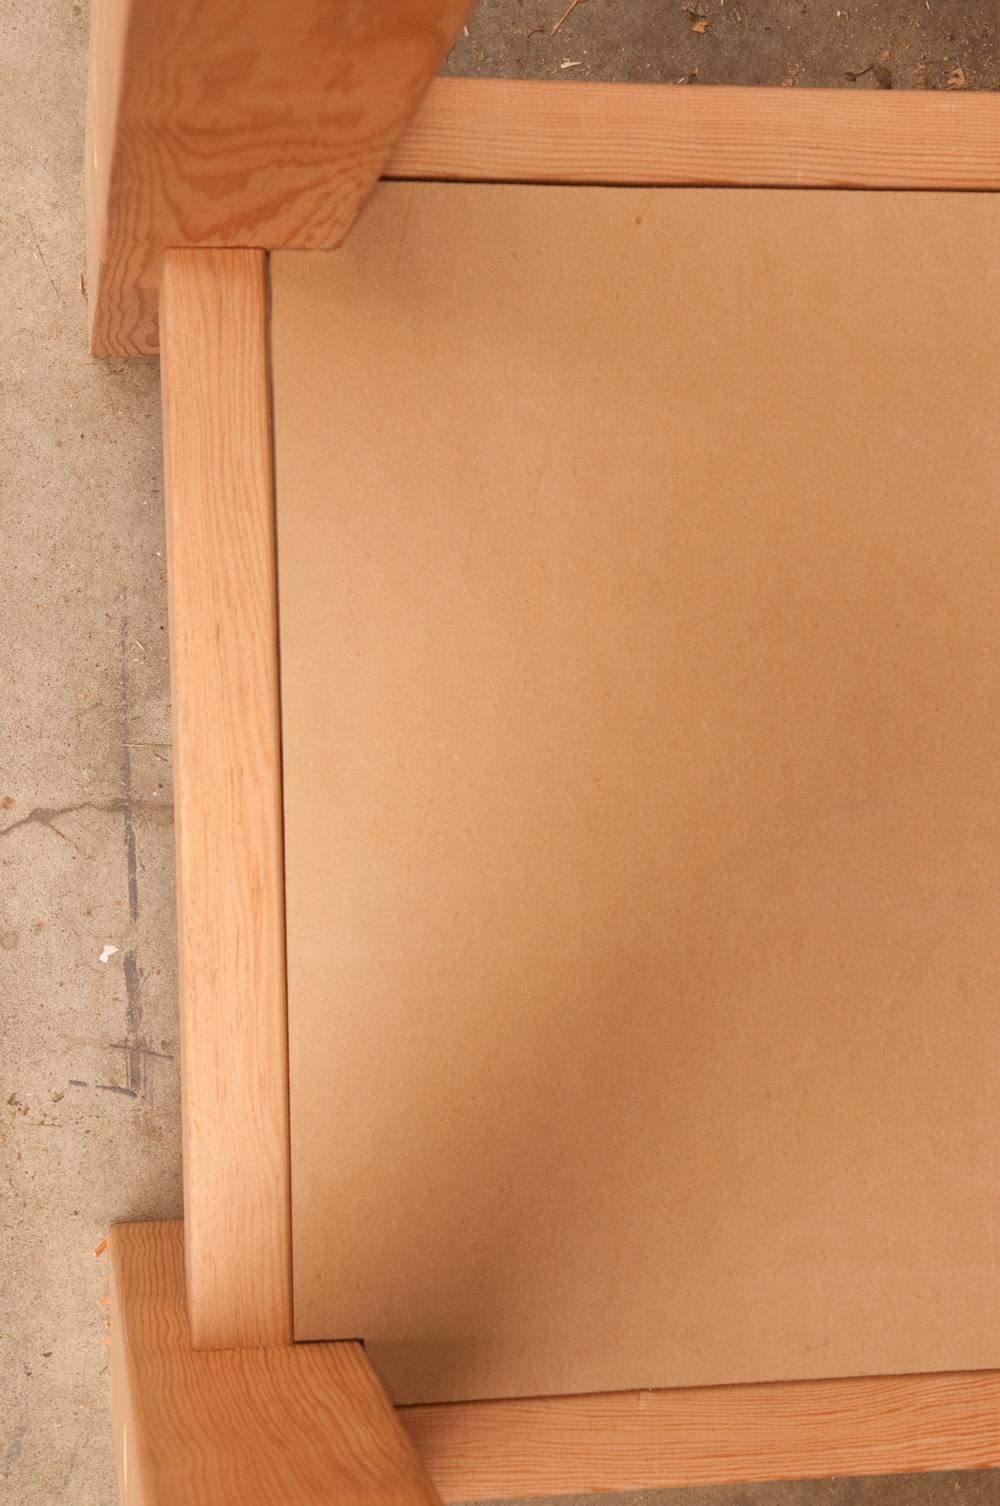
Make the top
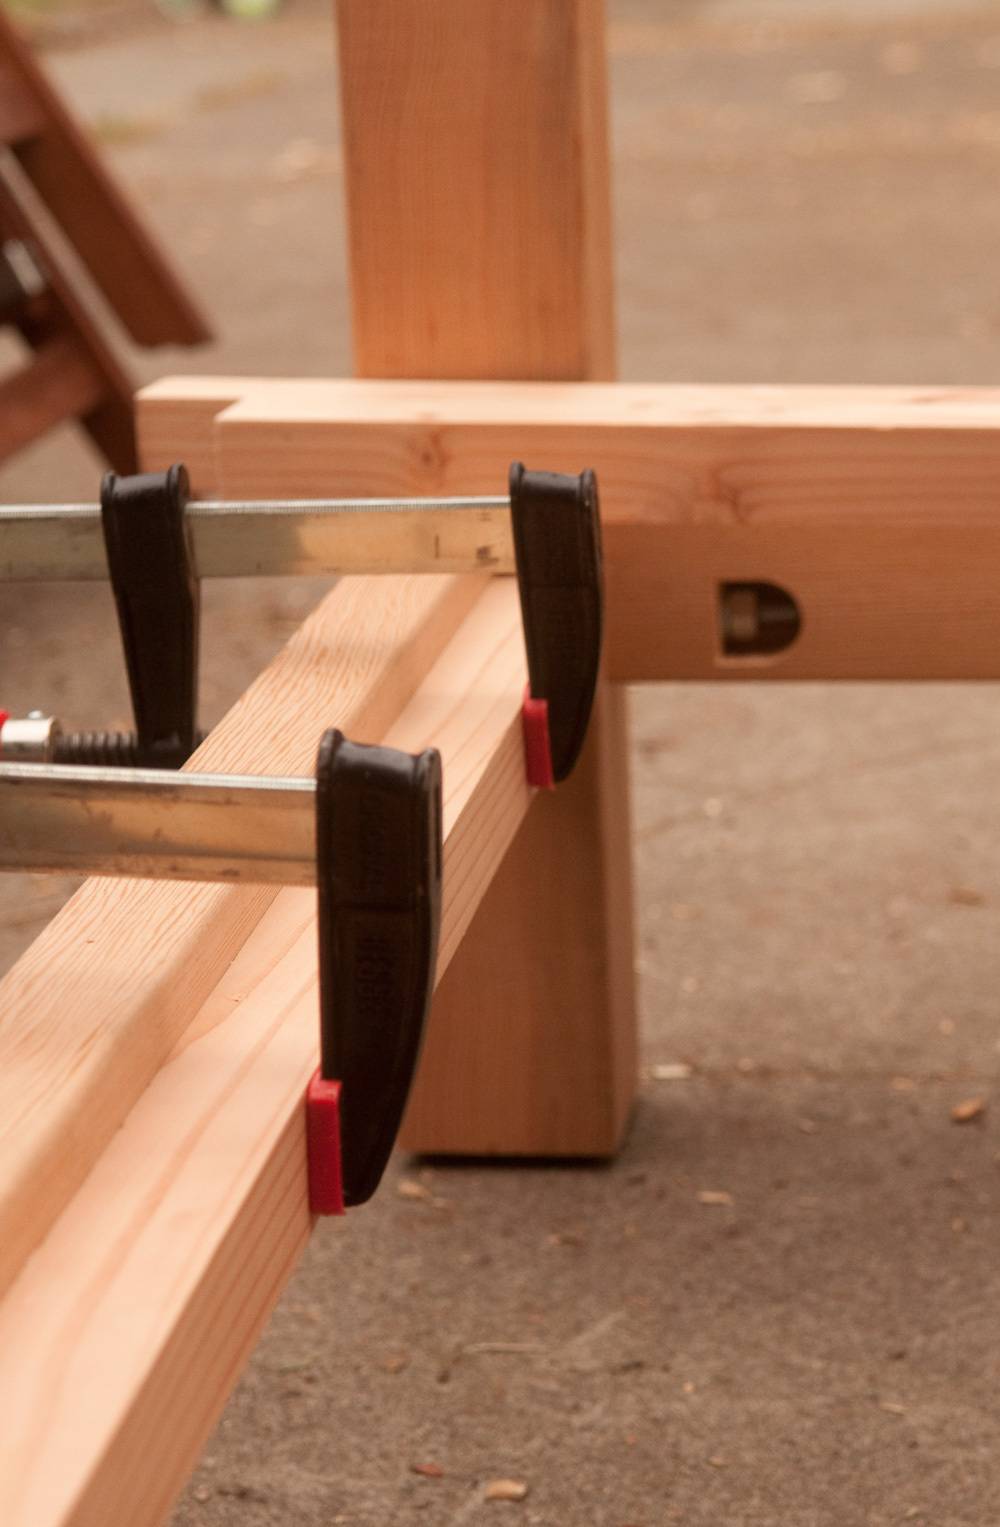
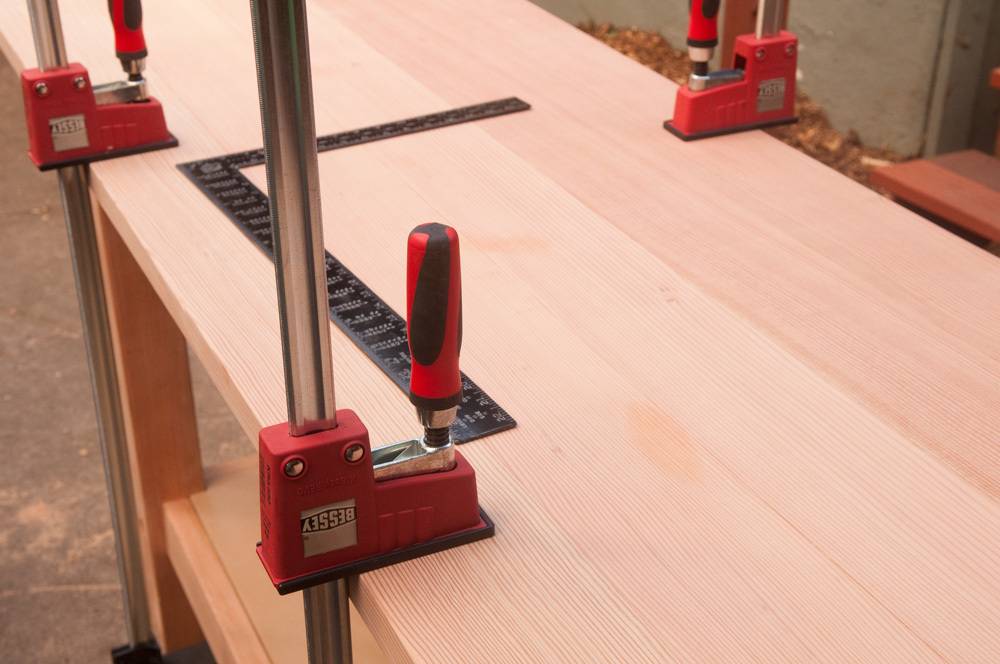
That’s a lot of measuring and drilling, so let’s turn our attention to the bench top. I glued my top together using long clamps to add pressure for a tight bond. If you don’t have a set of clamps this long (at least 28″), you can simply add a couple of 1x4s across the bottom and screw them into each 2×6 to keep things aligned. Just make sure they don’t interfere with the bench’s base.
Dimensional lumber is rounded over on the edges, and I wanted to slice those off so my workbench would have a nice flat top without any little grooves. I plan to take a lot of photos on this thing for future DIY projects, and so I wanted a nice consistent surface. You can choose to do this with a circular saw, table saw, or jointer if you have access to them. If not, don’t worry about it; your bench will work just fine.
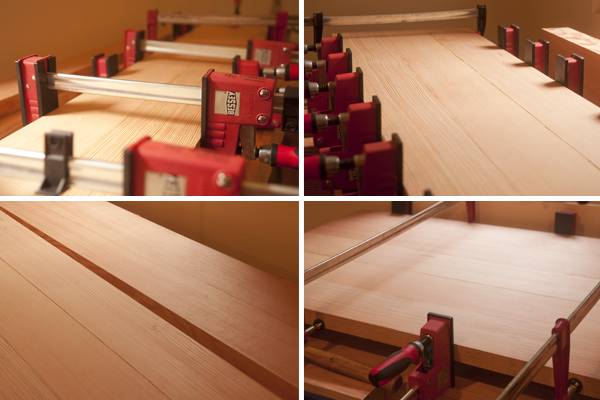
I first glued up boards one and two, then added number three. Then, boards four and five were glued together, and lastly, the two blocks were attached to form the final top.
To get the best bond and save headaches, glue each 2×6 on one at a time. It will take a bit longer, but it will help you get the flattest top and reduce the amount of slipping and sliding around on wet glue. Just apply glue evenly to both edges, and press them together. Clamp firmly until you see a small bead of glue emerge from the joint. Let cure for about 30 minutes before working on the next piece.

Use a chisel or metal putty knife to remove the glue after a couple of minutes (once it has gelled up a bit). While you wait for the glue to set up on the top, you can finish up the base.
Create the nut mortises
The bolts go through the 4×4 legs into the 2x4s, and are tightened by a nut that’s set inside the 2x4s. This is commonly known as a ‘bed bolt.”
To lay these out, you’ll want to make a mark the cross member 2 1/2″ in from the end, in line with your already drilled bolt holt. (Use the bolt to guide you). Once each cross member is marked, use the 1 1/4″ Forstner bit to drill a hole 1 1/8″ deep. You want the hole to have enough room to accommodate the nut, but not blow out the other side. Test your depth on a scrap piece first.
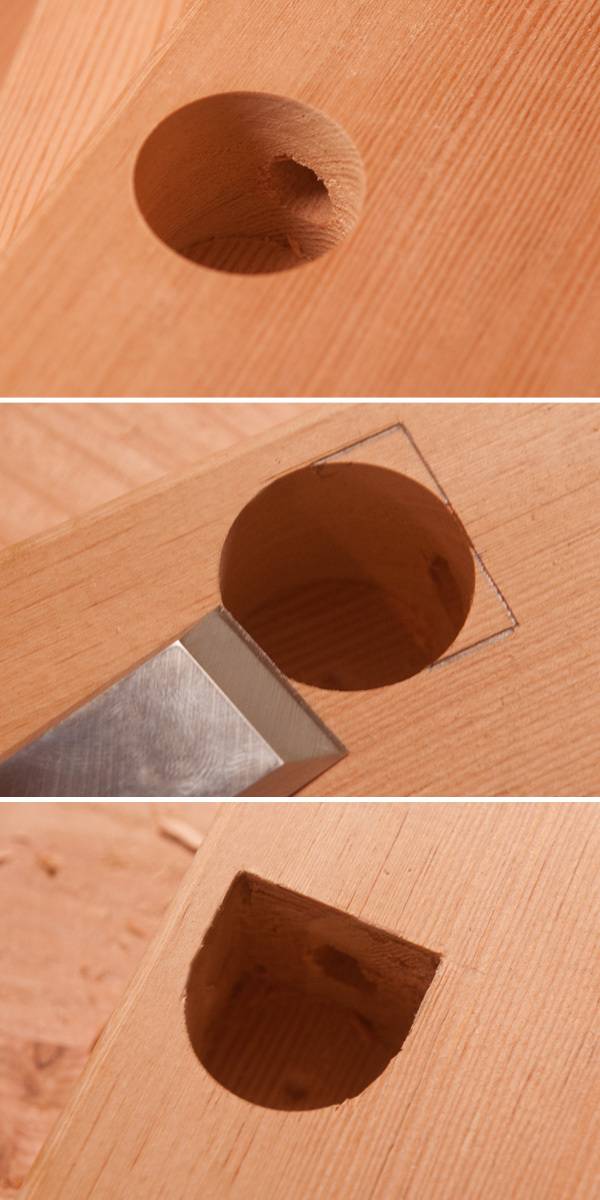
Once the mortise holes are drilled, you should square up one edge to give the nut and washer a flush wall to snug up against. Just extend the sides of the mortise, and chop it out with a chisel and mallet to make a nice, smiley-shaped U.
Repeat for the rest of the mortises.
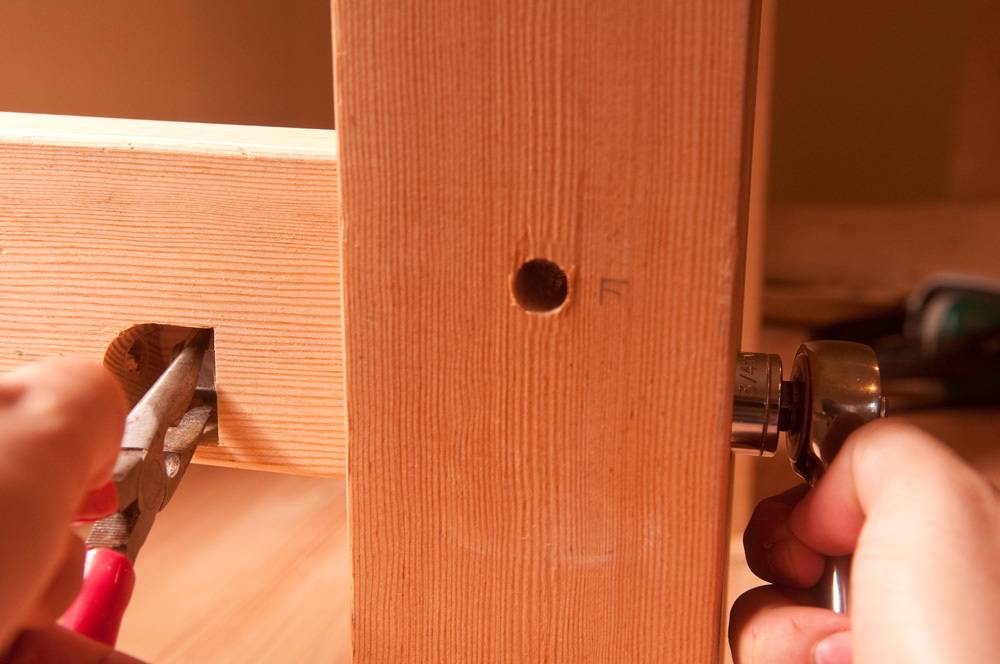
Begin to assemble the base
Okay, now it’s time to enjoy the fruits of your labor. Add a washer to the bolt and insert it through a leg. Slide on the accompanying 2×4 until you can just see the bolt end in the mortise. Add a washer and spin on a nut. Then, hold the nut still with a pair of pliers or open-ended wrench, and use a 3/4″ socket wrench to tighten up the bolt head. Repeat for all the bottom cross members.
Add a shelf (optional)
Placing a shelf on the bottom stretchers is a great way to bring stability and structure to the base, as well as add some serious storage. If you want it in there, you’ll likely need to add it now, before the top is in place, so there’s enough room to make it fit.

I made mine by adding some fir supports to the inside of the shelf on all sides, 3/4″ down from the top, then attaching them with countersunk screws from the inside. (I cut mine from some scrap 2x4s, but you could use 1x2s) Size these so they sit in between your mortises, so you can still access the nuts later for tightening. If you’re less of a perfectionist than I am, you could simply set the shelf on top of the 2×4 stretchers.
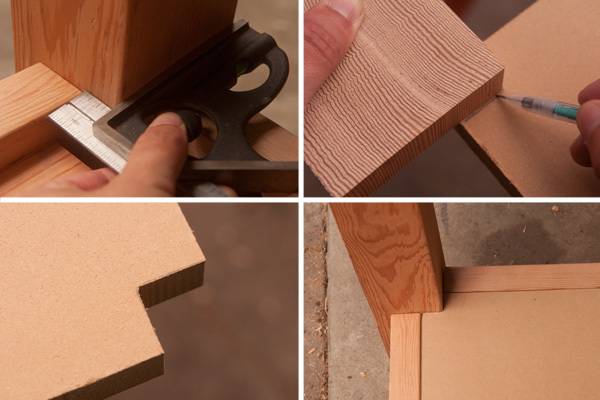
Then, I notched out the corners of a 2×4′ sheet of plywood, which I cut to width. The internal length should be right on 48″. I notched the corners with a simple $15 coping saw.
I then attached the shelf from below with screws.
Complete the base
With the shelf in place, attach the remaining 2x4s with the hardware, tightening everything up. It should feel nice and sturdy at this point. Good work!
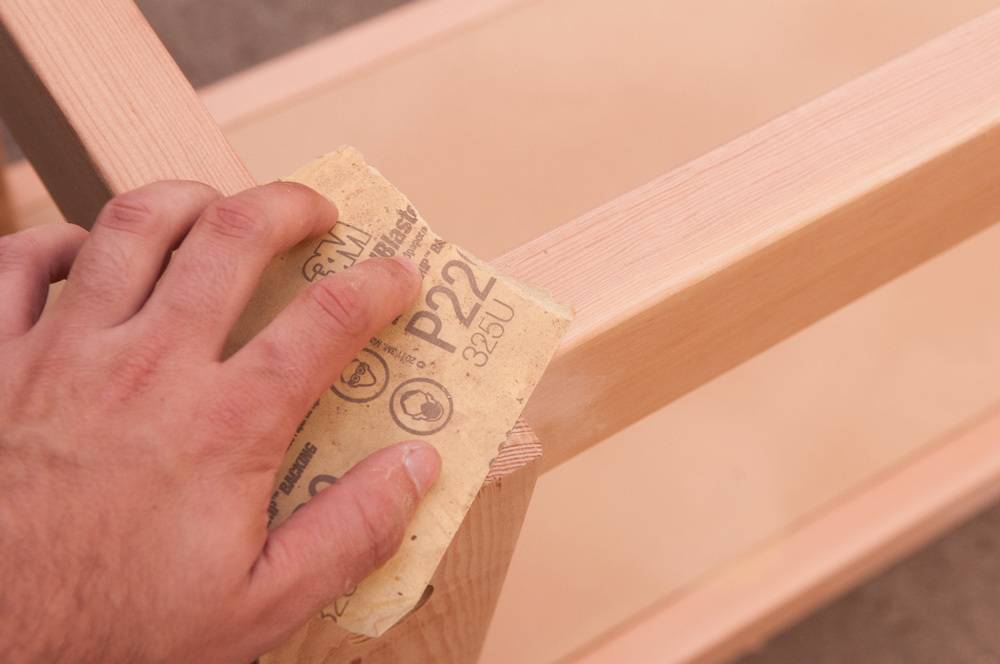
Sand everything with 220 grit sandpaper. If you can still see pencil marks, use some denatured alcohol to remove them.
Finish it up
Finally, add the top, and place it on the base as you see fit. I left 13″ of overhang on one side, and 19″ on the other to make space to store some particular tools beneath. (Remember, the benchtop is still oversized by two inches) Center it front and back, and clamp it in place on the base.

Screwing from the bottom of the top cross members, attach the top with a whole bunch of countersunk 4″ screws. You could also use heavy duty lag bolts, but you’ll need to counter bore them. I just used A LOT of screws, and this thing isn’t going anywhere.
With the top in place, use a circular saw and a straight edge as a fence to cut 1″ off each side to square up the top and create a nice flush edge.

Sand the top with 220-grit sandpaper, and use a sanding block to break the edges a bit. Wipe the whole top with a wet rag to raise the grain, then allow to dry. Sand again to 220, and apply two coats of Danish Oil, which you can find in the stains and finishes section of True Value. You don’t want to use a film finish like a clear coat here – it will crack with all the banging and hammering you’ll be doing on this. Remember – this is a workbench!
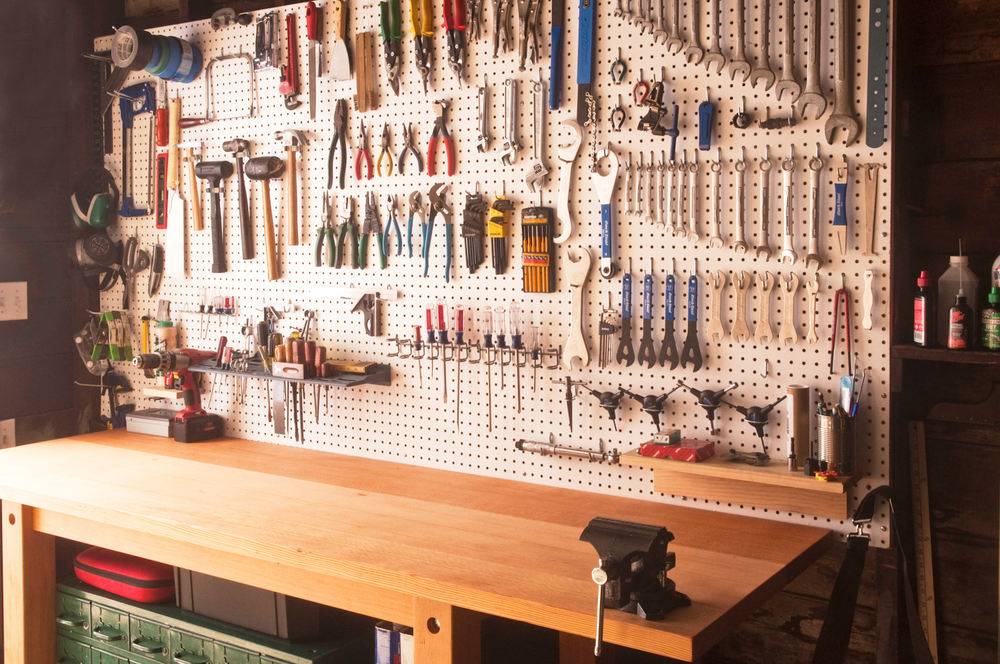
Done and done! I had already placed my tools on the pegboard in groups, starting with the woodworking tools on the left side, the general household stuff in the middle, and the bike and mechanics tools on the right side. I placed the workbench right in the middle, and added my grandfather’s tool chest to the bottom shelf.
This thing is sturdy as can be, and I love that the huge work surface can handle all sorts of projects. It’s still a dark and aged 100-year-old garage, but with some shop lights, all my tools on the wall, and a nice clean place to work, it’s already the most finished space in our house. Time to move on to the next one!


This is lovely, and is definitely going in my To Do pile when we move into our new house. I was wondering, would you be able to also do up a plan of your pegboard? What kinds of hooks and things you used, how pig a piece of pegboard, etc. I would love to be able to use it as a jumping off point.
@Ladyloo – the pegboard is a full sheet, sized 8′ x 4′. The hooks are the standard 1/8″ thick sized ones from the hardware store. I usually buy a couple multipacks, and then look for specific individual hooks for particular tools. You can also check a local store fixture store for cool solutions.
Other than that, it’s just a lot of experimenting to get the best layout. I arrange mine by type, woodworking on the left and mechanical tools to the right, and my most reached for items in the middle so they’re easiest to access. This is my fourth (and hopefully final) pegboard system, so I’ve figured out the best solution for my particular needs. You may want to lay the pegboard on the floor and place the tools to get your general layout. Snap a few pics with your phone, then translate to the wall.
Good luck!
I see your tool box on the right, but where did you get the green boxes on the left?
thinking about this for my hubby for the garage
@troutay – The green tool chest was my grandfather’s. It’s at least as old as the 1960s, but I think maybe even from the 50s or late 40s (It’s been painted at some point in its life).
I talk a bit about planning the bench shelf around incorporating it in the design discussion above.
Thanks!
Chris
Oh, thanks. there is a standard tool box in the picture and I assumed that is what you meant.
Awesome job. I’m going to tackle this next weekend.
Hi! I think this is the table that I want to build for my garage.
I’ve read and re-read how you did it and examined the plan, everything seems clear except I don’t quite understand how you used the jig for the cross members.
If you sandwich the jig between the leg and the cross-member, then the holes would be hidden and you wouldn’t be able to mark them – right? Do you even need to line the jig on the leg at all?
Hi @Jenna –
The jig does not interact with the leg at all. Once you’ve drilled the hole to accept the bolt into the end grain, you use the jig to mark where the bolt ends inside the crossmember. Ideally, it will be straight on and centered, but in reality, it probably won’t be.
The jig helps you know where to drill and chop your access hole so you can insert the nut and it will line right up. If you search “bed bolt jig” you’ll find a few articles from magazines that might help explain the process.
Hope that helps. Good luck!
– Chris
I really like this workbench and intend to attempt building it this weekend. I’ve read and reread the instructions and was wondering, instead of using the bed bolt system, can I just use lag bolts instead? It seems that the look and strength of the workbench would be about the same with a lot less precision work.
Hi Jim –
Great question. You certainly could use lag bolts and washers to attach the crossmembers to the legs.
The drawback here is that you won’t be able to tighten up your bench over the years, and it will start to wobble a bit as the wood expands and contracts with environment changes. I built mine 11 months ago, and it has already benefited from one tightening.
Is it totally necessary? I don’t think so. I intend to use this thing for a very long time, and so it was worth the extra work to me. It only took about an additional 90 minutes to layout, drill, and chisel. Spread over the next twenty years, that investment of time was a no-brainer.
If you try the lag bolt option, I’d love to hear how it goes. Please share your bench with us when you’re done.
Thanks!
Chris
I am unable to download the plans
I really like this plan. I want to put this in my basement. My floor is not level and I don’t want to mess up the clean look with shims and I don’t want a wobbly bench. Any suggestions?
So, following your instructions, which are great, except I’ve come to discover that two of the legs in the plans should have 8 mirroring holes, otherwise you cannot connect the 2 sides. My sanity check came to late!
I misspoke. 2 of the holes must face their partners on each leg.
O O
-O———O-
| |
| |
O O
-O ———O-
Or am I crazy?
@Wm – Fair point. Yes, the four aren’t exact matches. But since it’s a through-hole, it doesn’t affect the layout of the bolt holes. They’re placed at the same point on each leg. But you would need to select which side the counterbores go on.
I’ll see what I can do to update the image in the plans.
Hi Chris – I love this design and am currently putting the supplies together to build it. One thing I think is worth mentioning re: the washers – you mention 1/2″ internal diameter (ID), but they also need to have an OD of maximum 1-1/4″ to fit in the counter bore holes! Most of the 1/2″ washers I found at the Home Depot had an OD of at least 1-1/2″, I had to search for quite some time to find some that would work.
(I am also very envious of the wood you found, I ended up buying some more expensive kiln-dried cedar from Lowe’s because all of the other wood at HD was really knotty and ugly.) I still have some knots but am planning on filling them with epoxy to get a nice smooth surface. Thanks for the design, it’s a real inspiration!
My dry fit is a disaster. Can’t even push it all together, much less get everything flush. I used a pilot hole and drill guide for all my holes. How could it be that off on so many holes? I know I’m not an expert but it shouldn’t be this bad. Thoughts? Suggestions? I really don’t want to have to scrap the whole thing.
@andrew – Hi there. Send me an email at Chris @ [siteurl] and explain a little more what’s going on and we can hopefully figure out your issues. If you can snap and share a few pics, that’d be helpful.
Chris,
Quick question about the table top… You wrote “I first glued up boards one and two, then added number three. Then, boards four and five were glued together, and lastly, the two blocks were attached to form the final top.” What are the two blocks you refer to? Trying to visualize this but I’m probably missing something obvious…
Thanks in advance.
Hey James,
In woodworking, a bunch of edge-glued pieces like this are referred to, very practically, as a “glued up block.” So the blocks are – attached pieces 1,2,3 and attached pieces 4+5. I can see how that was confusing in the directions, and I apologize that I didn’t make it clearer.
How about this:
– Glue board 1 and 2 together. Let cure. Add 3. This is now glued-up block X.
– Glue boards 4 and 5 together. This is now glued-up block Y.
– Glue blocks X and Y together.
Thanks!
Chris
With only one point of fastening on each of the cross members, how do they not pivot? Is the torque on one bolt on each end enough to stop the other end of the sliding if given a good knock? I like the cleaned up look of the bench, but it just seems odd not to have two points of fastening through a 2×4. Wouldn’t it at least make sense to alternate top and bottom on each side? As in a bolt goes through the upper half of the cross member on the left side and a bolt goes through the lower half of the cross member on the right side? Thanks, looking to get this going soon
@Bryan – Please say more. What 2×4 are you referring to? The cross members, going along the width of the bench? These are secured by the top, Also, that’s why we take the time to use the bedbolt system. If they ever do need tightened up, that can be done in five minutes or less.
@Bryan I would imagine the bottom shelf (if added) would also keep the bottom stretchers from pivoting. If no bottom shelf was added, then I would question the same about the pivoting.
Looking forward to doing this project as well. The lumber in my area (South TX) is TERRIBLE, lots of knots and lots of bows in the lumber. I’ve been reading up on this project and making notes for over a month. At the same time I’ve been searching for decent lumber at Lowes and HD (we don’t have any mom and pop shops in town).
@Chris – Thanks for these plans, the bench is beautiful. By the time mine is done it will look like yours, especially the right side.
2012 Giant Anthem
2015 Giant Fast 1 SLR flat bar roadie.
Origin 8 SS
@Marc – Thanks for your thoughts.
If you have a table saw, you might try to mill up your own lumber from 2 x 12s from the home center. If you cut from the outside, you’ll essentially end up with quartersawn stock.
These likely aren’t kiln dried or seasoned, but if you’re in South Texas and the humidity is low, it should dry out pretty quickly.
I want to build your workbench, however, I want to print out your whole article on it but cannot print it out without the URLs. Is there a way to print out just the text and (of course) pictures?
I appreciate you sharing your skills, especially, for a beginner such as I am.
olá chris,como está?
achei muito bom seu projeto,sem duvidas um exelente banco muito bem elaborado sem falar nos detalhes.Vou me aventurar a montar um para meu uso apesar de pouca habilidade com madeira mas creio que com sua coordenada conseguirei.
Muito grato e um abraço.
Nick,
Is the 32 1/2″ leg length a misprint. At that height I’d be sitting on the floor to use the bench.
@Nick – No, not at all. Our legs are definitely thirty-two and one half inches long. Coupled with the top, they make a bench that’s thirty-four inches of the ground.
Why would that require you to sit on the floor?
Firstly, thanks for the design. It is good practice for those that are new to wood-working.
That said, I will give some suggestion and comments based on my experience building this bench.
The 2×4’s are completely pointless. You are using a half-inch stainless steel bolt to hold together a 2×4 that you have cut out all but 1/4 of an inch to create the mortise. The wood is by far weaker at that point. I ended up using 4×4’s for the entire frame, and after doing the joinery I am completely convinced that using 1/2 inch screws with pilot holes will be just as if not more solid and 1000% times easier to prep, measure, and assemble. If you don’t do the mortises perfectly, your bench will fit together like a round peg in a square hole. You can still use the forstner bit on the outside to recess the bolts and make it look exactly the same, but using screws will be much, much simpler and just as secure.
Also, if you don’t know what you are doing when you try to chisel out a square so that your washers and nuts flush up inside the mortises, you will crack the edges of your wood rendering them waste. There is just not enough room inside those boards to create holes that large. I’m sure if you have experience with this you can get around it, but either way it will take you half a day just to do this on the 16 mortise holes.
Bottom line, it’s good practice and will end up looking nice if you know what you are doing, but if you want a sturdier bench that looks exactly the same and fits together much more solidly and you are new to wood-working I would shy away from the mortises and just drill screws straight into the joinery. I would also use 4×4’s because they are not that much more money, and when done you could land a plane on top of it.
I semi agree with Adam on the 2×4’s. When doing my test mortise and chisel, I split the wood with the chisel. So definitely watch some videos on how to, as well as test, test, test, before you do anything to your final product.
I am at the point on my project where it’s decision making time. The 4×4’s are all drilled out. I really wanted Doug Fir but could not find 2×4’s only 2×6’s. I’m at the point of, do I just use the 2×6 instead of the 2×4 (no table saw) and use screws or try and HOPE I don’t crack any wood on my finished product when doing the mortise.
I like the looks and style of this bench. I will be using this link to build my bench. I will be using left over pressure treated 4×4’s for the legs and then stud lumber or some yellow pine for the rest.
90% done with mine y’all. Base is complete, table top is complete. Just need to attach table top to the base, oh and finish the bottom shelf.
I made my total height 40” as I stand when I work and it’s fine. The only thing I did not stick to is the bed bolt system. After testing I split the wood more than I would get a good flat chisle for the mortise. I used a kreg jig instead. Super solid no worries at all, and you can’t see the screws.
Thanks again Chris. I’ll send pics once sanding is done!!!
Beautiful work bench. I’m working on one now, It will take me quite a few weekends to build it, but I really enjoy working in my newly build shop/garage. It’s my favorite hobby, and I will appreciate it more when It’s all set up like I want it. Thanks for sharing this Awesome plan.
I just finished building this table, great job on the design Chris! I really enjoyed it. I ended up modifying a few things. First off, I dropped the hardware to 3/8” but kept the 1/2” holes. I found that the 1/2” bolts in the 1/2” holes were too tight for my liking and it provided me some slip to make up for non-perfect cuts/holes. Also, I couldn’t find 1/2” washers that fit in the counterbore. For the top, I opted to go to my local Habitat for Humanity and buy a solid door as the bench top. I think it was 7’ tall and has smooth faces. I cut the width down a little bit to get rid of the hardware holes. It makes a excellent and very sturdy top. Lastly, I made my legs about 2” taller. I am 5’10” and felt it was a better working height for me. However, this is my first workbench so we will see how I feel as I use it. Overall, excellent project and I’m very proud of the results!
Oh I also decided to attach the top with pocket hole screws rather than going all the way through the top stretchers.
Looking at the work bench I noticed a green 18 drawer metal box under the table. I had one and it was left at the house I moved from. Could you please let me know where you found one as I have looked and not been able to locate one. Follow your DIY ideas. hank You.
Val
Been following these instructions, with some modifications of my own devising, namely using 2x6s for the top rails and stretchers and omitting the front rail to make room for some drawers (plywood forming the floor of the drawer box takes it place).
Being completely uninitiated in carpentry, but being a huge nerd with access to a 3d Printer. I 3d printed some jigs so I’d get the holes drilled spot on 😀 !
Could you add a little more detail on the shelf please Chris, perhaps a photo from underneath. Am having difficulty visualising how it rests on the frame internally. Great project for me as a newbie!
Thanks a bunch – the email with download instructions came this afternoon.
Decided to build this without the plans, based on your explanation and pictures. Found it quite difficult (I’m a newb!) but its really starting to come together and I think it is going to be a tank when its done. Few issues I encountered that will maybe help the next guy/gal:
– Drilling perfectly straight holes is impossible without a guide. Even drilling through 1.5″ for the hole guide/jig was incredibly difficult. I ended up buying a drill guide to assist. If you have access to a drill press it will make your life much easier.
– Drilling straight into the end of the 2x4s to receive the bolts was also challenging, even with the drill block. Couldn’t clamp it anywhere so I did my best to hold it in place. Came out OK but not perfect.
– Take your time drilling out the mortises. You need to drill in quite deep to make room for the washer/nut. Most times I was extremely close to blowing out the other side but luckily got through this step relatively unscathed.
– I’m going to add locking caster wheels to each 4×4 leg to make the table maneuverable.
– Finding a number of 8′ 2x6s that are straight enough for a glue up is proving to be a big challenge after a couple trips to the yard. Unfortunately don’t have access to a jointer and planer so making the table top is going to be tricky… this weekend’s project.
I do suggest tackling this project, its going to be nice and solid when it’s done with a good amount of storage (I opted to include the bottom shelf).
Biggest takeaway: invest the money and buy the proper tools to build perfectly straight holes. If you try to freehand you’ll be left with a mess and a headache!
Excelente, felicitaciones por su dedicación a enseñar todo ésto
Hi Chris,
I’ve been looking at many different DIY workbenches and this one looks beautiful! How do I get the downloadable instructions? Thanks again for sharing your plans!
Interesting looking plans – Seems quite high to me – how tall are you ?
I’m in the UK and plan to build something similar – I might struggle to find the right timber. Elsewhere I’ve seen guidance to only make the top a max of 24″ wide – how wide is your bench?
I’d appreciate an engineering drawing if you have made one please 🙂
would love a printable version of instructions
i love it
I knew this tutorial was from you. Excellent photos and perfect steps. I’m so happy you now have the ultimate workbench for your tools, hammering space and storage. Plus, I’m just happy to hear you’re still tinkering away and found your forever house.
did it – LOVE IT!
Bad bad bad description and specs. You need to center the holes on the top braces otherwise you get blow out. You need to use a drill press for the mortises otherwise you’ll break your wrist with a hand drill. If you want to do more of these education things I suggest fewer close up pics of you drilling (worthless) and more detail.
Thanks a lot for sharing your design, Chris. I just finished this project and it turned out great. I am brand new to this, so it was a fun first project with a lot of tools I had not used before.
I ended up utilizing a friends miter saw and table saw to make all of the necessary cuts…I doubt I would have had these results if I had tried to use my circular saw.
I was able to complete all of the drilling using my power drill (with built in level) and no drill guide. It worked out nicely, however, it was the slowest part of the project. If folks have a drill press, awesome, but it is definitely not a necessity. I ended up using a jig from scrap 2 x 4 for the 1 1/4″ mortises and it worked like a charm to get my drill holes started before actually drilling into the side of the 2 x 4s. I would highly recommend doing that rather than measuring each time.
My biggest mistake was ordering my lumber from Lowes online, rather than picking out the pieces myself. Two of my 2 x 6s came with a pretty significant twist, which is now noticeable on the finished product.
The workbench is incredibly sturdy and I imagine I will get years of use out of it! Thanks again for sharing and sorry for some of the grumpy comments below.
I love the way this is built and looks. I am looking for an ‘L’ shaped bench to be 8′ x 10′. 34″ deep and 40″ tall. w/ bottom shelf all the way around. Can you design this for me?
I am in the process of building this bench. I have to assume the author has access to hardware that is not normally found where I am at. A standard 1/2″ washer has an O.D. usually around 1 1/4″ which means to just make the washer fit you need a counterbore of 1 1/4″. Which is what I decided to do but I then did not think about the motorise . Now that I am working on the motorise I see no way you can use a 1 1/4″ washer. Even if you had perfectly aligned holes you would blow out the cut for the mortise since it needs to be 1 1/4″ deep and a 2×4 is only 1 1/2″ deep but remember a fostner bit has a pilot on it that I am sure will peak through that extra 1/4″ or so.
I have attempted to located a 1/2″ washer with a smaller OD but so far no luck. I may do what another commenter did and size down to 3/8″ hardware.
Also note if doing this project, I do not have a drill press and I would not do this one again without a drill press. When making the mortise hole the drill will just about break your arm, plus these plans rely on accuarate holes that just can not be done with a hand drill.
Chris, I’m about to get the lumber to start this plan. If I wanted to make it longer, with less overhang on the ends (and with more lower shelf space, would I be able to simply adjust the length of my rails? I’d keep the same width so the stretchers would not be affected. Thanks for the plans. I bought the .pdf and am copying the written instructions to accompany them.
Hey DWC! That makes sense to me and should do the trick. But definitely still a measure twice, cut once kinda thing. 🙂 Let us know how it goes!