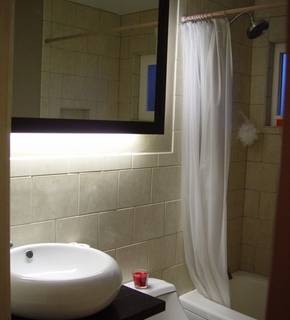
This HOW-TO explains the steps I took to build a custom, back-lite Mirror. I was looking for a large mirror for a while but could not justify a custom frame for over $400.00 (not including the mirror) so I decided to make my own. The inspiration came from a picture where the mirror was placed in front of a window.
I don’t have a picture for every step (I was not planning on posting it) but this should get the message across. Also, I did not bother including specific measurements since this can pretty much be any size you want it to be. My mirror is about 30”x 45”.
Steps I took:
• Made the supporting frame.
• Installed/wired the Fluorescent fixtures
• Made and finished the frame molding from stock lumber.
• Put it all together.
Materials:
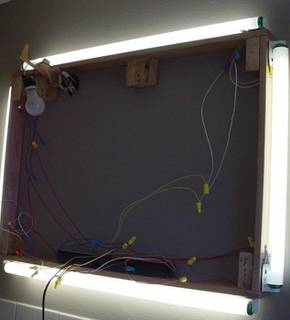
• 2 Fluorescent light fixtures. I bought mine for about $20.00 each. If you have a couple of old ones lying around, that would work even better since you will be taking them apart anyway.
• 1×3 stock softwood for the structural frame.
• 1×3 stock hardwood for the frame molding (I used Maple)
• Mirror
• ¼” plywood
• “Liquid Nail” adhesive ( READ THE LABEL! you need the recommended type for mirror installation)
• Screws
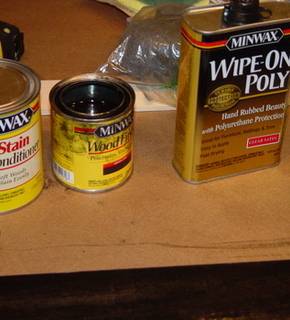
• Wood stain/finish of your choice. I used a dark stain and finished it with “Wipe-on Poly” that worked great!
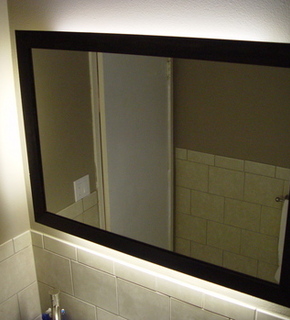
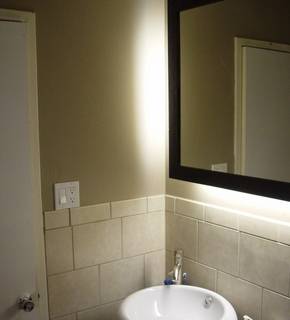
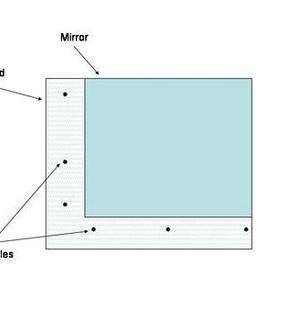
The basic idea is to have 2 frames, one bigger than the other. The smaller of the two will act as the support system and the light fixture. The bigger frame sits on top of the first one and covers the first frame and fluorescent bulbs.
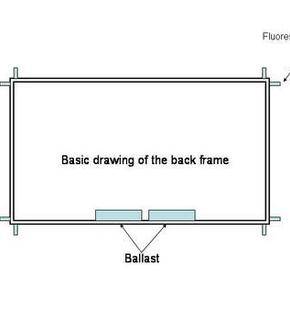
step 2The Supporting frame / Wiring
This is a very basic frame.
Sidewalls of the frame are wide enough for the Fluorescent bulb and the ballasts. Wide enough, to be able to change the bulbs in the future, while the frame is attached to the wall.
Once the frame is put together, drill holes to run the socket wiring through.
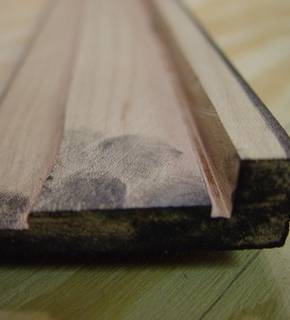
step 3Making/Finishing the frame molding
Making of the molding is as easy as 1, 2, 3 , as long as you have access to a table saw.
You will be making two parallel cuts into the plank, making room for the mirror and the plywood; and a third cut to remove the excess.
Here is a tip, once you set the saw’s fence for one cut, continue the same cut on all pieces before you do the next cut. This will ensure you will have a uniformly cut molding at the end.
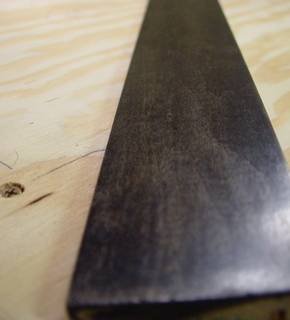
Once you have the molding cut, it is time for “finishing “.
First, sand the heck out of the molding with 220-240 Grit to get rid of any minor imperfections etc and then, dust it off with a cloth i used an old T shirt.
After that
1. One coat of Minwax Pre-Stain Wood Conditioner
2. Three coats of Minwax Wood Finish oil-based stain
3. Two coats of Minwax Wipe-On Poly. This stuff is FANTASCTIC! Just rub it on with a cloth no brush or brush marks to deal with and the result is great.’
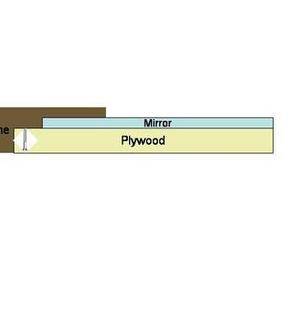
Now it’s time to attach the plywood to the first frame and stick the mirror to it.
• I cut the plywood 2 ½ ‘(all around) larger than the supporting frame to allow enough overlap to cover the fluorescent bulbs without obscuring the light too much.
• I centered the frame on top of the ply and outlined it from the inside and out. Then, I drilled pilot holes between the lines.
• After that, I reversed the positions (ply on top of the frame) and used the pilot holes to center the frame again and secure it with screws. Make sure the screws sink in below surface of the plywood. The mirror will be glued on top of them.
I cut an old closed door mirror to size for this project and used a whole tube but Liquid Nail to glue the mirror to the ply wood.
Almost there!
Once the mirror is in place and the adhesive has cured, it’s time to cut the molding to size (at 45 degree) and put it all together.
The trick is to attach the molding to the plywood so that it frames the mirror without any sign of screws. The simplest way achieve that is to screw the molding from the back side of the plywood.
Just drill pilot holes every few inches, place the molding on top and secure in place with a clamp and drive in a small screw form the back and work your way around.
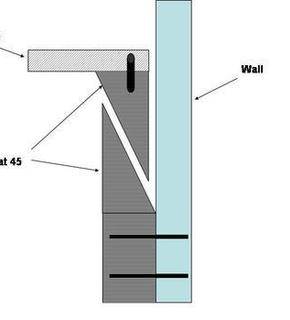
How the heck you hang it now?
As you might have imagined this thing is pretty heavy. To secure it to the wall, I took a 1×3 and cut the top 1/3 at a45 degree. Then, I screwed the smaller piece to the top side of the support frame and the bigger piece to the wall. Check out the drawing, it will make more sense
That’s about it!
I did this project in about 20 to 25 hours over 2 weeks and spent just about $100.
Here another site I posted this on http://www.instructables.com/id/Custom-Mirror