This is sort of a follow up to my “Painting Trailer Walls” blog. I was so scared to paint my walls because I thought they would peel like a dirty bandaid. And nobody had, to share, a personal account of painting them, so I listened to my husband and accepted that it couldn’t be done. About five minutes after that, I changed my mind and went to Home Hardware.
For anyone who wants advice for painting those lousy vinyl covered trailer walls with the little trim over the seams, here is my personal account:
I asked the nice lady at the paint department of Home Hardware for Primer. It had to be super adherant and durable. She gave me a gallon of primer made for aluminum house siding. I should have remembered the number on it but it got to the recycle depot before I remembered to write it down. It was “something something -80”. Two letters (I’m so helpfull)
Next I had the nice lady mix me some paint that I picked from a tiny swatch at the store. I don’t beleive you have to take it home to find out if you love it. Either take a fabric sample to match to it, or if it doesn’t have to match anything, walk around the store under the light section with it, take it out of the exit door and come back in the entrance door. If you still feel good looking at it, then it’s the one. I got a “velvet” finish, sort of like eggshell but a touch glossier. Is glossier a word? GlossYer?
I grabbed a few medium-pile rollers, a tray and some inserts (I thought they were wastefull at first, but it’s no worse than washing paint down the sink or onto your yard).
Then I put in some headphones to block out the smirks of the nay-sayers and painted away. It took two coats and a couple of days drying time, but they turned out so pretty and are super-durable now.
If you have the same trailer walls as mine, then you might want lose the trim and cock the seams. You can get ‘flexible” cocking for shifty walls like mine. (yes, I know about the mis-spelling, was just making sure you’re still paying attention, maybe get a giggle out of you XD)
I should have been more patient and re-applied a second layer of the caulking. It sort of sinks into the grooves as it sets. But I wasn’t and they are still visible. But the paint took to it well, it worked really good.
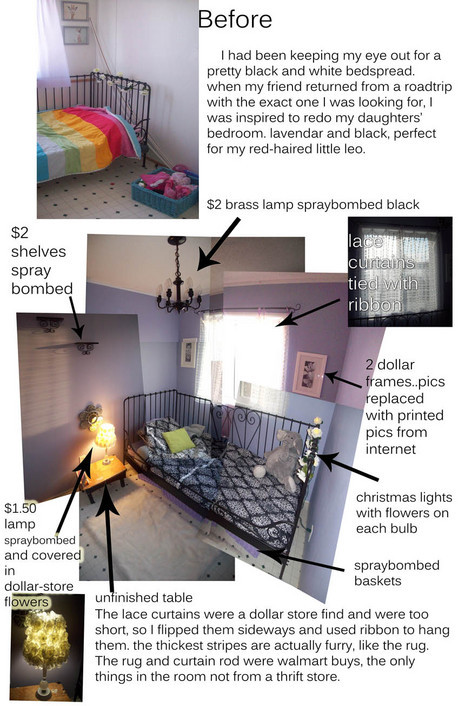
My daughter really didn’t have many ‘accesories’ for her room, so most of what is in the picture was thrifted or taken from another room and painted. I also took off that horrible squeeking closet door and hung a pretty white cotton curtain with little roses punched out of it. I’ll be keeping my eye out for monochromatic accent pillows, and things in a light shade of green to compliment the lavender. The little table was my painting stool, it needs a sanding, and maybe I’ll mosaic it with broken mirror on the top…. not sure yet. Suggestions are good 🙂
Total cost of the room, including paint, accesories, and bedding/textiles: $200.

You did totally good! I know what you mean about the caulk sinking in. I used the textured elastomeric caulk and it puffs out but I panicked thinking that it would stick out and not scrape off and I scraped it smooth with the wall…oh me of little faith…if you let it dry it sinks in even with the wall. Lesson learned and next time I will wait and hope that mine look as good as yours!