Anyone interested in design and architecture can appreciate the brilliant combination of modern materials and contemporary lifestyle patterns inhabitated in the classic mid-century modern ranch home. But rare is the lucky individual that’ll every live in an Eichler or an iconic Case Study House. Heck, most of us will never even live in California.

So bring some modernism to your house, whatever its era, by creating a home for your native avian population by building a mid-century birdhouse. I’ve included my measurements and process here, but feel free to model yours after architecture you love. And don’t worry if you don’t have a full collection of woodworking tools (I don’t either…) You can build a birdhouse with any handsaw, an electric drill, and glue. Or, you can borrow tools from a local tool lending library or have the employees at your local lumberyard or home center make the cuts for you.
Or, if you’re looking for a less woodworking-intense version, check out this streamlined mod birdhouse that can be made with just a drill.
Press play above, or view the video here.
1. Design your birdhouse with plain old graph paper and a pencil. Consider the size and weight of your final project.
2. Create a “cut list” by listing the measurements of each of you facades, i.e. base, front wall, back wall, left wall, right wall, roof one, roof two, etc. Something to consider (which I did AFTER mine was glued together), is a way to access the inside of the space to clean out old nests, pests, etc. A trap door in the bottom or back, seems like it’d would the trick. If you’re following my design, the inside wall of the ‘carport’ area would be a good option.
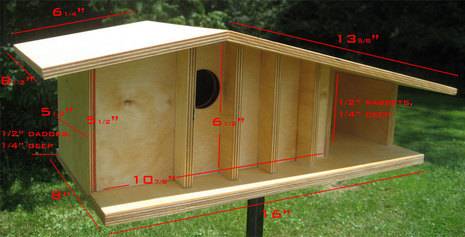
Click here for a larger diagram.
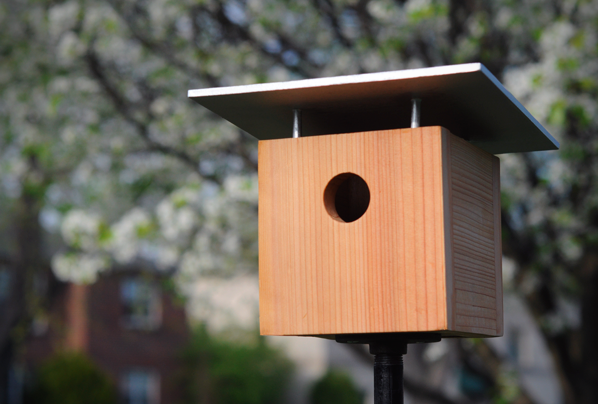
3. Cut your wood to size. I used baltic birch plywood, cause I like the hi-ply of the exposed edges. Soft woods like pine and cedar are fine as long as you’re painting the final product.
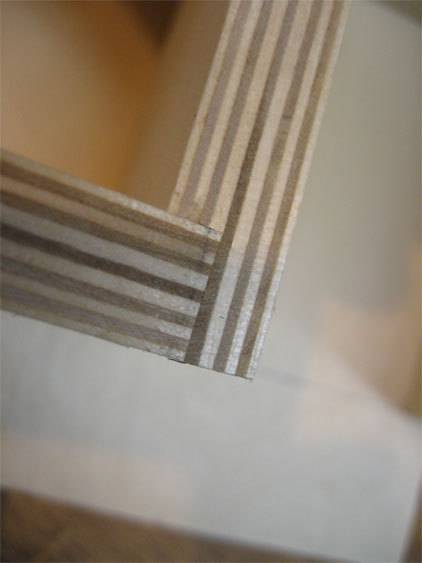
4. Do any extra joinery cuts that you might wish. For example, I cut 1/2″ rabbets in my side walls, and 1/2″ dados at a 1/4″ depth where all my walls sat in the base avoid using large mechanical fasteners, like screws, and as a learning exercise in making stopped dado cuts.
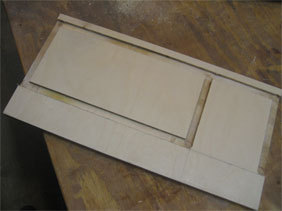
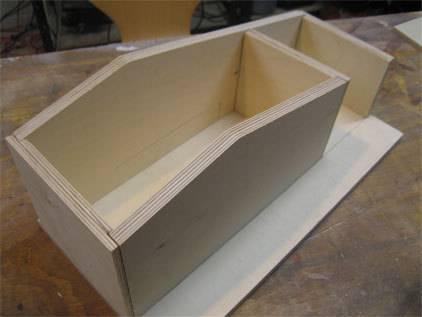
5. Assemble your pieces for a dry fit, check it over, and then once satisfied, glue the whole thing together, adding small nails or even screws if necessary. Let it dry overnight.
6. Finish your project as you wish. Remember, this is going to be outside, and raw wood doesn’t stand up to the forces very well. Whatever you use, be sure it’s safe for the birds to live in. Don’t do anything to the inside, just the exposed surfaces. Paint is really the best option, but anything that’s designed for long-term outdoor use will work, as long as you’re up to reapply every few seasons.
7. I chose to mount mine free standing, but you could hang yours from a tree or set it atop a fence or handrail on a deck or balcony. To mount as I did, screw a 1/2″ black pipe flange to the bottom of the birdhouse (using pilot holes to avoid splitting the wood), and attach it to a long 1/2″ black pipe, both of which are available in the plumbing section of the hardware store or home center. Purchase a pipe at least two feet longer than your desired height, as you really need to sink it to eliminate any wobble. If you have a permenant location, digging a bigger hole and filiing it with some QuikRete is a good idea. (Don’t be afraid, just follow the directions on the package).
8. Create a choice cocktail in a vintage martini glass or tiki mug, throw on some bossa nova, and watch your new feathered friends come home.
If you’re looking for a less woodworking-intense version, this streamlined mod birdhouse that can be made with just a drill. Yay!
Thanks. Can you tell us how far the 6.5″ tall decorative piece is from the left side of the birdhouse? Also, is the 6.5″ piece lined up with the center of the birdhouse? Thanks again.
Hi Matt – Unfortunately, I can’t share that info. I gave this to a friend years ago as a gift, so I dont have it around to check those measurements. (I made this in 2008) But those vertical members are truly decorative, so, once you have your entry hole drilled, you could just place them it a spot that looks right, and then set your spacing that way.
Good luck! Please share a photo if you actually make this.
Best,
Chris
Thanks Chris–a friend of mine wants to make it. She’s not a wood worker, so I thought I’d lay it out as plainly as possible for her. I’ll just mock one up in a CAD program and get it close using the measurements you did share. We’ll definitely post a picture if she does make it.