Last weekend, I whipped up these fun, graphic wooden arrows, made from some scrap walnut and maple I had lying around. The whole project took me about thirty minutes, and I love thecombination of the ornate woodgrain and the bold, geometric shape. I shipped them off to Curbly’s deputy editor Capree to use in her new home office, but they’re light enough that you could attach them to the wall with 3M Command strips or other non-damaging adhesives. They provide a fun decorative element that gives a space some movement, and they give off the vibe of an expensive secondhand find, even though I made them for free in less than half an hour. Sometimes the simplest projects are the best projects.
Oh, and have you seen Capree’s full office makeover? The results are amazing, and I’m happy to have my arrows living in this inspiring space.
Wanna make some? Awesome – just grab the free template and let’s hop to it.
Tools and Materials:
- Wood stock: 1/2-1″ thick
- Arrow template – Get it here
- Spray adhesive
- Jigsaw or coping saw
- Sandpaper: Fine grits such as 150, 220, or 320
- Wood finish or paint (we used Danish Oil)
![]()
1. Begin by selecting your wood. For a project like this, you can use whatever you want: scraps, construction lumber, plywood. Check the cut-off bin at the home center or hardware store, or use something left over from another project. I had these great scraps of walnut and maple, so I selected them for the color contrast.
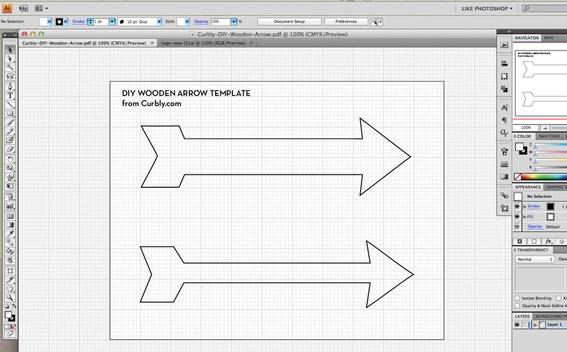
2. I whipped up this quick template, which you can download here. Since I wanted these arrows to be larger than 11″, I tiled the PDF over two pages, and then printed a copy off for each arrow.
![]()
3. Next, spray a light coat of spray adhesive on your wood, and position the templates. Connect any gaps with a pencil and ruler so you have nice solid lines to follow.
![]()
4. Then, cut them out. I used a jigsaw, but you can buy an inexpensive coping saw at any hardware store. They’re excellent at cutting curves and are easy to use, though, of course, they take a bit longer to use than a power tool. Heck, if you’re still not comfortable with wood, you could make these out of heavy art board that you can find at the art supply shop. They won’t be as three-dimensional, but will still look great. (Although, seriously – get a coping saw. They’re affordable and awesome, and you can use it on lots of projects.)
Note: Whenever you cut irregular shapes, you want to stay just outside the line. Then, you can sand to the line for the exact shape. So….
![]()
5. Use sandpaper to smooth any saw marks, and sand your piece to shape. Unless you’ve made some big mistakes, you should be able to smooth it up quickly with 150 and 220 grit paper. If you shape is pretty wobbly, use a courser 100 to remove irregularities, then clean it up with the fine paper.
Tip: Always keep your template attached until the sides are shaped where you want them. Check the back of the piece for reference. Then, remove the template and sand the top smooth.
![]()
6. The last step is to finish your wood. Since I used this beautiful hardwood, I opted for a clear, hand-rubbed oil finish, which I applied with 320 grit sandpaper to work into the wood. If you used a soft fir or pine, feel free to stain these whatever color you’d like, or even paint them a bold color for some big impact.
![]()
This really is a quite simple project, and great way to start working with wood if you haven’t been ready to take that leap yet. This is a project that can easily be completed without a workshop – and you could do it inside on winter weekend afternoon, especially if you’re using a coping saw. The spray adhesive is the messiest part!
Have fun! If you have other ideas for cool shapes and wall art to make, post ’em in the comments below.
[Top and bottom photos by Capree Kimball]
I’m more interested in the clock in that picture. In info on how that was made???
Hi Anon – The clock is the U Suspend Floating Clock by Umbra.
wait, what is this applying a finish with sand paper!? I love it! I’ve never heard of it! So, once you do that, your sandpaper needs to be thrown away thought, right?
Hey Dawn – It’s one of my favorite techniques when applying oil finishes. It adds just a little bit of grit, and the particulates help fill in an coarse grain. Yes, when you’re done, the paper will be saturated with oil and wood dust, so you’ll likely toss it. A tiny square will go a long way.
Very neat!! Thank you for clarifying for me! I am going to try this! What oil do you use?