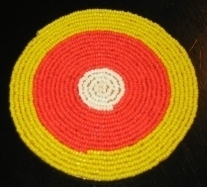
I started this project thinking that I could do it with my 5-year old. He’s learning about patterns in school and I wanted to use his new knowledge while making something that he could give back to his teacher as a gift (see the orange, blue & white coaster pictured, it has a growing pattern). It’s a fairly straightforward project, but it can be very tedious. After doing a couple of coasters, I now realize that it’s probably too difficult for a 5-year old, but he can still help by stringing random beads for the length of his attention span… 3 minutes give or take a minute…
The colors and lengths of the seed bead strings are specific to the candy corn coaster and they may not be dead-on, but they should be close.
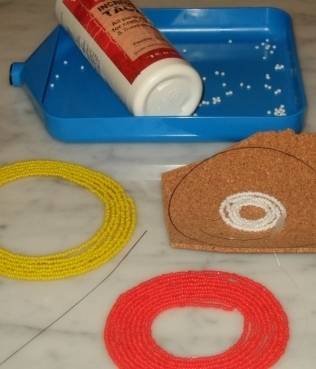
Supplies
1 large white button (option 1 see step 5)
White seed beads (option 2 see step 5)
Yellow seed beads
Orange seed beads
Thread (that sort of matches the beads)
Beading needle (I use a big eye needle in this project, but I’ve used ordinary sewing needles in the past. As long as the needle can pass through the bead, it will work.)
Craft Glue
Medium sized paintbrush (you will use it to paint on some glue)
Small piece of aluminum foil or anything that you can pour glue on
Cork roll (you will need a 4.5 x 4.5 square for this project)
Scotch Tape
Toothpicks or other pointy prodding tool
Small Scissors
Directions
1. Prepare the Cork
If you are good at eyeballing measurements, you don’t really have to do this step, I’ve included it as a visual guide.
Draw a 4-inch circle onto a piece of the cork roll.
Add a 3.5-inch circle within the 4-inch circle trying to center it as best as possible.
Add a 1-inch circle to the center and again center as best as possible.
Do not cut the circle out of the cork; you may want to use some of the excess room around your cork circle
2. Prepare the seed bead strings
3. Unwind 6.5 feet of beading thread then thread the beading needle. String the orange seed beads onto the thread. It takes approximately 17 to 18 beads per inch (after threading about 4 feet of beads, you tend to start counting unconsciously… or maybe it’s just me). When you are at the 6-foot mark, pull the string tight (so that all the beads fit snugly together and there is no excess string) and put a small drop of glue on the last bead. Once dry, this bit of glue will keep the beads from falling off the thread and it will allow you to more easily handle the beaded thread in later steps. (Note – instead of gluing the last bead, you could tie a knot, but sometimes this makes the beads lay funny when you glue them down. I have also used a piece of tape in lieu of glue. Take about 1/4 inch of tape and wrap it around the space of thread that is directly behind the last bead.)
4. Unwind 6 feet of beading thread and thread the beading needle. String the yellow seed beads onto the thread. When you are at the 5-1/2 foot mark, pull the string tight (so that all the beads fit snugly together and there is no excess string) and put a small drop of glue on the last bead (or use a piece of tape).
Option 1 – Step 5.
Using a button as your center is more kid (and adult) friendly because it’s easier to wind the beads around something that’s already there. If you don’t want to do this, go to Option 2 Step 5.
Option 2 – Step 5.
If you are using seed beads as your center then, unwind 1 foot of beading thread and thread the beading needle. String the white seed beads onto the thread. When you are at the 6-inch mark, pull the string tight (so that all the beads fit snugly together and there is no excess string) and put a small drop of glue on the last bead (or use a piece of tape).
6. Pour some glue onto a small square of tin foil (about 4” x 4”). Grab a medium sized paintbrush and dip it in the glue then paint the center area of the cork. Paint only as much area as required by the button or seed beads from step 5. This should be about a 1-inch area.
If using Option 1 – Step 5, then do this for step 7.
Place the button on top of the glue and press down. Allow the button/glue to dry a bit.
If using Option 2 – Step 5, then do this for step 7
Take the white seed bead string and place the first bead in the very center of the coaster, then wrap/glue the string around and around until there are no more beads. Getting this center area filled-in is the hardest part of the project, be patient and make sure your beads are secured to the string before attempting it. Once the last white bead is secured, let it dry a bit then cut-off any excess string. Don’t worry if some of your beads come off the string, you can use your toothpick to push them back into place. It may get sticky, but it’s doable.
Note: A toothpick is useful to push/pull the beads as you arrange them. You can also use the toothpick to add some glue in small, tight spaces.
8. Paint some glue over the 3.5-inch area that now encircles the white button or white seed beads. Take the orange bead string and line-up the first orange bead with the last white bead. Wrap the string around and around until there are no more orange beads left. Let the beads dry to the cork a little then cut-off any excess string.
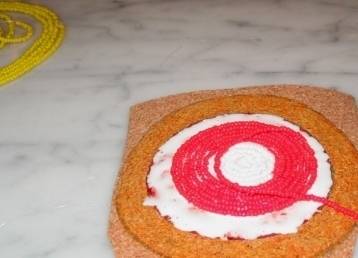
9. Paint some glue over the remaining cork. Take the yellow bead string and line it up so that the first yellow bead is glued directly after the last orange bead. Wrap the string around and around until there are no more yellow beads. Let the beads dry to the cork a little then cut-off any excess string.
10. Let the glue dry then trim off the excess cork.
11. Apply something protective to the coaster to make it last. I was thinking that a few coats of polyurethane spray might do the trick, but I’m not sure. If anyone reading this post has a better idea, please comment!
Alternate Backing Ideas
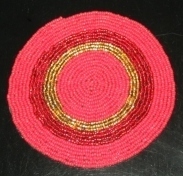
- Ordinary Craft Felt (see below picture of the coaster with the red and gold beads, it’s backing is felt, not cork.
- Self-Stick Floor Care Pads: You may be able to take advantage of the adhesive backing and use this as your surface, and then you would not have to use glue. You can get larger pieces of self-stick floor pads wherever they sell the smaller 1 x 1 pieces that are used to protect wood floors etc… The only sticklers that I see are that protective felt is thicker and not the easiest to cut, and adjusting the placement of the beads could be more difficult.
Last Notes:
In the candy corn coaster, I used a Sharpie and colored the cork orange where the orange beads are and yellow where the yellow beads are. I would have colored the white area too if I had a white Sharpie… I did not include this in the directions as it’s not necessary, but I do like the effect of the beads blending with background. Who knows, it may be more interesting if the cork were colored a contrasting color…I’ll have to try in the future.
When I do this project again (and I will) I think I’ll try a different, easier route. Instead of stringing my bead colors on separate threads, I think I’ll make another coaster with a button in the center then string my colors all on ONE thread, instead of several different threads. With my newfound knowledge that 1-inch is equal to 17 or 18 beads, I think I can make some decent guesstimates. Half the fun will be in not knowing how it’s going to turn out!