
This mid-century style table was made with ¾” thick plywood and hairpin metal legs. With some basic woodworking skills, this modern patio table can be built for $200 to $300, depending on the types of legs you choose. I made this table that seats six for a covered patio, but it can be used indoors as well. I found a sheet of plywood with a walnut veneer at the local lumber yard. Independent lumber companies are a good source because they typically have a better selection than big box stores. Marine-grade plywood is a good choice because it is treated with water resistant preservatives and holds up well outdoors.
Plywood works well for a tabletop because it has a large, smooth surface and can be cut into any shape. I designed a trapezoid shape with rounded corners that was 74 inches long and 44 inches wide. Straight cuts are accomplished a circular saw and a 2×4 for a straight edge to guide the saw.
1. Use bar clamps to hold the 2×4 in place and measure a gap from edge of the 2×4 to the cut line equal to the distance between the edge of the saw guide (also known as a shoe) to the edge of the blade. When cutting wood with a veneer or laminate surface, use a fine-tooth blade instead of a ripping blade and cut with the good side of the plywood face down.
2. An easy way to draw rounded corners is with a one-gallon paint can. You can use coffee cans or spray paint cans for smaller radius corners. Carefully cut the corners with a power jigsaw. If you are not experienced using a jigsaw, practice on scrap of plywood.
3. Once the tabletop is cut to shape, use a hard sanding block and 150 grit sandpaper to smooth the edges. Sand the surface with the grain of the veneer using a soft sanding block and 220 grit sandpaper or finer. I prefer hand sanding because you have more control and it won’t leave marks in the wood.
4. Some engineering is required with larger tables so the plywood doesn’t sag in the middle. I used pine 2x2s. The trick is to buy warped wood with a bend to counteract the sag in the plywood. Lay the 2×2 on the ground so you can see the curve. An 8 foot long 2×2 should be about 3/4″ above the ground in the middle, and have an even arc to the curve. Select two with the same shape.
5. Turn the plywood upside down on a couple of two by fours that allow the tabletop to sag and match the curve of the 2x2s. Glue and screw the 2x2s to the bottom of the plywood tabletop so they curve to the sag of the plywood. Use wood screws that will set into the plywood ½” and not push out the top of the table. Apply two coats of acrylic waterproofing wood stain and let dry one to two hours between coats. This will protect the underside from moisture and add years to the life of the table.
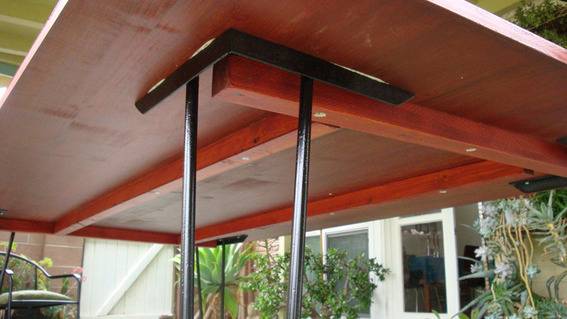
6. Next, attach the legs while the tabletop is still upside down. Several different styles of metal and wood table legs are available from a variety of online sources. Use wood screws and a multi-surface glue to attach the legs. Place the table legs close to the corners of the table so you don’t hit your knees on them. Let all the glue dry for 8 hours before turning over the table.
Once you turn the table over, it may have a slight curve upward. This is fine, it will settle over time, especially if there is a centerpiece on the table.
8. Now that table is assembled and turned right-side up, treat the edges and surface of the table. There are several options for covering the edges of cut plywood. Wood tape is popular because it’s easy to apply with a hot iron that activates heat-sensitive adhesive. You can also use plastic edges that are available in a variety of colors that apply with double-sided tape.
An exposed plywood edge has a nice modern appearance. Use high-quality plywood, fill any gaps in the layers with plastic wood and sand smooth.
9. Now stain the tops and edges of the table. First, dust off the plywood and wipe it down with tack cloth. Start staining with the edges. Apply with a paint brush and be careful to keep stain off the top surface. Apply a thick base coat and sand lightly with a 220 grit sandpaper. Next, stain the tabletop surface using a 3 or 4” wide paint brush with polyester fibers. Brush the stain onto the table using long brush strokes. While the stain is still wet, wipe it off with a soft, clean rag that is folded into a pad larger than your hand. Wipe in strokes the from edge to edge across the entire tabletop the same direction as the wood grain. Early morning is the best time to stain or paint large surfaces because the air is still and moist. This prevents the stain from drying or skinning over before you are finished. With larger tables you can brush then wipe one half of the table and then the other.
The first coat of stain will raise wood fibers from the veneer. Give the tabletop a light sanding with 220 grit or finer sand paper the same direction as the wood grain. Dust again and wipe with a tack cloth. Use the same technique to apply at least two more coats, and coat the edges a couple of times with the tabletop. Your table is now ready for years of outdoor use.
There are other options for your tabletop. You can paint the plywood, apply a polyurethane clear coat, or apply a Formica (or similar) laminate that is glued down with contact cement. A router is required to cut the laminate to the edge of the plywood, and it looks better with edging. Also note that butcher block counter tops are a good option, and can be cut to size the same way as plywood. They can be sealed with mineral oil and are thick enough that you don’t have to reinforce them to prevent sagging.
Thanks!
Just a thought… If you could deal with square corners a solid core door slab a home depot could work too. 🙂
What kind and color stain did you use?