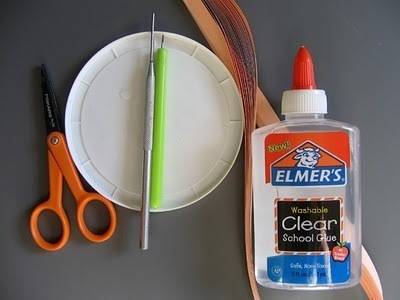
Love where you live. Sign up for our newsletter

How to Make Paper Roses

by on Jan 15, 2021

Photo: Lexy Ward

I  love working with flowers. Fresh or fake, they just make me happier. While not all of us have a green thumb (I am not declaring I do as I am still struggling to keep my plants alive), paper flowers are the easiest way to enjoy some new blooms and keep them around far longer than a few days. And you can learn how to make paper roses in a matter of minutes! So hunker down with that hot glue gun and let’s get to work.      

Materials

  • Several sheets of colorful paper (12″ x 12″)
  • scissors 
  • pen or pencil
  • hot glue gun and sticks
  • paper floral stem wire
  • 1 can of spray paint (optional!)
Materials needed for this project
Photo: Lexy Ward

How to Make a Paper Rose 

Time needed: 30 minutes

Here’s how to make paper roses. These paper flowers are easy, quick, and fun. If you lack green thumbs, these paper flowers will last the whole year!

  1. Cut the paper into a swirly strip

    Take your scissors, and starting at the outside edge of the paper, cut in a swirly fashion (technical term) towards the center of the sheet. Move the scissors in a back-and-forth motion as you cut so the edges aren’t perfectly round and smooth. This will give your paper roses a more organic look.How to make a paper rose in minutes

  2. Create a fringe

    Once you get to the center, cut a few strips halfway down the center of the flower to create “fringe”.

  3. Shape the petals for your paper rose.

    Take the pen or pencil and slightly roll the edges around it to help give the flower “petals” some shape.

  4. Roll the paper into a flower shape

    Starting at the center of the swirl (again, technical term), begin to roll the paper into a rose-like shape. Take the hot glue gun and place small dots of glue to help keep the rose together. Be sure to hold the hot-glued sections together until the glue has cooled and set. Continue to roll and glue until you’ve come to the outside edge of the paper. 

  5. Attach the stem

    Once you’ve reached the end of the paper swirl, place a small dollop of hot glue on the end and tuck it inside the bottom of the rose. You can see what the back of the rose looks like in the photo above. The hot glue is necessary to keep the paper in place and give the rose its floral shape.
    Attach the floral stem wire by putting a small dot of hot glue on one end and sticking it into the center of the rose on the backside. 
    Trim the wire at different lengths with a wire cutter and place it in a vase to arrange. Bend the wire to manipulate the arrangement into the shape you like!DIY Paper Rose

  6. Spray paint

    Spray paint is optional for a project like this, but adds a few pops of color and texture to the paper! 

Here are some pictures of the finished paper roses!

DIY paper rose flower
Photo: Lexy Ward
An easy-to-make bouquet of paper roses!
Photo: Lexy Ward
DIY Paper Flowers
Photo: Lexy Ward
Description for Pinterest!
Photo: Lexy Ward
how to make paper flowers the easy way!
Share this project on Pinterest! 

I love receiving flowers on Valentine’s Day or just in general, but I daresay I’d like to receive a bouquet of these instead! They can stay up year-round! 

1 Comments