
First, an update. Okay, so after being totally intimidated last week, I decided to do some research and take the plunge. Ultimately, this review prompted me to settle on the Canon G10, which has become my Red Rider B-B gun of sorts. I would have slept with it the first night after I brought it home if I knew I wouldn’t roll over and break it. But I digress.
This week in class we focused on being out of focus. More specifically depth of field (DOF) and what the heck it means. First, a definition. According to John Shaw, ‘Depth of field refers to the section of a photograph that appears to be in sharp focus.’ Here’s an illustration:
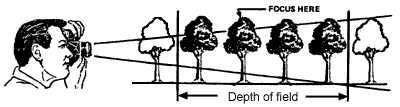
So, for the photographer in the picture, the area in his depth of field is in focus whereas the objects outside the DOF are blurry.
Why should we care about DOF? Here’s one example: Let’s say you want to take a picture of a subject that’s in front of a distracting background. Maybe the background is too busy; maybe it’s not terribly ‘pretty’. To eliminate or, at least, tone down the distraction, you can manipulate your depth of field by making the background blurry, thereby putting all the ‘focus’ on your subject. Here’s an example of what I mean, courtesy of hanselmannphotography.com.

Okay, easier said than done, right? Wrong. With the help of a very handy website called dofmaster.com, anyone can get a handle on depth of field. Once in the website, click on ‘On-line Depth of Field Table’, find your camera in the drop down, click on it and a DOF table will emerge.
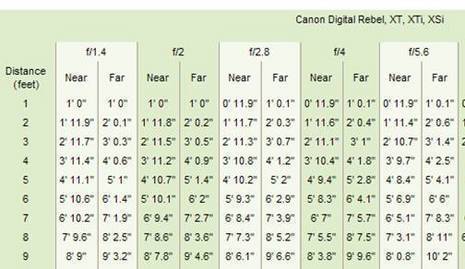
Now let’s try to decipher this puppy. Let’s say you’re using a Canon Digital Rebel XSi with focal length of 50mm and you’re standing 6 feet from your subject (depicted on the left of the table). If you change your f-stop to f/4, that means things will be in focus from 5’8.3″ to 6’4.1″ from where you’re standing.
Understanding DOF is all well and good, but if you’re new to digital photography, you might not know how to actually manipulate your f-stops. If you’re working with a Canon product, change your shooting mode to ‘Av’; if you’re using a Nikon product, set it to ‘A’. Doing so will allow you to change f-stops.
P.S. The Peacock feather pic was shot on my G10 using the macro (‘Tulip’) on auto with natural light, southern exposure.