Welcome to our newest blog series, My Total Office Makeover, in which Curbly’s editor-in-chief, Chris Gardner, realizes that as a full-time design and craft blogger working from home, he’d better transform his second bedroom into an inspiring space where work can actually get done.

Part II: The Master Plan
(Read Part 1 here) I looked around at what I’d maintained and realized the software I had would work: my computers and other media gear, office supplies, etc were all the tools I wanted to use regularly. But as far as the hardware: the desks, chairs, organization and storage tools? No way. Had to start from scratch.
I, as in the other rooms in my house, wanted a bright, Scandinavian feel: white walls and fixtures with pops of color here and there. Had I a higher income, I’d have looked into the very fine array of investment-style furniture from some of the amazing design houses and companies out there. But as a young man in a single-income household? I needed to go with some more feasible options, and that meant IKEA.
I made a list of requirements I’d need:
- Multiple, adaptable work surfaces, including:
- A dedicated desk for my music and film editing gear, including a place to permanently house my media desktop computer and essential equipment
- A general work desk where I’d store most of the home office supplies, most often use my laptop, pay bills, and do sewing projects
- A large table top for “clean” crafts and art (no paint or sawdust), that could also serve as a fabric cutting table, and house a light box.
- Bookshelf space for my non-fiction library. The others stay in the living room, organized by color, but these need to be appropriately arranged so its easier to locate individual works
- Ample storage space for craft supplies, including sewing and fabric, paper crafts, drawing and painting, yarn and fiber arts, photography, and video
- A flat file system for storing and protecting paper
- Safe, accessible way to hang my guitar and stringed-instrument collection
- Large inspiration boards to collect my favorite visual pieces
- Clean white surfaces close to the large window to take well-lit step-by-step photos, and window treatments to maximize natural light for photography.
- A space for my Eames lounge
I knew not everything would come from IKEA, but figured that’d be the best bet for my bookshelves, desks, and storage boxes. IKEA actually offers a free room planning software to help you place pieces and figure out the best fit. At that point, the software was Windows-only, so I went to my local library to design my space. Though, now, it looks like the planner is a browser plugin for Firefox or IE, so OS X users can now take advantage. Excellent.
I tried several designs, but with my particular needs, there was a clear winner. No matter how many other options I played with, only one made sense with the room dimensions and my needs.
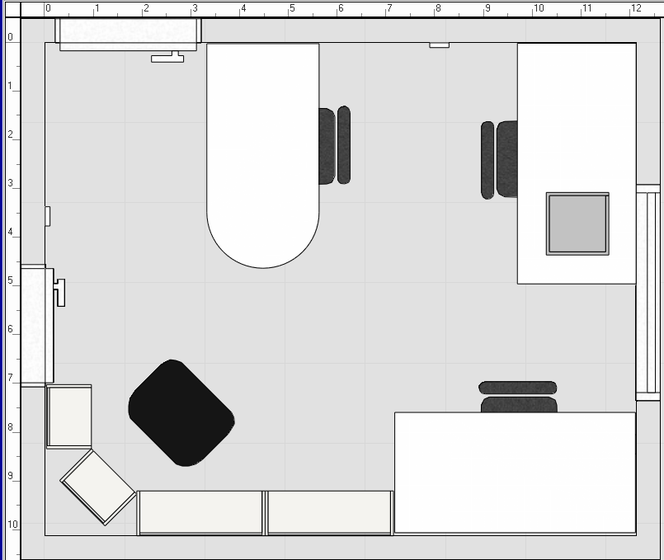
The IKEA planner allows you to pick the dimensions, add windows, doors, and electric outlets, and then place IKEA products in the space. Even if you don’t intend to use the actual pieces from IKEA, you can find similar products and use them as stand-ins for size. It really helps to have a recent catalog around for easy searching.
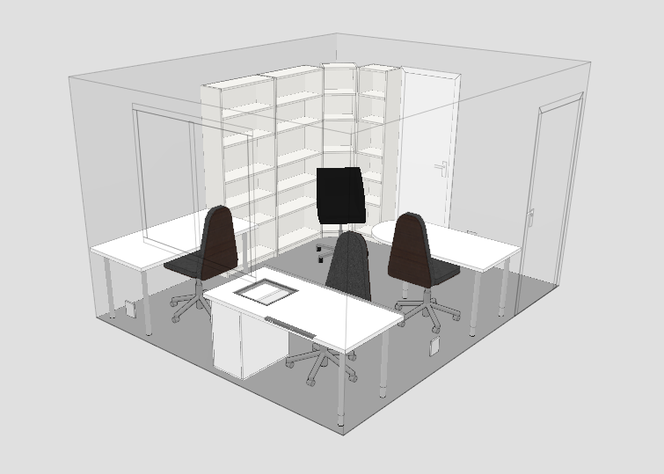
You can see that the space isn’t huge, but I was able to come up with a design that fits a lot of goodies in, and still maintains and open air-y feel (which I’m sure has a lot do with the white furniture).
And, the software allows you to save a shopping list which you can show to an IKEA employee, and who’ll help you locate everything you need in the actual store. You can even create an account and save an “ICF” file that the employees can bring up in store. Not too shabby.
So, now that I had gotten off my butt and committed to something, planned and shopped, it was time to start hacking these products into workable solutions for me. So, next week, I’ll show you how I created two custom desk setups on the cheap!