
Groovy Headboard…as in lots of grooves, see? It was the express intention of the designers of this piece not to have a monolithic hulk of a headboard, so they decorated it with negative space. The grooves also highlight the edge strata of the plywood, adding depth and interest that change with your viewing angle. And if you really want to get groovy, you can install some hidden lighting in the back (letting the glow play through the slats or throwing bars of light onto the ceiling). At 60″ wide, a sheet of Baltic birch is perfect for a queen-size bed; larger beds might call for a standard 4 x 8-foot panel running lengthwise. In any case, this is a job for good material with thin, even plies (and minimal voids, of course).
Materials
- One 5 x 5-foot sheet ¾” Baltic birch plywood
- (26¼” x 60″ min.)
- Scrap materials for routing jig (see step 4)
- Finish materials (as desired)
- One 8-foot length 2 x 4 lumber
- Coarse-thread drywall screws or wood screws
- (length as needed)
- Wood glue
- 6d (2″) finish nails
- Wood putty or white glue
Tools
- Circular saw with straightedge guide
- Table saw (optional)
- Jigsaw
- Router with ½” straight bit
- Wood file or sanding block
- Sandpaper (up to 220 grit)
- Level
- Drill with:
- Pilot bits
- Counterbore bits
- Nail set
1. Cut the panel to size.
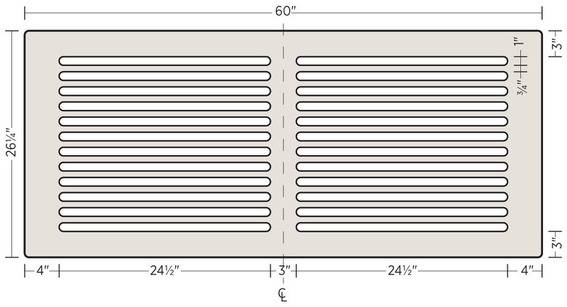
As shown here, the headboard measures 60″ wide and 26¼” tall. If you’re using a 5 x 5-foot panel with its edges in good shape, you need to make only one cut to size the piece. Make the cut with a circular saw and a straightedge guide (or a table saw) for a clean, straight edge.
For a bed size other than a queen, cut the panel to the desired dimensions. You can also make your headboard as tall as you like. And keep in mind that the groove sizing and layout are almost infinitely customizable.
2. Mark the grooves.
Lay out the grooves on the back face of the headboard panel, following the cutting diagram. The headboard shown here has 1″-wide grooves spaced ¾” apart. Again, you can adjust the dimensions or layout as desired. To prevent mistakes and to make sure the design is right for you, it’s a good idea to draw the entire groove pattern on the panel, then fill in each of the grooves with scribbled pencil lines. With repeating linear patterns like this, it’s easy to lose your bearings when making cuts. Taking the time to mark everything carefully can save you from a disastrous miscut.
3. Rough-cut the grooves.
Precutting the grooves with a circular saw and jigsaw will save considerable wear on your router bit (and your patience). Working from the back face of the panel, cut the long edges of the grooves with a circular saw, staying about ?” inside the cutting lines. Stop each cut about 1″ or so from the end of the marked groove.
With both long edges cut on all of the grooves, finish the rough cutouts with a jigsaw. Keep in mind that the router, when making the final cuts, will round over the corners of the grooves with a ¼” radius (if you’re using a ½” bit). Therefore, keep the saw cuts about ½” from the groove ends; the router will clean up the rest.
Note: Cutting the grooves with a circular saw requires plunge cuts — lowering the spinning blade into the work by pivoting on the front edge of the saw’s foot. If you’re not familiar or comfortable with this operation, you can drill a ?” starter hole inside each marked groove and insert the jigsaw blade into the hole to initiate the cut. With this method, you will rough-cut the groove entirely with the jigsaw.
When using either saw, be very careful to prevent tearout (splintering) on the faces of the panel, especially the front face. Use sharp blades, and take your time. Even the router can cause splintering if it’s not sharp.
4. Build the router jig.
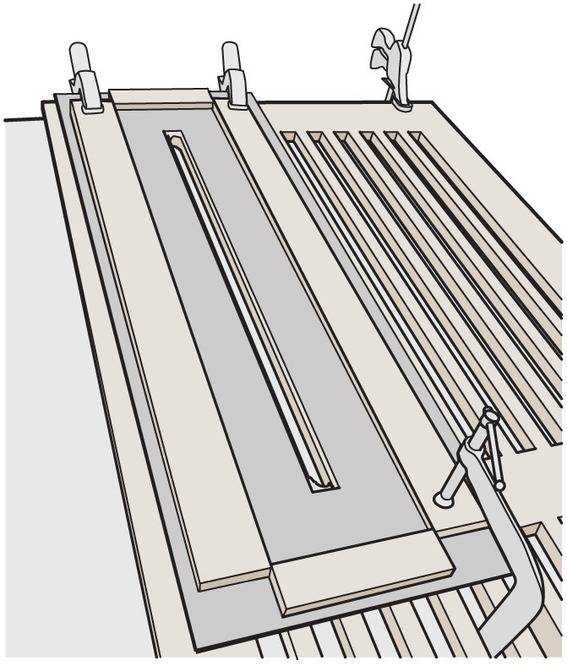
A simple shop-made jig makes the routing process easy and relatively foolproof; see the illustration of the router jig setup. You can cut the jig base from any flat sheet material, preferably something thin, like hardboard or thin MDF, and use straight scraps of plywood, solid stock, or old trim for the guide (fence) pieces.
The jig base is a rectangle that’s about 32″ long and at least 10″ wide. Mark a straight reference line across the base, 3″ from (and parallel to) one long edge. Cut two fence pieces to length at about 30″. Glue or fasten one of the fence pieces to the base, aligned with the outside of your reference line.
Set up a router with a ½” straight bit. Using the router to guide the spacing, secure the other long fence piece to the jig base so the two fences are perfectly parallel and the router, when floating between them, will cut a 1″-wide groove. Cut two short fence pieces to fit between the long fences. Secure these to the base to serve as end stops for the router so the groove will be 24½” long.
Clamp the jig over a sacrificial surface, then carefully cut through the base with the router and ½” bit, with the fences guiding the router. The finished cutout will match the final grooves cut into the headboard.
5. Rout the grooves.
Prop the headboard panel back side up on scrap material (or you can use a sacrificial backerboard if it will help prevent tearout), and clamp the jig to the board so its cutout edges are aligned with one of the groove’s cutting lines. Clean up the groove’s edges with the router and ½” bit, making several passes and increasing the bit depth about ?” with each pass. Repeat to rout the remaining grooves. Again, watch carefully for tearout as you work.
Note: Once you’ve cut the first few grooves, you’ll need a relatively narrow C-clamp to secure the inside end of the jig, as shown in illustration of the router jig setup. The clamp fits through the adjacent groove to secure the jig.
6. Finish the headboard.
Mark the ¼” roundovers on the corners of the headboard, as shown in the cutting diagram; tracing around a 9 mm or 11/32″ socket makes this easy. Shape the corners by sanding them with a file and/or coarse sandpaper and a sanding block.
Finish-sand the entire headboard, working up to 220-grit or finer sandpaper. Carefully sand the outside edges of the panel and all the grooves’ edges to smooth the sharp corners and prevent any splintering, while maintaining crisp edges with minimal rounding. Finish the headboard as desired. The piece as shown was finished with paste wax. Another good finish option is a penetrating oil, such as Danish oil, that doesn’t require sanding between coats. This is not a fun project to sand.
7. Prepare the mounting cleats.
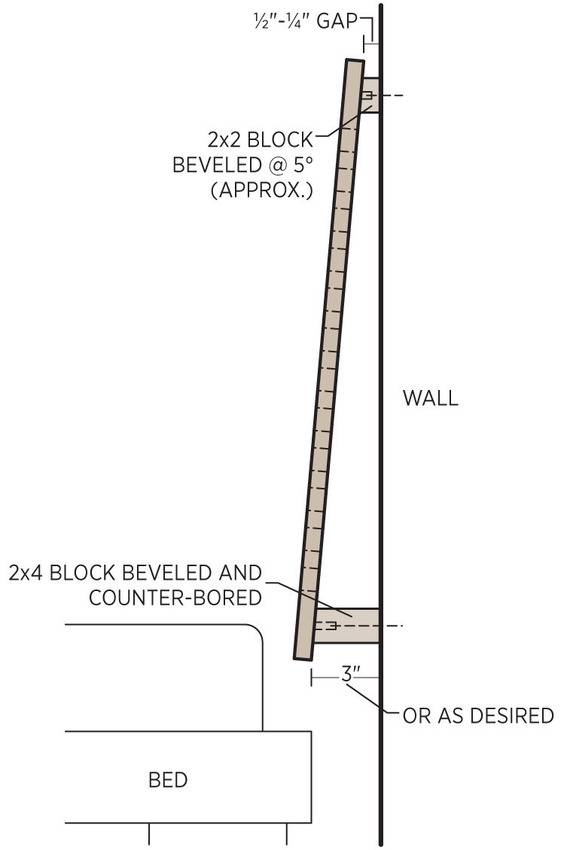
The headboard shown here was mounted to a wall so that it reclines at a 5-degree angle; see the side-view illustration. This slight slope softens the look just a bit, and it makes the headboard more comfortable as a backrest for sitting up in bed. You can slope your headboard as much or as little as you like, or you can position it vertically.
To create mounting cleats for the sloped installation, cut two lengths of 2 x 4 at about 46″. Bevel one short edge of one of the pieces at 5 degrees so the longer side is about 3″ wide, using a circular saw with the blade (foot) tilted at 5 degrees.
Bevel the other piece of 2 x 4 at 5 degrees so its narrow side is about ½” wide. This is the upper mounting cleat.
8. Install the headboard.
Determine the desired location of the headboard. Mark a level line on the wall to represent the top edge of the upper mounting cleat; the cleat should be roughly centered on the 3″ solid space at the top of the headboard. Drill pilot holes, and mount the upper cleat to the wall with drywall or wood screws, driving the screws into wall studs. Alternatively, if you’d like the headboard to be movable (see note at right), glue the cleat to the backside of the headboard instead of fastening it to the wall.
Measure down from the upper cleat location and make reference marks for the lower wall cleat, roughly centering it on the bottom solid portion, as before. Drill pilot holes through the cleat at the wall stud locations, then drill a deep counterbore into each hole so the screws will reach at least 1½” into the wall studs. Fasten the lower cleat to the wall with screws.
With a helper or two, position the headboard over the cleats, making sure it is centered behind the bed and level across the top. Drill pilot holes, and fasten the headboard to the cleats with one 6d finish nail near each corner of the headboard. Set the nails slightly below the surface with a nail set, then fill the holes with color-matched wood putty or a homemade blend of white glue and sawdust. Touch up the putty with finish, if desired.
Note: To make the headboard movable, you can hang its bottom edge from the lower cleat using two homemade metal clips. Cut two strips of any stiff scrap metal (¾” wide, or so) about 3″ long. Use pliers to make two bends in one end of each strip to form a square-cornered “J” that hooks onto the headboard’s bottom edge. Drill a hole through the upper portion of the strip for a mounting screw. Fasten the clips near the ends of the lower mounting cleat, using 1¼” wood screws or drywall screws. Set the headboard into the clips, resting the upper cleat against the wall. The 5-degree angle keeps the headboard in place.
Excerpted from PlyDesign (c) Philip Schmidt. Project design by Designed by Kathy and Philip Schmidt. Used with permission of Storey Publishing. Photos: (c) Lightbox Images Photography, images by Thomas Cooper