From WikiHow:
By Hand
-
 Tie a knot and sew 1/4 inch running stitches along the edge.
Thread a needle with a thread that is at least one foot longer than the length you need to gather down to. For example, if you need to gather a length of ribbon to 8 inches long, you will need at least 20 inches of thread. Tie a knot on the end of your thread.
-
 Hold thread firmly and gently slide cloth along the thread to gather it.
Sew 3-4mm (1/4 inch) running stitches along the edge to be gathered. Pull gently to slide your material in small waves/folds toward the knotted end of your thread as you sew the running stitch. When all of your material has been “gathered” to the length you want, tie off your thread securely.
By Machine
-

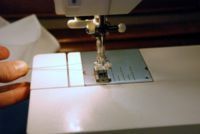
 Adjust stitch length to its longest setting. Usually 6mm.
Lengthen your machine stitch to its longest setting.
-
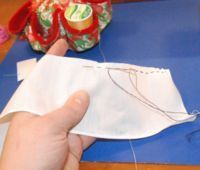
 Dark top thread, red bobbin thread.
Slightly loosen your tension on the top thread (the one going through the needle).
-
 First line.
Sew two lines/seams close to the edge of your fabric.
-
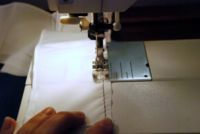
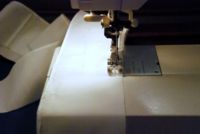
 Second line parallel to first.
Take care to sew parallel lines that do not cross each other. Leave long threads on each end of the seam.
-
-
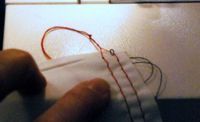
 Tie bottom (bobbin) thread into a sturdy knot.
Knot the bottom (bobbin) threads together at one end of the area to be gathered.
-
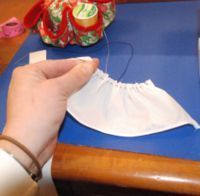
 Pull bottom (bobbin) thread while gently sliding fabric along it to form waves/folds.
Gently pull the bottom (bobbin) threads from the other end and carefully slide the cloth along the threads toward your knot, forming small waves/folds. When your cloth has been “gathered” to the needed length, knot the gathering ends securely with each other.
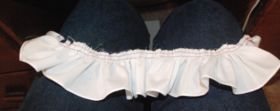
- Make your gathering even by gently sliding “bunched” areas apart and toward smoother areas of your parallel threads.
- Very long sections of gathering should be broken into several smaller sections to avoid the frustration of breaking your thread.
- Use a strong thread, such as Coats & Clark. The less expensive brands will snap much more easily and you will need to do all your work all over again.
- To make it easier to spread the ruffles out evenly, before gathering find the center of the ruffle by folding the piece in half end to end and place a dot in the middle of the piece inside the seam allowance where it won’t show in the finished piece; then fold the half sections in half again and place another dot at the fold. You can do this as many times as you want. When the piece is gathered you can tell by the distance between the dots if you have the ruffles evenly spaced. When pinning the gathered piece to the fabric, place a pin at the side seams, then one at the middle dot, then pins at the dots marking the middle of the smaller sections, etc. until you have the piece securely pinned in place.
- When sewing the ruffle to the garment, flatten out the areas that will be in the side seams so the fabric will lie flat there and part of the ruffle doesn’t get caught in the seam.
- To keep the ruffles evenly spaced during sewing, use a basting stitch to hold them in place. This can be done by hand or with the sewing machine using a long stitch and decreasing the pressure on the feed dogs of the machine to let the fabric and pins slide more smoothly through the stitching area. If the pressure is too tight the ruffled fabric can slide together making the gathering lumpy. After basting you can set the foot pressure back to normal and remove the pins because the basting stitch will hold the ruffles in place. This line of basting stitches sometimes comes out a little crooked depending on how small the part of the garment being worked on may be, such as sewing a sleeve into an armhole. After basting, look at the piece from the right side and see if the gathers are evenly space. If not, you can cut the basting stitch on the smooth side of the seam (not the gathered side because the stitches will probably be hidden by the gathers) and repin and resew the section you want to fix. If basting stitches show on the outside of the piece after the final sewing is done, they are easy to remove because they are a long stitch that a seam ripper or small scissor can slide under to cut the thread without cutting the fabric.
- To make the finished item wear longer, stitch the gathered piece to the fabric twice–once at the stitching line and again about 1/8th to 1/4 inch away into the seam allowance. This will prevent strain on the stitching line that can make the gathered fabric pull loose.
- It is much easier to hem the gathered fabric before gathering.
Hi! Thank you for this how to on gathering ruffles I have a question tho. I’ve been hand sewing for years and within the last couple years started using a singer machine that I love, and I’m now making dresses. If you went thru any of the ads for prom dresses this year ruffles and curly que mermaids are what ins. I was wondering if you had any tips on how to get the ruffled gather and curly que hem with fishing line to work together to make that cute mermaid trumpet look the girls are wanting? Any advice would help! Thank you and happy sewing everyone!