Here’s a final project attempting to recycle old ballpoint pens. (Here’s my first, and a second.)

Materials:
- 10 used ball point pens
- 1” Select Grade Pine, in the following sizes: 17×6” (back), 17×3 1/4” (shelf), 3 1/4 x 2” (x2) (shelf supports)
- Wood glue and short bar clamps
- 10 – 1 1/2” Wood screws
- Electric drill and masking tape or drill press
- 3/8” drill bit
- Phillips driver bit
- Drill bit for pilot hole and countersink
- 1” spade bit
- Utility Knife
- Tape Measure or ruler
- Danish oil
- Miter saw or table saw (optional)
1. Cut, or have cut, the pine to the dimensions above. Drill 1” holes in the top corners of the backing piece. If you have a router, a 1/4” roundover or chamfer breaks down sharp edges.
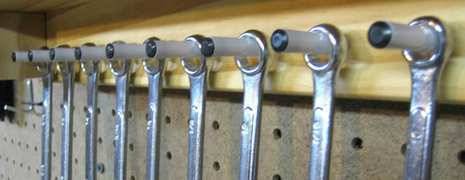
2. Using the 3/8” drill bit, Drill 10 evenly spaced holes, 3/8” deep, along the bottom of the back piece, starting 2” from the sides. If using a hand drill, use masking tape to mark the desired depth.
2. To make the shelf, glue the two shelf supports under the outer edges of the shelf (see photo). Drill two pilot holes through the top of the shelf, and counter sink two screws on each side.
3. Attach the shelf to the back piece with glue, and then drill and counter sink six screws through the back, evenly spacing four screws along the length of the shelf and at least one screw through each shelf support.
4. Remove the ink inserts from the pens, and use the utility knife to cut them to 1 1/2” lengths. Make a pool of wood glue, and dip the cut end of each pin in glue, and the insert them into each of the ten holes. Allow to dry.